background image

7

SMARTBATIP

- 3 - FUNCTIONS AND SETTINGS

3.1 OPERATION

Switch on the SMARTBATIP with the power switch (If the battery charge is very low, connect the supplied 

main cable to a socket (100-240V~/50-60Hz).). The unit is ready for operation and can be operated via a 

controller or it independently performs its show program in succession.

After operation, switch off the unit with the power switch.

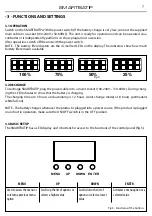
NOTE - The battery life indicators are the 4 small red LEDs on the display. The indicators show how much 

battery life remains available

MENU

UP

DOWN

ENTER

Used to access the menu or 
to return a previous menu 
option

Scrolls up the list of options or 
selects a higher value

Scrolls down the list of 
options or selects a lower 
value

Activates a menu option or a 
selected value

3.2 RECHARGE

To recharge SMARTBATIP, plug the power cable into a mains socket (100-240V~ / 50-60Hz). During charg-

ing the LED indicates to show that the battery is charging. 

The charging time are 5 hours and autonomy is 12 hours (color change mode) or 8 hours (permanent 

white full-on).

NOTE - The battery charges whenever the product is plugged into a power source. If the product is plugged 

in and not in operation, make sure the ON/OFF switch is in the OFF position.

3.3 BASIC SETUP

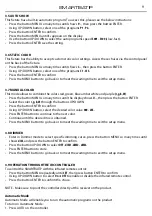
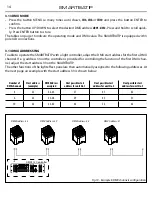
The SMARTBATIP has a LED display and 4 buttons for access to the functions of the control panel (fig.5).

Fig.5 - Functions of the buttons

Fig.4 

MENU

UP

DOWN ENTER

100%

75%

50%

25%

Summary of Contents for SMARTBATIP

Page 1: ...MANUALE UTENTE USER MANUAL SMARTBATIP IT EN PORTABLE BATTERY POWERED UPLIGHTER...

Page 2: ...arziale per propri scopi commerciali vietata Al fine di migliorare la qualit dei prodotti la Music Lights S r l si riserva la facolt di modificare in qualunque momento e senza preavviso le specifiche...

Page 3: ...ionamento 3 2 Impostazione base 3 3 Processo di ricarica 3 4 Struttura menu 3 5 Auto Show 3 6 Static color 3 7 Manual color 3 8 Funzione dimmer 3 9 Funzionamento tramite il controller IRC 3 10 Modalit...

Page 4: ...no liquidi infiammabili acqua o oggetti metallici Non smontare e non apportare modifiche all unit Tutti gli interventi devono essere sempre e solo effettuati da personale tecnico qualificato Rivolgers...

Page 5: ...ficienza con colori pi vividi e minore assorbimento energetico delle lampade a scarica tradizionali Sistema di sintesi colore miscelazione RGBW FC 16 milioni di colori per possibilit cromatiche illi m...

Page 6: ...mia batteria 12 ore con funzionamento in cambio colore e di 8 ore in full output Tempo di ricarica max 5 ore Switch load storage batteria Maniglia per il trasporto e posizionamento dell illuminatore P...

Page 7: ...ss 4 POWER IN spina da pannello VDE per il collegamento ad una presa di rete 110 240V 50 60Hz tramite il cavo di rete in dotazione Accanto alla spina si trova il portafusibile Sostituire un fusibile d...

Page 8: ...rono dei supporti robusti per il montaggio L area di collocazione deve avere una stabilit sufficiente e supportare almeno 10 volte il peso dell unit Inoltre assicurarsi di rispettare tutte le avverten...

Page 9: ...e discendente o aumentare il valore della funzione stessa Per scorrere attraverso le diverse funzioni in ordine ascendente o diminuire il valore della funzione stessa Per entrare nel menu selezionato...

Page 10: ...m speed slow to fast 5 Custom Color Mixing U r0 r255 Red 0 100 g0 g255 Green 0 100 b0 b255 Blue 0 100 W0 W255 White 0 100 6 Dimmer dIM OFF OFF Dimmer speed off dIM1 DIM1 Dimmer speed fast dIM2 DIM2 Di...

Page 11: ...l display non appare U quindi premere il tasto ENTER per confermare Selezionare il colore r g b W attraverso il tasto ENTER Utilizzare i tasti UP DOWN per impostare il valore desiderato 000 255 Premer...

Page 12: ...re o diminuire la percentuale di ciascun colore Operazioni varie Per regolare la velocit di lampeggio stroboscopico del programma 1 Premere STROBE sul telecomando 2 Premere oppure per aumentare o dimi...

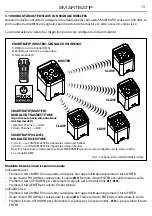
Page 13: ...l dtAU SMARTBATIP SLAVE MODALIT RICEVITORE 1 drCH se l UNIT MASTER impostata su Manual Channel 2 drAU se l UNIT MASTER impostata su Auto Channel Nota Per funzionare correttamente tutti gli SMARTBATIP...

Page 14: ...ilasciare dopo 5 secondi il tasto AUTO sull unit Slave NOTA Sull unit master selezionare una delle modalit standalone Impostare sulle unit slave la stessa configurazione canali DMX e lo stesso indiriz...

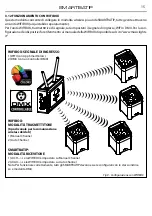
Page 15: ...manuale dellaWIFIBOX disponibile sul sito www musiclights it Fig 9 Configurazione con WIFIBOX WIFIBOX SEGNALE DI INGRESSO 1 WIFI con App SmartColors 2 DMX con un Controller DMX WIFIBOX MODALIT TRASME...

Page 16: ...are l indirizzo di start DMX per il primo canale DMX Se per esempio sull unit di comando previsto l indirizzo 33 per coman dare la funzione del primo canale DMX si deve impostare sul SMARTBATIP l indi...

Page 17: ...170 171 200 201 205 206 210 211 215 216 220 221 225 226 230 231 235 236 240 241 245 246 250 251 255 7 STROBE No Function Strobe slow to fast 000 010 011 255 8 AUTO PROGRAMS No Function Auto Program 1...

Page 18: ...o tipo e valore 2 Con un cacciavite rimuovere il portafusibile dalla sua sede e il fusibile bruciato dal suo supporto sostituire il fusibile con uno identico per tipologia e valore 3 Inserire il porta...

Page 19: ...sciare le batterie scariche per lunghi periodi riduce la durata della batteria 3 Conservare le unit contenenti batterie al litio a temperature fredde Una temperatura ambientale troppo alta riduce note...

Page 20: ...by any means for any commercial use In order to improve the quality of products Music Lights S r l reserves the right to modify the characteristics stated in this instruction manual at any time and w...

Page 21: ...g 3 Functions and settings 3 1 Operation 3 2 Basic setup 3 3 Recharge 3 4 Menu structure 3 5 Auto Show 3 6 Static color 3 7 Manual color 3 8 Dimmer 3 9 Operation through the IRC controller 3 10 Master...

Page 22: ...e Do not dismantle or modify the fixture All work must always be carried out by qualified technical personnel Contact the nearest sales point for an inspection or contact the manufacturer directly Thi...

Page 23: ...gy saving LEDs featuring more vivid colours and lower power consumption compared to tradi tional lamps Colour synthesis RGBW FC color mixing 16 million colours for a limitless colour range White tempe...

Page 24: ...echarge time 5 hours max Load Storage battery switch Ergonomic carrying handle for transportation and positioning Adjustable foot support for tilt regulation up to 20 Power unit 100 240V 50 60Hz VDE i...

Page 25: ...ons and manage them 3 AUTO SYNC CLEAR button for WiFi mode 4 POWER IN mains plug for connection to a socket 100 240V 50 60Hz via the supplied mains cable The support for the mains fuse is located near...

Page 26: ...ort a weight of 10 times of the unit s weight When carrying out any installation always comply scrupulously with all the regulations particularly re garding safety currently in force in the country in...

Page 27: ...rolls up the list of options or selects a higher value Scrolls down the list of options or selects a lower value Activates a menu option or a selected value 3 2 RECHARGE To recharge SMARTBATIP plug th...

Page 28: ...m speed slow to fast 5 Custom Color Mixing U r0 r255 Red 0 100 g0 g255 Green 0 100 b0 b255 Blue 0 100 W0 W255 White 0 100 6 Dimmer dIM OFF OFF Dimmer speed off dIM1 DIM1 Dimmer speed fast dIM2 DIM2 Di...

Page 29: ...shows U then press the button ENTER Select the color r g b W through the buttons UP DOWN Press the button ENTER to confirm Using UP DOWN button select the desired color value 000 255 Press ENTER butto...

Page 30: ...R G or B to choose your color 5 Press or to increase or decrease the percentage of each color Miscellaneous Operation To adjust the strobe rate of the program 1 Press STROBE on the controller 2 Press...

Page 31: ...al Channel dtCH 2 Auto Channel dtAU SMARTBATIP SLAVE RECEIVER MODE 1 drCH MASTER UNIT sets on Manual Channel 2 drAU MASTER UNIT sets on Auto Channel Note To work in the right way all SMARTBATIP must b...

Page 32: ...TO button on Master unit Wait 5 seconds and release the AUTO button on Slave unit NOTE Use any one of the standalone modes for the master unit Set the slaves to the same DMX modes 3 11 OPERATION WITH...

Page 33: ...the configuration of the devices refer to the manual of WIFIBOX available on www musiclights it WIFIBOX SIGNAL INPUT 1 WIFI with SmartColors App 2 DMX with a DMX Controller WIFIBOX TRANSMITTER MODE t...

Page 34: ...o store The tables on page 16 indicate the operating mode and DMX value The SMARTBATIP is equipped with 3 pole XLR connections 3 14 DMX ADDRESSING To able to operate the SMARTBATIP with a light contro...

Page 35: ...170 171 200 201 205 206 210 211 215 216 220 221 225 226 230 231 235 236 240 241 245 246 250 251 255 7 STROBE No Function Strobe slow to fast 000 010 011 255 8 AUTO PROGRAMS No Function Auto Program 1...

Page 36: ...damage to it 4 2 FUSE REPLACEMENT 1 Disconnect this product from the power outlet 2 Remove the safety cap by a screwdriver 3 Replace the blown fuse with a fuse of the exact same type and rating 4 Inst...

Page 37: ...iest opportunity leaving batteries discharged for long periods will reduce battery life 3 Store units containing Lithium batteries at cool temperatures High ambient temperatures significantly reduce t...

Page 38: ......

Page 39: ......

Page 40: ...t della Music Lights S r l PROLIGHTS TRIBE is a brand of Music Lights S r l company MUSIC LIGHTS S r l Via Appia km 136 200 04020 Itri LT ITALY Phone 39 0771 72190 Fax 39 0771 721955 www musiclights i...

Reviews: