background image

13

VERSAPAR

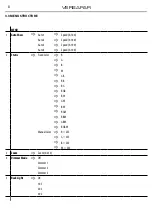
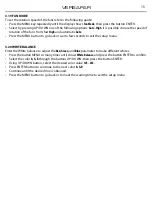
3.13 DMX CONTROL

 5 CHANNEL 

MODE 

FUNCTION 

DMX

Value

5 Ch

1

RED

0~100%

000 - 255

2

GREEN

0~100%

000 - 255

3

BLUE

0~100%

000 - 255

4

WHITE

0~100%

000 - 255

5

ZOOM

0~100%

000 - 255

 10 CHANNEL 

MODE 

FUNCTION 

DMX

Value

10 Ch

1

DIMMER

0~100%

000 - 255

2

RED

0~100%

000 - 255

3

GREEN

0~100%

000 - 255

4

BLUE

0~100%

000 - 255

5

WHITE

0~100%

000 - 255

6

COLOR MACROS

No Function
Color Macros

000 - 015
016 - 255

7

STROBE

No Function
Slow to fast

000 - 010
011 - 255

AUTO SPEED

Slow to fast

000 - 255

8

AUTO MODE

RGBW mode
Pulse effect 0~100%
Pulse effect 100%~0
Pulse effect 100%~0~100%
Auto fade transition
Auto snap transition (4 colors)
Auto snap transition (15 colors)

000-010
011-050
051-090
091-130
131-170
171-210
211-255

9

DIMMER SPEED

Preset dimmer speed from display menu
Dimmer speed mode off
Dimmer speed mode1 (fast speed)
Dimmer speed mode2 (middle speed)
Dimmer speed mode3 (slow speed)

000-051
052-101
102-152
153-203
204-255

10

ZOOM

0~100%

000 - 255

 7 CHANNEL 

MODE 

FUNCTION 

DMX

Value

7 Ch

1

DIMMER

0~100%

000 - 255

2

RED

0~100%

000 - 255

3

GREEN

0~100%

000 - 255

4

BLUE

0~100%

000 - 255

5

WHITE

0~100%

000 - 255

6

STROBE

No Function
Slow to fast

000 - 010
011 - 255

7

ZOOM

0~100%

000 - 255

Summary of Contents for VERSAPAR

Page 1: ...MANUALE UTENTE USER MANUAL VERSAPAR IT EN PARLED ZOOM...

Page 2: ...arziale per propri scopi commerciali vietata Al fine di migliorare la qualit dei prodotti la Music Lights S r l si riserva la facolt di modificare in qualunque momento e senza preavviso le specifiche...

Page 3: ...ruttura menu 3 4 Modalit automatica 3 5 Modalit statica 3 6 Modalit manuale 3 7 Modalit Master Slave 3 8 Collegamento 3 9 Modalit DMX 3 10 Indirizzamento DMX 3 11 Collegamenti della linea DMX 3 12 Cos...

Page 4: ...i 40 C Evitare che nell unit penetrino liquidi infiammabili acqua o oggetti metallici Non smontare e non apportare modifiche all unit Tutti gli interventi devono essere sempre e solo effettuati da per...

Page 5: ...a totale silenziosit di funzionamento rende VERSAPAR idoneo anche in ambienti sensibili al rumore o in applicazioni con un gran quantitativo di proiettori 1 2 SPECIFICHE TECNICHE SORGENTE LUMINOSA Sor...

Page 6: ...t connesse in serie CARATTERISTICHE FISICHE Connessioni di segnale 3p 5p in out Connessioni di alimentazione PowerCON in out IP 30 Raffreddamento Aria filtrata forzata con ventole silenziate Sospensio...

Page 7: ...5 N C 7 DMX OUT XLR a 5 poli 1 massa 2 DMX 3 DMX 4 N C 5 N C 8 POWER IN per il collegamento ad una presa di rete 100 240V 50 60Hz tramite il cavo rete in dotazione 9 PORTAFUSIBILE sostituireunfusibil...

Page 8: ...abilit sufficiente e supportare almeno 10 volte il peso dell unit Inoltre assicurarsi di rispettare tutte le avvertenze in materia di sicurezza Fissare il proiettore attraverso l apposita staffa 1 ad...

Page 9: ...data da un interruttore 3 2 IMPOSTAZIONE BASE Il VERSAPAR dispone di un black OLED display e 4 pulsanti per accesso alle funzioni del pannello di con trollo fig 4 Fig 4 Funzione dei tasti MENU UP DOWN...

Page 10: ...0 100 Auto 2 Speed 0 100 Auto 3 Speed 0 100 Auto 4 Speed 0 100 2 Static Fixed Color R G B W GB RB RG RGB RW GW BW RGW RBW GBW RGBW Manual Color R 255 G 255 B 255 W 255 3 Zoom Zoom 0 255 4 Dimmer Mode...

Page 11: ...selezionato NOTA I programmi Auto 1 Auto 4 sono completamente pre programmati e non possono essere modificati Nella modalit automatica l unit MASTER 3 5 MODALIT STATICA L unit dispone di preset color...

Page 12: ...e quindi premere il tasto ENTER per confermare la scelta Premere il tasto UP DOWN e selezionare Slave per impostare le unit come slave Sull unit MASTER selezionare il programma desiderato come indicat...

Page 13: ...ali DMX Indirizzo di start esempio Indirizzo DMX occupati Prossimo indirizzo di start possibile per unit n 1 Prossimo indirizzo di start possibile per unit n 2 Prossimo indirizzo di start possibile pe...

Page 14: ...bile i dati di controllo DMX Collegare l uscita DMX del controller con l ingresso DMX della prima unit Collegare quindi l uscita DMX con l ingresso DMX della successiva unit l uscita di quest ultima c...

Page 15: ...55 8 AUTO MODE RGBWmode Pulseeffect0 100 Pulseeffect100 0 Pulseeffect100 0 100 Autofadetransition Autosnaptransition 4colors Autosnaptransition 15colors 000 010 011 050 051 090 091 130 131 170 171 210...

Page 16: ...urs Version 3 Premere il tasto ENTER per confermare la scelta 4 Al termine dell impostazione premere il tasto MENU per tornare indietro o rispettare il tempo di attesa per uscire automaticamente dal m...

Page 17: ...ornare indietro o attendere alcuni secondi per uscire dal menu di imposta zione 3 20 BILANCIAMENTO BIANCO Per impostare il bilanciamento del bianco premere il tasto MENU fino a quando sul display non...

Page 18: ...T2A 250V 2 Con un cacciavite rimuovere il portafusibile fig 8 dalla sua sede e il fusibile bru ciato dal suo supporto sostituire il fusibile con uno identico per tipologia e valore 3 Inserire il port...

Page 19: ......

Page 20: ...by any means for any commercial use In order to improve the quality of products Music Lights S r l reserves the right to modify the characteristics stated in this instruction manual at any time and w...

Page 21: ...n 3 2 Basic 3 3 Menu structure 3 4 Auto show 3 5 Static mode 3 6 Manual mode 3 7 Master Slave mode 3 8 Linking 3 9 DMX mode 3 10 DMX addressing 3 11 Connection of the DMX line 3 12 Construction of the...

Page 22: ...rer directly If the unit is to be put out of operation definitively take it to a local recycling plant for a disposal which is not harmful to the environment Warnings and installation precautions If t...

Page 23: ...interface The absolute noiseless VERSAPAR operation makes it suitable even in noise sensitive environments or in applications with a large quantity of projectors 1 2 TECHNICAL SPECIFICATIONS LIGHT SOU...

Page 24: ...on at 120V 120W Output at 230V 12 units on a single power line PHYSICAL Signal Connection 3p 5p in out Power Connection PowerCON in out IP 30 Cooling Forced air with low noise fan user definable level...

Page 25: ...age them 6 DMX IN 5 pole XLR 1 ground 2 DMX 3 DMX 4 N C 5 N C 7 DMX OUT 5 pole XLR Rear panel Fig 2 1 ground 2 DMX 3 DMX 4 N C 5 N C 8 POWER IN PowerCON IN for connection to a socket 100 240V 50 60Hz...

Page 26: ...ly scrupulously with all the regulations particularly re garding safety currently in force in the country in which the fixture s being used Install the projector at a suitable location by means of the...

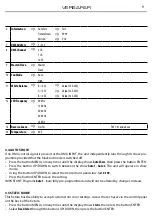
Page 27: ...h can be switched on and off via a light switch 3 2 BASIC Access control panel functions using the four panel buttons located directly underneath the black OLED display fig 4 Fig 4 Functions of the bu...

Page 28: ...100 Auto 2 Speed 0 100 Auto 3 Speed 0 100 Auto 4 Speed 0 100 2 Static Fixed Color R G B W GB RB RG RGB RW GW BW RGW RBW GBW RGBW Manual Color R 255 G 255 B 255 W 255 3 Zoom Zoom 0 255 4 Dimmer Mode O...

Page 29: ...pre programmed and will not be altered by changes Instead 3 5 STATIC MODE This fixture has the ability to accept custom static color settings Access these chases via the control panel on the back of...

Page 30: ...For longer cable runs we suggest a terminator at the last fixture see page 13 Set on master fixture the desired program see section 3 4 Set the slaves to the same DMX modes 3 8 LINKING 1 Connect the...

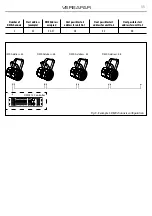
Page 31: ...38 DMX Address 43 Fig 5 Example 5 DMX channels configuration Number of DMX channels Start address example DMX Address occupied Next possible start address for unit No 1 Next possible start address for...

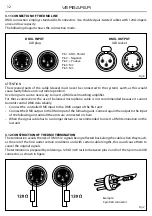
Page 32: ...f the first unit Connect the DMX output to the DMX input of the following unit Connect again the output to the input of the following unit until all the units are connected in chain When the signal ca...

Page 33: ...255 8 AUTO MODE RGBWmode Pulseeffect0 100 Pulseeffect100 0 Pulseeffect100 0 100 Autofadetransition Autosnaptransition 4colors Autosnaptransition 15colors 000 010 011 050 051 090 091 130 131 170 171 21...

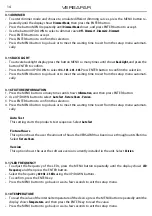
Page 34: ...tion and then press ENTER button 2 Use UP DOWN button to select AutoTest Fixture Hours Version 3 Press ENTER button to confirm the selection 4 Press the MENU button to go back or to meet the waiting t...

Page 35: ...r wait a few seconds to exit the setup menu 3 20 WHITE BALANCE Enter the White balance to adjust the Red Green and Blue parameter to make different whites Press the button MENU so many times until sho...

Page 36: ...ever use a liquid it might penetrate the unit and cause damage to it 4 2 FUSE REPLACEMENT 1 Remove the safety cap by a screwdriver 2 Replacetheblownfusewithafuseoftheexactsametypeandrating T2A 250V 3...

Page 37: ......

Page 38: ......

Page 39: ......

Page 40: ...t della Music Lights S r l PROLIGHTS TRIBE is a brand of Music Lights S r l company MUSIC LIGHTS S r l Via Appia km 136 200 04020 Itri LT ITALY Phone 39 0771 72190 Fax 39 0771 721955 www musiclights i...

Reviews: