background image

Via Appia km 136,200 - 04020 Itri (LT) ITALY

tel. +39  0771 72190  fax +39  0771 721955

www.musiclights.it

info@musiclights.it

Music & Lights 

S.r.l.

entertainment  technologies

ISO 9001:2008

Certified Company

©

20

14

 M

us

ic

 &

 L

ig

ht

S.

r.l

.

PR

OLIGHT

è un br

and di pr

opr

ietà della M

usic & Ligh

ts S.r

.l.


PR

OLIGHT

S

 is a br

and of M

usic & Ligh

ts S.r

.l .c

ompan

y.

Summary of Contents for spider

Page 1: ...EN IT Manuale Utente User Manual SPIDER SUPER FAST BEAM WASHER ...

Page 2: ...rziale per propri scopi commerciali è vietata Al fine di migliorare la qualità dei prodotti la Music Lights S r l si riserva la facoltà di modificare in qualunque momento e senza preavviso le specifiche menzionate nel presente manuale di istruzioni Tutte le revisioni e gli aggiornamenti sono disponibili nella sezione Manuali sul sito www musiclights it ...

Page 3: ...u 3 4 Funzionamento in modalità automatica 3 5 Modalità Musicale 3 6 Funzione sensibilità microfono 3 7 Modalità Master Slave 3 8 Collegamento 3 9 Configurazione canali DMX 3 10 Modalità DMX 3 11 Collegamenti della linea DMX 3 12 Costruzione del terminatore DMX 3 13 Tabella canali DMX 3 14 Impostazione del proiettore 3 15 Informazioni sul dispositivo 3 16 Modalità Manuale 3 17 Calibrazione 4 Manut...

Page 4: ... gli interventi devono essere sempre e solo effettuati da personale tecnico qualificato Rivolgersi al più vicino centro di assistenza tecnica autorizzato Se si desidera eliminare il dispositivo definitivamente consegnarlo per lo smaltimento ad un istituzione locale per il riciclaggio Attenzioni e precauzioni per l installazione Se il dispositivo dovesse trovarsi ad operare in condizioni differenti...

Page 5: ...lle Condizioni Generali di Garanzia Si prega dopo l acquisto di procedere alla registrazione del prodotto sul sito www musiclights it In alternativa il prodotto può essere registrato compilando e inviando il modulo riportato alla fine del manuale A tutti gli effetti la validità della garanzia è avallata unicamente dalla presentazione del certificato di garanzia Music Lights constata tramite ve rif...

Page 6: ...W FullColor CREE Lux 2m 13 500 Sistema di sintesi colore miscelazione RGBW FullColor 16 milioni di colori per possibilità cromatiche illimitate e controllo della temperatura colore Preset temperatura colore bianco 3200K 10000K Angolo di proiezione 10 Vita media sorgente LED 50 000 h Dimmer Shutter Strobo Colors Dimmer lineare 0 100 Regolazione curva dimmer 4 configurazioni selezionabili Shutter in...

Page 7: ... posizione per mezzo di supporti omega inclusi con sistema di ag gancio quick lock Alimentazione Alimentazione 100 240V 50 60Hz Connessioni PowerCON IN OUT Output alimentazione per connessione di più unità in serie fino a 16 proiettori a 230V Consumo ad emissione massima 105W Peso e dimensioni Peso 5 7 kg Dimensioni LxAxP 266x316x167 mm Fig 1 316 266 167 ...

Page 8: ...SPIDER 8 1 3 ELEMENTI DI COMANDO E DI COLLEGAMENTO Fig 2 2 A 1 B 3 Vista A 5 6 4 13 14 15 16 18 19 17 7 12 8 9 10 11 Vista B ...

Page 9: ...mentare il valore della funzione stessa 11 Tasto ENTER per entrare nel menu selezionato o confermare un impostazione del menu 12 LED SOUND 13 POWER IN PowerCON IN per il collegamento ad una presa di rete 100 240V 50 60Hz tramite il cavo rete in dotazione 14 POWER OUT PowerCON OUT collegamento per l alimentazione all unità successiva 15 PORTAFUSIBILE sostituireunfusibiledifettoso solo con uno dello...

Page 10: ...i evitare vibrazioni e scivolamenti durante il funzionamento L area di collocazione deve avere una stabilità sufficiente e supportare almeno 10 volte il peso dell unità Inoltre assicurarsi di rispettare tutte le avvertenze in materia di sicurezza È assolutamente necessario assicurare il proiettore contro la caduta utilizzando un cavo di sicurezza in particolare collegare il cavo in un punto adatto...

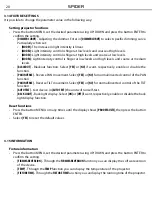
Page 11: ...data da un interruttore 3 2 IMPOSTAZIONE BASE Il proiettore SPIDER dispone di un display LCD e di 4 pulsanti per l accesso alle funzioni del pannello di controllo e la loro gestione fig 4 Fig 4 MENU ENTER UP DOWN Per scorrere il menu principale o tornare ad una opzione del menu precedente Per entrare nel menu selezionato o confermare il valore attuale della funzione o l opzione all interno di un m...

Page 12: ...1 Show 2 Show 3 Show 4 DIMMER CURVE Mode 1 Mode 2 Mode 3 Mode 4 SLAVE MODE Slave 1 Slave 2 BLACK OUT Yes No SOUND STATE On Off SOUND SENSE 0 100 PAN INVERSE Yes No TILT INVERSE Yes No BACK LIGHT On Off FUNCTION DELAY No Delay 1 s Delay 2 s Delay 3 s Delay WHITE BALANCE Red 125 255 Green 125 255 Blue 125 255 ...

Page 13: ...andata tramite la musica In presenza di segnale musicale con un determinato ritmo nei bassi e con volume sufficiente tramite il microfono interno si comanda il senso e la velocità di rotazione nonchè il cambio di colore Se il comando musica non dovesse funzionare perfettamente aumentare il volume o ridurre la distanza fra sorgente audio e l unità oppure alternativa mente aumentare la sensibilità d...

Page 14: ...onare la configurazione DMX desiderata tra 9CH 12CH 14CH 16CH e 28CH quindi premere il tasto ENTER Premere il tasto MENU per tornare indietro o attendere alcuni secondi per uscire dal menu di impostazione Le tabelle a pagina 17 indicano le modalità di funzionamento e i relativi valori DMX Come interfaccia DMX l unità possiede dei contatti XLR a 3 5 poli 3 10 MODALITÀ DMX Per il funzionamento trami...

Page 15: ... essere collegata alla terra dell impianto ciò comporte rebbe malfunzionamenti delle unità e dei controller Per passaggi lunghi può essere necessario l inserimento di un amplificatore DMX In tal caso è sconsigliato utilizzare nei collegamenti cavo bilanciato microfonico poiché non è in grado di trasmettere in modo affidabile i dati di controllo DMX Collegare l uscita DMX del controller con l ingre...

Page 16: ...so indietro lungo il cavo provocando in certe condizioni e lunghezze la sua sovrapposizione al segnale originale e la sua cancellazione La terminazione deve essere effettuata sull ultima unità della catena con connettori XLR a 3 5 pin saldan do una resistenza di 120Ω minimo 1 4W tra i terminali 2 e 3 così come indicato in figura Esempio connettore XLR a 3 pin Fig 7 ...

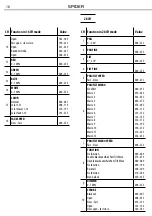
Page 17: ... Shutter open Strobe 3 closing pulse fast to slow Shutter open Strobe 4 random strobe fast to slow Shutter open Strobe5 randomopeningpulse fasttoslow Shutter open Strobe 6 random closing pulse fast to slow Shutter open Strobe 7 burst pulse fast to slow Shutter open Strobe 8 random burst pulse fast to slow Shutter open Strobe 9 sine wave fast to slow Shutter open Strobe 10 burst fast to slow Shutte...

Page 18: ...LEE 021 Gold amber LEE 778 Millennium gold LEE 135 Deep golden amber Open Fast slow clockwise Stop Slow fast counterclockwise Open Fast 000 009 010 014 015 019 020 024 025 029 030 034 035 039 040 044 045 049 050 054 055 059 060 064 065 069 070 074 075 079 080 084 085 089 090 094 095 099 100 104 105 109 110 114 115 119 120 124 125 129 130 134 135 139 140 144 145 149 150 154 155 159 160 164 165 169 ...

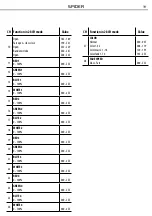
Page 19: ...5 13 COLOR 3 Color 1 31 000 255 14 COLOR 4 Color 1 31 000 255 CH Function in 16 CH mode Value 1 PAN 0 540 000 255 2 PAN FINE 000 255 3 TILT 0 270 000 255 4 TILT FINE 000 255 5 PAN TILT SPEED Fast Slow 000 255 6 PAN TILT MACRO No effect Macro 1 Macro 2 Macro 3 Macro 4 Macro 5 Macro 6 Macro 7 Macro 8 Macro 9 Macro 10 Macro 11 Macro 12 000 015 016 035 036 055 056 075 076 095 096 115 116 135 136 155 1...

Page 20: ... 4 TILT FINE 000 255 5 PAN TILT SPEED Fast Slow 000 255 6 PAN TILT MACRO No effect Macro 1 Macro 2 Macro 3 Macro 4 Macro 5 Macro 6 Macro 7 Macro 8 Macro 9 Macro 10 Macro 11 Macro 12 000 015 016 035 036 055 056 075 076 095 096 115 116 135 136 155 156 175 176 195 196 215 216 235 236 255 7 PAN TILT MACRO SPEED Fast Slow 000 255 8 FUNCTION No function Enable blackout while Pan Tilt Move Disable blacko...

Page 21: ... strobe Open 182 189 190 231 232 239 240 247 248 255 11 RED 1 0 100 000 255 12 GREEN 1 0 100 000 255 13 BLUE 1 0 100 000 255 14 WHITE 1 0 100 000 255 15 RED 2 0 100 000 255 16 GREEN 2 0 100 000 255 17 BLUE 2 0 100 000 255 18 WHITE 2 0 100 000 255 19 RED 3 0 100 000 255 20 GREEN 3 0 100 000 255 21 BLUE 3 0 100 000 255 22 WHITE 3 0 100 000 255 23 RED 4 0 100 000 255 24 GREEN 4 0 100 000 255 25 BLUE ...

Page 22: ...zione imposta zione normale YES attiva la funzione Pan inverse TILT INVERSE Inclinazione in senso opposto della testa mobile NO disattiva la funzione impo stazione normale YES attiva la funzione Tilt inverse AUTO TEST Verifica dispositivo Nella sezione AUTO TEST è possibile verificare il corretto funziona mento dell unità BACKLIGHT Retroilluminazione display ON attiva la funzione retroilluminazion...

Page 23: ...egolazione home position Per effettuare la preimpostazione dei valori correttivi modalità offset Premere il tasto MENU Tenere premuto per circa 3 secondi il tasto ENTER Selezionare con il tasto UP DOWN la funzione desiderata quindi premere il tasto ENTER per la scelta Impostare servendosi dei tasti UP e DOWN il valore per la funzione L intervallo dei valori possibili per le diverse funzioni è ripo...

Page 24: ...o di polveri e grassi La frequenza con la quale effettuare le operazioni sotto indicate dipende da diversi fattori quali la quantità di movimenti degli effetti e la qualità dell ambiente di lavoro umidità dell aria presenza di polvere salsedine ecc Per rimuovere lo sporco dal riflettore dalle lenti e dai filtri usare un panno morbido inumidito di un qualsiasi liquido detergente per la pulizia del ...

Page 25: ...sitivo regolarmente Installare il gruppo ottico correttamente Il proiettore non è alimentato Mancanza di alimentazione di rete Cavo di alimentazione danneggiato Alimentatore interno difettoso Verificarelapresenzadellatensionealimentazione Controllare il cavo di alimentazione Sostituire l alimentatore interno Il proiettore non risponde al DMX Indirizzamento DMX errato Cavo di segnale DMX difettoso ...

Page 26: ...r by any means for any commercial use In order to improve the quality of products Music Lights S r l reserves the right to modify the characteristics stated in this instruction manual at any time and without prior notice All revisions and updates are available in the manuals section on site www musiclights it ...

Page 27: ...peration 3 2 Basic 3 3 Menu structure 3 4 Operation in automatic mode 3 5 Music mode 3 6 Sensitivity microphone function 3 7 Master Slave mode 3 8 Linking 3 9 DMX configuration 3 10 DMX mode 3 11 Connection of the DMX line 3 12 Construction of the DMX termination 3 13 DMX control 3 14 Fixture settings 3 15 Information 3 16 Manual mode 3 17 Service function 4 Maintenance 4 1 Maintenance and cleanin...

Page 28: ... technical personnel Contact the nearest sales point for an inspection or contact the manufacturer directly If the unit is to be put out of operation definitively take it to a local recycling plant for a disposal which is not harmful to the environment Warnings and installation precautions If this device will be operated in any way different to the one described in this manual it may suffer damage...

Page 29: ... www musiclights it Please remember to register the piece of equipment soon after you purchase it logging on www musiclights it The product can be also registered filling in and sending the form available on your guarantee certificate For all purposes the va lidity of the guarantee is endorsed solely on presentation of the guarantee certificate Music Lights will verify the validity of the claim th...

Page 30: ...Color CREE LEDs Lux 2m 13 500 Colour synthesis RGBW FullColor mixing 16 million colours for a limitless colour range and variable CTC control White temperature presets 3200K 10000K Beam angle 10 LEDs average life span 50 000 h Dimmer Shutter Strobe 0 100 linear dimmer 4 different dimming curves available Independent shutter and fading effects with adjustable speed Strobe Electronic 1 20 flash per ...

Page 31: ... through quick lock omega brackets included Power supply Power supply 100 240V 50 60Hz Connections PowerCON IN OUT Power output allowing up to 16 units to be connected on a single power line at 230V Max power consumption 105W Weight and dimensions Weight 5 7 kg Dimensions WxHxD 266x316x167 mm Fig 1 316 266 167 ...

Page 32: ...SPIDER 6 1 3 OPERATING ELEMENTS AND CONNECTIONS Fig 2 2 A 1 B 3 View A 5 6 4 13 14 15 16 18 19 17 7 12 8 9 10 11 View B ...

Page 33: ... of the current function 11 ENTER button enter the currently selected menu or confirm the current function value 12 LED SOUND 13 POWER IN for connection to a socket 100 240V 50 60Hz via the supplied mains cable 14 POWER OUT Connect to supply power to the next unit 15 MAIN FUSE HOLDER replace a burnt out fuse by one of the same type only 16 DMX IN 3 pole XLR 1 ground 2 DMX 3 DMX 17 DMX IN 5 pole XL...

Page 34: ...g The mounting place must be of sufficient stability and be able to support a weight of 10 times of the unit s weight When carrying out any installation always comply scrupulously with all the regulations particularly regarding safety currently in force in the country in which the fixture s being used Always additionally secure the projector with the safety rope from falling down For this purpose ...

Page 35: ...the unit to a socket which can be switched on and off via light switch 3 2 BASIC The SPIDER has a LCD display and 4 button used to access the control panel functions and manage them fig 4 MENU ENTER UP DOWN Used to access the menu or to return a previous menu option Used to select and store the current menu or confirm the current function value or option within a menu Navigates upwards through the...

Page 36: ...1 Show 2 Show 3 Show 4 DIMMER CURVE Mode 1 Mode 2 Mode 3 Mode 4 SLAVE MODE Slave 1 Slave 2 BLACK OUT Yes No SOUND STATE On Off SOUND SENSE 0 100 PAN INVERSE Yes No TILT INVERSE Yes No BACK LIGHT On Off FUNCTION DELAY No Delay 1 s Delay 2 s Delay 3 s Delay WHITE BALANCE Red 125 255 Green 125 255 Blue 125 255 ...

Page 37: ... mode NOTE In automatic mode the unit will be set as Master 3 5 MUSIC MODE In music mode via its integrated microphone the unit can be controlled by music with a clear rhythm in the bass range If the music control should not work optimally increase the volume or reduce the distance between the sound source and the light effect unit Press the button MENU so many times until the display shows SOUNDS...

Page 38: ...t the desired DMX configuration 9CH 12CH 14CH 16CH 28CH through the button UP DOWN Press the ENTER button to confirm Press the MENU button to go back or wait some seconds for automatic exit from the menu The tables on page 15 indicate the operating mode and DMX value The SPIDER is equipped with 3 5 pole XLR connections 3 10 DMX MODE For operation via light control unit with DMX512 protocol is suff...

Page 39: ...oller operation Over long runs can be necessary to insert a DMX level matching amplifier For those connections the use of balanced microphone cable is not recommended because it cannot transmit control DMX data reliably Connect the controller DMX input to the DMX output of the first unit Connect the DMX output to the DMX input of the following unit Connect again the output to the input of the foll...

Page 40: ...ng the cable when they reach es the end of the line under certain conditions and with certain cable lengths this could cause them to cancel the original signals The termination is prepared by soldering a 120Ω 1 4W resistor between pins 2 and 3 of the 5 pin male XLR connector as shown in figure Example 3 pin XLR connector Fig 7 ...

Page 41: ...tter open Strobe 3 closing pulse fast to slow Shutter open Strobe 4 random strobe fast to slow Shutter open Strobe5 randomopeningpulse fasttoslow Shutter open Strobe 6 random closing pulse fast to slow Shutter open Strobe 7 burst pulse fast to slow Shutter open Strobe 8 random burst pulse fast to slow Shutter open Strobe 9 sine wave fast to slow Shutter open Strobe 10 burst fast to slow Shutter op...

Page 42: ...LEE 021 Gold amber LEE 778 Millennium gold LEE 135 Deep golden amber Open Fast slow clockwise Stop Slow fast counterclockwise Open Fast 000 009 010 014 015 019 020 024 025 029 030 034 035 039 040 044 045 049 050 054 055 059 060 064 065 069 070 074 075 079 080 084 085 089 090 094 095 099 100 104 105 109 110 114 115 119 120 124 125 129 130 134 135 139 140 144 145 149 150 154 155 159 160 164 165 169 ...

Page 43: ...0 089 090 199 200 209 210 249 250 255 9 DIMMER 0 100 000 255 10 STROBE Open Slow Fast Open Slow open fast close 000 015 016 131 132 139 140 181 16 CH CH Function in 14 CH mode Value 6 Macro 11 Macro 12 216 235 236 255 7 PAN TILT MACRO SPEED Fast Slow 000 255 8 FUNCTION No function Enable blackout while Pan Tilt Move Disable blackout while Pan Tilt Move No function Reset all No function Stand alone...

Page 44: ... 4 TILT FINE 000 255 5 PAN TILT SPEED Fast Slow 000 255 6 PAN TILT MACRO No effect Macro 1 Macro 2 Macro 3 Macro 4 Macro 5 Macro 6 Macro 7 Macro 8 Macro 9 Macro 10 Macro 11 Macro 12 000 015 016 035 036 055 056 075 076 095 096 115 116 135 136 155 156 175 176 195 196 215 216 235 236 255 7 PAN TILT MACRO SPEED Fast Slow 000 255 8 FUNCTION No function Enable blackout while Pan Tilt Move Disable blacko...

Page 45: ... strobe Open 182 189 190 231 232 239 240 247 248 255 11 RED 1 0 100 000 255 12 GREEN 1 0 100 000 255 13 BLUE 1 0 100 000 255 14 WHITE 1 0 100 000 255 15 RED 2 0 100 000 255 16 GREEN 2 0 100 000 255 17 BLUE 2 0 100 000 255 18 WHITE 2 0 100 000 255 19 RED 3 0 100 000 255 20 GREEN 3 0 100 000 255 21 BLUE 3 0 100 000 255 22 WHITE 3 0 100 000 255 23 RED 4 0 100 000 255 24 GREEN 4 0 100 000 255 25 BLUE ...

Page 46: ...INVERSE Reverse PAN movement Select YES or NO for normal inverted control of the PAN function PAN INVERSE Reverse TILT movement Select YES or NO for normal inverted control of the TILT function AUTOTEST test device In AUTOTEST the unit will run self test BACKLIGHT Back light display Select ON or OFF if want respectively enable or disable the back light display function Reset functions Press the bu...

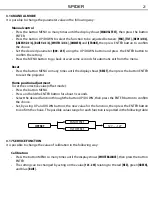
Page 47: ...lay shows RESET then press the button ENTER to reset the projector Home position adjustment To set the corrective value offset mode Press the button MENU Press and hold the ENTER button for about 3 seconds Select the desired function through the button UP DOWN then press the ENTER button to confirm the choice Set by using UP and DOWN buttons the new value for the function then press the ENTER butt...

Page 48: ...quency with which the following operations are to be carried out depends on various factors such as the amount of the effects and the quality of the working environ ment air humidity presence of dust salinity etc Use a soft cloth dampened with any detergent liquid for cleaning glass to remove the dirt from the reflectors from the lenses and filters It is recommended that the projector undergoes an...

Page 49: ...ssembly Misaligned lens assembly Clean the fixture regularly Install lens assembly properly Fixture does not power up No power Loose or damaged power cord Faulty internal power supply Check for power on power outlet Check power cord Replace internal power supply Fixture does not respond to DMX Wrong DMX addressing Damaged DMX cables Bouncing signals Check control panel and unit addressing Check DM...

Page 50: ......

Page 51: ...chi conseguenti sono a carico del possessore dell apparecchio A tutti gli effetti la validità della garanzia è avallata unicamente dalla presentazione del certificato di garanzia The guarantee covers the unit in compliance with existing regulations You can find the full version of the General Guarantee Conditions on our web site www musiclights it Abstract General Guarantee Conditions Please remem...

Page 52: ...date Data acquisto FORM TO BE FILLED IN AND MAILED CEDOLA DA COMPILARE E SPEDIRE FORM TO BE FILLED IN AND KEPT CEDOLA DA COMPILARE E CONSERVARE PROV ZIP CODE C A P MODEL MODELLO SERIAL N SERIE N Purchased by Acquistato da SURNAME COGNOME Dealer s stamp and signature Timbro e firma del Rivenditore NAME NOME ADDRESS VIA N CITY CITTà Purchasing date Data acquisto PROV ZIP CODE C A P ...

Page 53: ......

Page 54: ......

Page 55: ......

Page 56: ...39 0771 721955 www musiclights it info musiclights it Music Lights S r l entertainment technologies ISO 9001 2008 Certified Company 2014 Music Lights S r l PROLIGHTS è un brand di proprietà della Music Lights S r l PROLIGHTS is a brand of Music Lights S r l company ...

Reviews: