background image

15


NB 

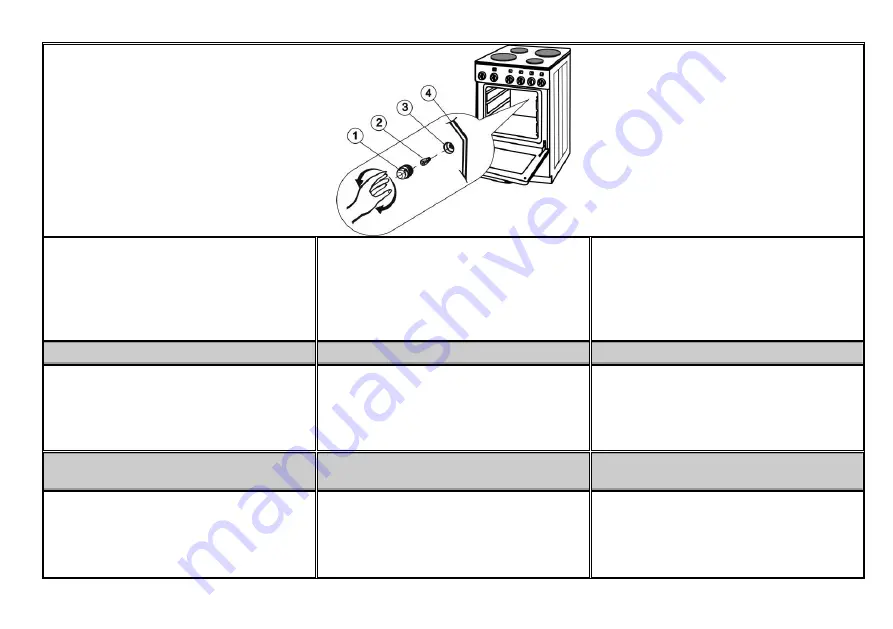
Pour  l’éclairage  intérieur  du  four,  choisissez  toujours 
une  ampoule  correspondant  aux  spécifications 
suivantes: Culot E 14, 230 V, 25 W, 300° C.


1. 

Couvercle en verre 

2. 

Ampoule 

3. 

Douille 

4. 

Panneau arrière du four 

NOTE:  

For illumination it is necessary to use a bulb:  
T 300° C, E14, 230  V, 25 W. 
1. 

Glass cover 

2. 

Lamp 

3. 

Sleeve 

4. 

Oven rear wall 

BEACHTEN SIE:  

Verwenden Sie nur Glühbirnen mit folgenden Daten:  
T 300° C, E14, 230 V, 25 W. 
1. 

Glasabdeckung 

2. 

Glühbirne 

3. 

Fassung 

4. 

Backofenrückseite 

CONDITIONS DE GARANTIE 

CLAIMS 

GARANTIEANSPRUCH 

En cas de dysfonctionnement durant la période de  
garantie, n’essayez pas de réparer l’appareil vous  
même. Adressez une réclamation au point de vente où  
vous l’avez acheté et vérifiez si vous pouvez produire  
le certificat de garantie avalisé. En l’absence de  
certificat de garantie dûment avalisé, votre réclamation  
ne serait pas recevable.


In case of any defects of the appliance during warranty 
period,  do  not  attempt  to  repair  it  by  yourself.  Make  a 
claim at an authorised dealer or place of purchase and 
ensure  that  you  are  in  possesion  of  the  Certificate  of 
warranty.  Beware  that  in  the  absence  of  duly 
completed Certificate of warranty your claim is null and 
void. 

Wenn  Sie  während  der  Garantiefrist  irgendeinen 
Defekt  am  Gerät  feststellen,  versuchen  Sie  nicht,  das 
Gerät  selbst  zu  reparieren.  Melden  Sie  die  Störung 
umgehend 

bei 

Ihrem 

Händler 

oder 

beim 

nahegelegenen Kundendienst. 
 

MISE AU REBUT  

DES EMBALLAGES 

RECYCLING OF PACKAGES 


VERWENDUNG UND ENTSORGUNG 

DER VERPACKUNG 

L'appareil est livré avec un emballage de protection qui 
est recyclable. Apportez 

les matériaux d’emballage à la 

collecte spécialisée pour qu’ils soient recyclés. 
Carton ondulé, papier kraft : 


remise à une déchetterie ; 

dépôt dans le conteneur destiné au papier. 

Bois :  


When you receive your cooker, note that the packaging 
materials  used  for  protecting  the  appliance  should  be 
recycled.  Please  take  them  to  the  appropriate 
collection systems. 
 Corrugated board, wrapping paper 
- sale to the collecting places 
- in garbage containers for collection paper 

Indem  Sie  die  Verpackung  bei  einer  entsprechenden 
Sammelstelle 

abgeben, 

sor

gen 

Sie 

für 

ihre 

Verwertung.  
Wellpappe, Packpapier 

Sie  können  dieses  Verpackungsmaterial  bei  einer 

entsprechenden Sammelstelle abgeben, 
- oder in entsprechenden Papier-Containern ablegen.  

Summary of Contents for CP561 STE-2

Page 1: ...MARQUE PROLINE REFERENCE CP561 STE 2 CODIC 3756050...

Page 2: ...GB DE FR ELECTRIC COOKER ELEKTRO KOCHGER T CUISINIERE LECTRIQUE CP561 STE 2...

Page 3: ...es enfants de moins de 8 ans doivent tre maintenus l cart sauf s ils sont constamment supervis s This appliance is intended for domestic household use only and should not be used for any other purpose...

Page 4: ...e remote control system WARNING Ensure that the appliance is switched off before replacing the lamp to avoid the possibility of electric shock zu l schen aber schalten Sie das Ger t aus und decken Sie...

Page 5: ...when it is operating When the cooker is not in use please make sure that all control knobs are set to 0 off position For cleaning or repairs the main electric power switch must be off set all control...

Page 6: ...appliquant les consignes de tri mis en place par votre commune Avant d utiliser le four pour la premi re fois r glez le s lecteur de fonction sur la position convection naturelle et le s lecteur de t...

Page 7: ...hours For longer storage store the food in a an appropriate container The door should preferably be closed in all cooking modes Do not hang any cloth or garment to the handle of the oven BEMERKUNG De...

Page 8: ...ltung des Siedevorgangs von kleineren Wassermengen Aufw rmen von Saucen die Eigelb oder Butter enthalten Langsames Sieden Ragouts bzw Eint pfe Fleisch Fisch Gem se Obst Position 3 Knob position 3 Stel...

Page 9: ...NG THE OVEN Turn the knob to the desired cooking function The knob can be turned in both directions Set the temperature for food preparation by the thermostat knob within 50 250 C Turn the thermostat...

Page 10: ...allume lorsqu on active une fonction quelconque du four Interior lighting This light illuminates once a function of the oven is on Die Backofenbeleuchtung wird eingeschaltet wenn Sie eine der Funktio...

Page 11: ...peisen geeignet die eine h here Temperatur an der Oberseite ben tigen Gril infrarouge R glez le thermostat 230 C maximum Utilisez ce mode de cuisson pour griller des aliments ou pour cuire des aliment...

Page 12: ...auf welchen ein Br ter oder ein Backblech aufgestellt ist in die zweite Einschubebene von unten Vermeiden Sie das ffnen der Backofent r w hrend des Backvorgangs Das Heizsystem wird dadurch gest rt die...

Page 13: ...vant puis embrochez la viande et enfin fixez la fourche arri re La viande doit tre plac e bien au milieu pour que la charge soit quilibr e sur l axe et que la ASSEMBLING GRILLING EQUIPMENT Insert roas...

Page 14: ...ll the protection sheet as follows see figures above Open the oven door Insert the protection sheet in the fixing points located in the upper part of the oven cavity Close the door so that it faces th...

Page 15: ...e mit eine B rste wischen Sie danach die W nde mit einem feuchten Schwamm ab Verwenden Sie zum Reinigen Backofen Innenw nde keine scharfen Gegenst nde Reiben Sie danach den Backofen mit einem weichen...

Page 16: ...rre Set all the control knobs to 0 and disconnect the cooker from the mains Unscrew the lamp glass cover in the oven by turning counterclockwise Unscrew the faulty bulb Put and screw a new bulb in Mou...

Page 17: ...are in possesion of the Certificate of warranty Beware that in the absence of duly completed Certificate of warranty your claim is null and void Wenn Sie w hrend der Garantiefrist irgendeinen Defekt a...

Page 18: ...t nach Ablauf der Lebenszeit zu einem autorisierten Sammelplatz f r Elektro Altger te Pour tout renseignement sur la mise au rebut et le recyclage de ce produit veuillez contacter la mairie ou le serv...

Page 19: ...der Klemmenplatte INSTRUCTIONS ET R GLAGES CONCERNANT L INSTALLATION INSTALLATION INSTRUCTIONS AND SETTINGS INSTALLATION DES ELEKTROHERDES Seul un professionnel qualifi est habilit installer l appare...

Page 20: ...18...

Page 21: ...r with the operating and maintenance instructions NACH DER INSTALLATION DES GER TS berpr fen Sie ob die Angaben auf dem Typenschild des Ger ts mit den Angaben Ihrer Elektroinstallation bereinstimmen b...

Page 22: ...below also check that the links are in the correct position for your supply voltage Tighten the screws on the cable clamp and replace the cover WICHTIGER HINWEIS Wenn Sie den Herd an der linken Seite...

Page 23: ...nserted into the hole in the rear wall INSTALLATION Die stabilisierende Mittel gegen Umkippen Ger te console ist wie gezeigt die an der Wand mit D beln und Schrauben Anschlie end wird das Ger t gegen...

Page 24: ...CHNICAL DATA TECHNISCHE ANGABEN CUISINI RE LECTRIQUE ELECTRIC COOKER ELEKTRO KOCHGER T CP 561 STE 2 Dimensions Hauteur x Largeur x Profondeur Dimensions Height Depth Weight Ma e H he Tiefe Breite 850...

Page 25: ...oad Zeit zum Kochen einer Standardmenge in Min 54 9 Consommation d nergie en chaleur tournante kWh Energy consumption kWh Energieverbrauch KWh Temps de mont e en temp rature selon test normalis min Ti...

Page 26: ...tray Backblech Email L chefrite Oven tray Fettpfanne 1 jeu de pieds r glables Adjustable feet H heneinstellung Accessoires pour cuisson au gril Grill accessories Grillzubeh rs zum Grillen am Spie Pro...

Reviews: