


4
NB
Le constructeu
r se réserve le droit de procéder à des
modifications mineures du mode d’emploi suite à des
améliorations technologiques de l’appareil.
NOTE:
The manufacturer reserves the right of minor
modifications in the instructions resulting from
innovations or technological changes of the product.
BEACHTEN SIE:
Der Hersteller behält sich das Recht zu Änderungen
der Gebrauchsanweisung vor, die durch Erneuerung
oder technologischer Änderungen des Geräts bedingt
sind.
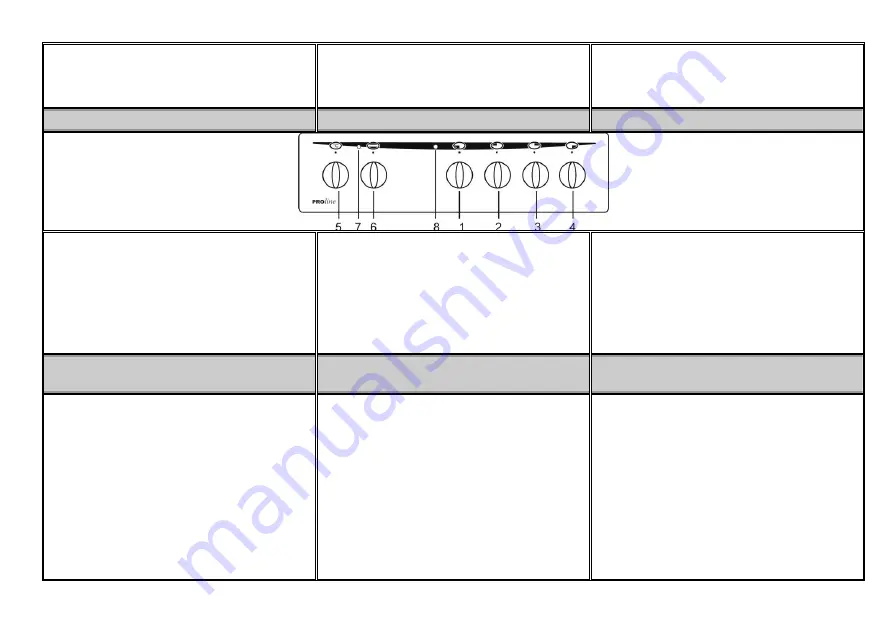
BANDEAU DE COMMANDE
CONTROL PANEL
BEDIENUNGSELEMENTE
1.
Manette du foyer avant gauche
2.
Manette du foyer arrière gauche
3.
Manette du foyer arrière droit
4.
Manette du foyer avant droit
5.
Sélecteur de température (four)
6.
Sélecteur de fonctions (four)
7.
Voyant de fonctionnement (four)
8.
Voyant de mise sous tension du ou des foyers
1.
Control knob of the left front cooking plate
2.
Control knob of the left rear cooking plate
3.
Control knob of the right rear cooking plate
4.
Control knob of the right front cooking plate
5.
Oven thermostat knob
6.
Oven function knob
7.
Thermostat function signal lamp
8.
“Power ON” control light of the cooking zone(s)
1.
Bedienungsknebel für die linke vordere Kochplatte
2.
Bedienungsknebel für die linke hintere Kochplatte
3.
Bedienungsknebel
für
die
rechte
hintere
Kochplatte
4.
Bedienungsknebel für die rechte vordere
Kochplatte
5.
Backofen-Thermostatknebel
6.
Backofen-Funktionswahlknebel
7.
Thermostat-
Signallämpchen
8.
Kontroll-
Lämpchen „POWER ON“
AVANT
LA PREMIÈRE UTILISATION
BEFORE
FIRST USE
HINWEISE FÜR DIE
ERSTINBETRIEBNAHME
Retirez d’abord l’emballage et tous les matériaux de
protection avant de mettre la cuisinière en service.
Plusieurs matériaux constituant l’emballage sont
recyclables. Jetez-les en appliquant les consignes
de tri mis en place par votre commune.
Avant d’utiliser le four pour la première fois, réglez
le sélecteur de fonction sur la position convection
naturelle et le sélecteur de température sur 250° C.
Laissez fonctionner le four pendant une heure, porte
fermée, en aérant la cuisine. Cette méthode
éliminera les résidus et les odeurs provenant des
différents traitements effectués en usine. Attention à
ne pas toucher la porte pendant cette opération, car
elle sera chaude.
Faites fonctionner les foyers du plan de cuisson
Before using the appliance for the first time, remove
protective and packing materials from the cooker.
Some packaging components are recyclable.
Handle them in compliance with the standing
regulations and national legislation.
Before using the oven for the first time turn the
control knob to the upper and lower heatig position.
Set the oven thermostat knob
to 250° C and let the
oven operate with the door shut for 1 hour. Ensure
that the room in which the appliance is installed is
properly ventilated. This process will remove any
agents and odours remaining in the oven from the
factory treatment. Be careful not to touch the oven
door during this operation, as it will be not.
Set the hot plate control knob to the position „6“ and
Entfernen sie vor der Erstinbetriebnahme des
Herdes alle Schutzmittel und die Verpackung.
Einzelne
Verpackungsteile
und
Komponenten
können recycelt werden. Behandeln Sie diese Teile
in Einklang mit den gültigen Hinweisen und
Vorschriften.
Drehen Sie den Backofen-Funktionswahlknebel auf
die Position "rundes Heizelement" (Ober- und
Unterhitze). Stellen Sie den Thermostaten auf
250°C und lassen Sie den Backofen bei
geschlossener Backofentür 1 Stunde laufen. Sorgen
Sie während dieser Zeit für eine ausreichende
Belüftung des Raumes. Dadurch werden vor dem
ersten
Backvorgang
eventuelle
Reste
von
Konservierungsmitteln und unangenehme Gerüche


