background image

3

E

n

g

li

sh

Crystal Weather Station 

Art.no  36-4878 

Model   KL4871

Please read the entire instruction manual before using the product and save it for  
future reference. We reserve the right for any errors in text or images and any necessary 
changes made to technical data. If you have any questions regarding technical  
problems please contact our Customer Services.

Safety 

•  Never subject the product to high temperature, dust, heavy vibration, impacts, 

humidity or moisture.

•  Do not expose the product to direct sunlight. 
•  Do not place the product where there is a risk of it falling into water or other liquid. 

Do not place any objects which contain liquid onto the product such as vases, 
drinks, etc.

•  This product should only be repaired by a qualified service technician.
•  The product should not be taken apart or modified. 
•  The product is designed for indoor use only. 
•  Pull the plug from the wall socket during thunder storms or if it is not to be used for 

an extended time period. 

•  Use only the included mains adaptor.

Care and maintenance

•  Unplug the lead before cleaning.
•  Clean the product using a soft, moist cloth. Use a mild detergent and never use 

solvents or strong, abrasive cleaning agents for cleaning as these can damage  
the product.

Disposal

This product should be disposed of in accordance with local regulations.  
If you are unsure how to proceed, contact your local authority.

Product description

•  Stylish weather station with weather engraved 3D weather icons which display  

the weather in a spectacular fashion. 

•  Time, date, indoor/outdoor and humidity display. 
•  Snooze alarm. 
•  Comes with mains adaptor. Battery backup: 3 × AAA/LR03 batteries (sold separately).
•  Comes with outdoor sensor. Sensor batteries: 2 × AAA/LR03, sold separately).

Summary of Contents for KL4871

Page 1: ...Crystal Weather Station V derstation Crystal V rstasjon Crystal S asema Crystal Art no Model 36 4878 KL4871 Ver 201205 English S ve ns ka No r s k S u o m i...

Page 2: ......

Page 3: ...ian The product should not be taken apart or modified The product is designed for indoor use only Pull the plug from the wall socket during thunder storms or if it is not to be used for an extended ti...

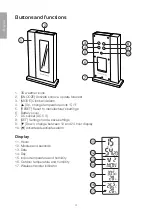
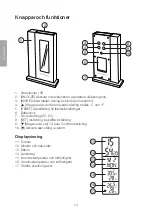
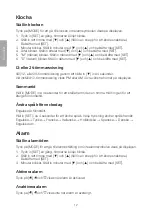
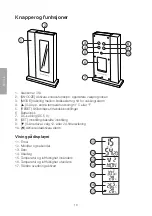
Page 4: ...e temperature units C F 5 RESET Reset to manufacturer s settings 6 Battery cover 7 DC socket DC 5 V 8 SET Settings mode save settings 9 Down change between 12 and 24 hour display 10 Activates deactiva...

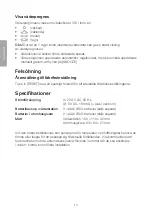
Page 5: ...eal between the cover and the sensor remain in place before screwing the battery cover in place Note Use alkaline batteries only Rechargeable batteries should not be used because they have too low a v...

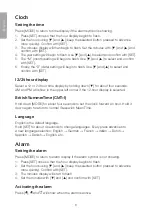
Page 6: ...for about four seconds AM and PM will show in the upper left corner if the 12 hour display is selected British SummerTime GMT 1 Hold down MODE for about four seconds to set the clock forward an hour H...

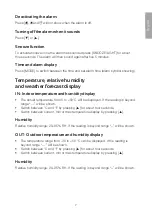
Page 7: ...display The actual temperature from 0 to 50 C will be displayed If the reading is beyond range will be shown Switch between C and F by pressing for about four seconds Switch between current min or ma...

Page 8: ...ET using a sharp object to reset back to factory settings Specifications Power supply Input 230 V AC 50 Hz Output 5V DC 180 mA centre positive Weather station battery backup 3 AAA LR03 batteries sold...

Page 9: ...ukten r avsedd endast f r inomhusbruk Bryt str mmen till produkten genom att dra ur n tadaptern fr n eluttaget vid skv der och n r den inte ska anv ndas under en tid Anv nd endast den medf ljande batt...

Page 10: ...t ndra temperaturvisning mellan C och F 5 RESET terst llning till fabriksinst llningar 6 Batterilock 7 DC anslutning DC 5 V 8 SET Inst llning bekr fta inst llning 9 Stega ner t v lj 12 eller 24 timmar...

Page 11: ...locket och givaren och skruva tillbaka batterilocket Obs Anv nd endast alkaliska batterier Laddningsbara batterier r inte l mpliga att anv nda eftersom de har f r l g sp nning Placering av utomhusgiva...

Page 12: ...marsvisning visas PM eller AM i vre v nstra h rnet p displayen Sommartid H ll in MODE i ca 4 sekunder f r att st lla fram tiden en timme H ll in igen f r att terg till normaltid ndra spr k f r veckoda...

Page 13: ...utanf r m tomr det visas p displayen V xla mellan visning i C och F genom att h lla in i ca 4 sekunder V xla mellan aktuell min eller maxvisning av temperaturen genom att trycka p Luftfuktighet M tom...

Page 14: ...ett spetsigt f rem l f r att terst lla till fabriksinst llningarna Specifikationer Str mf rs rjning In 230 V AC 50 Hz Ut 5V DC 180 mA plus i centrum Batteribackup i v derstation 3 AAA LR03 batterier...

Page 15: ...demonteres eller forandres p Produktet er kun beregnet for innend rs bruk Bryt str mmen til produktet ved trekke st pselet ut av str muttaket ved tordenv r eller n r det ikke skal brukes p en stund Br...

Page 16: ...p endre temperaturvisning til C eller F 5 RESET Stille tilbake til fabrikkinnstillinger 6 Batterilokk 7 DC kobling DC 5 V 8 SET Innstilling bekrefte innstilling 9 G nedover velg 12 eller 24 timersvisn...

Page 17: ...et og giveren Skru fast lokket igjen Obs Bruk kun alkaliske batterier Bruk ikke ladbare batterier De har for lav spenning Plassering av utend rsgiver 1 Utend rsgiveren kan henges opp innend rs eller p...

Page 18: ...n er innstilt vises PM eller AM i det vre venstre hj rnet p displayet Sommertid Hold MODE inne i ca 4 sekunder for stille tiden fram n time Hold inne igjen for g tilbake til normaltid Endre spr k p uk...

Page 19: ...Dersom temperaturen er utenfor m leomr det vil vises i displayet Skift mellom vising av C og F ved trykke p i ca 4 sekunder Skift mellom aktuell min eller maksvisning av temperaturen ved trykke p Luft...

Page 20: ...Trykk p RESET med en spiss gjenstand for resette Spesifikasjoner Str mforsyning Inn 230 V AC 50 Hz Ut 5 V DC 180 mA i sentrum Batteribackup i v rstasjonen 3 AAA LR03 batterier selges separat Batterier...

Page 21: ...a tai muuttaa laitetta Tuote on tarkoitettu vain sis k ytt n Sammuta laite ja irrota pistoke pistorasiasta ukkosella sek kun laite on pidemp n k ytt m tt K yt vain pakkauksen sis lt m muuntajaa Huolto...

Page 22: ...alitse l mp tilan n ytt tavaksi C tai F 5 RESET Tehdasasetusten palauttaminen 6 Paristolokero 7 DC liit nt DC 5 V 8 SET Asetustila asetuksen vahvistaminen 9 Siirry alasp in valitse 12 tai 24 tunnin n...

Page 23: ...i Varmista ett kannen ja anturin v linen tiiviste on paikoillaan ja ruuvaa kansi kiinni Huom K yt ainoastaan alkaliparistoja Ladattavat akut eiv t sovellu sill niiss on liian alhainen j nnite Ulkoantu...

Page 24: ...in ajan N yt n vasem massa yl kulmassa lukee PM tai AM kun olet valinnut 12 tunnin n yt n Kes aika Siirr kellonaikaa tunnilla eteenp in painamalla MODE nelj n sekunnin ajan Paina uudelleen palataksesi...

Page 25: ...alue 0 50 C n kyy n yt ll Jos l mp tila on alhaisempi tai korkeampi n yt ll lukee Vaihda C ja F asteiden v lill painamalla noin nelj n sekunnin ajan Valitse senhetkinen l mp tila tai alhaisin korkein...

Page 26: ...alauttaminen Palauta s aseman tehdasasetukset painamalla RESET ter v ll esineell Tekniset tiedot Virransy tt Otto 230 V AC 50 Hz Anto 5 VDC 180 mA keskell S aseman paristovarmennus Paristot 3 kpl AAA...

Page 27: ...odel KL4871 is in compliance with the essential requirements and other relevant provisions of Directive 1999 5 EC Article 3 1a Safety EN 60950 1 EN 50371 Article 3 1b EMC EN 301489 1 EN 301489 3 Artic...

Page 28: ...0 E post kundesenter clasohlson no Internett www clasohlson no Post Clas Ohlson AS Postboks 485 Sentrum 0105 OSLO Suomi Asiakaspalvelu Puh 020 111 2222 S hk posti info clasohlson fi Internet www claso...

Reviews: