background image

Power Button on 
Digital Controller 
face is depressed but 
doesn’t turn on. 

1.   Power cord is not plugged in. 
 
 
2.  Circuit breaker is tripped off in the 
site's breaker box. 
 
 
3.  Transformer has taken an 
electrical surge and is damaged. 


4.  Check voltage on the secondary 
side of the Transformer. If you read 
12VDC then you are receiving 
voltage to the controller. 
 
5.  Possible blown fuse. 
 

1. Plug the power cord into wall 
receptacle and power button. 
 
2. Reset circuit breaker that the 
grill is plugged into. Depress 
Power Button to turn on. 
 
3. Replace Transformer after you 
check secondary side of 
transformer. If working properly, 
you should receive 12vdc. 
 
4. Replace controller. Controller 
should be on once the power 
button is depressed. 
 
 
5. Replace fuse. 


68 
 
 
----- 


91 


85 


105 

Digital Controller's 
LED's are scrambled 
or randomly erratic. 
If when turning on, 
the display will first 
go to segment check 

1.  Possibly a component on the 
Digital controller is damaged. 
 
2. Control needs to reset. 

Replace digital controller. 
 
 
While unit is on unplug unit, wait 
for 1 min. Then plug machine on 
again  and depress power button. 
 

----- 


85 

Digital Controller on 
startup goes through 
LED segment check 
(8888) then to 
version # and then 
loops back to to the 
above reboot. 

The relay driver on the digital control 
may be blown. 

Replace digital controller. 

85 

Digital display shows 
PROB. No heat on 
Upper Platen. 
 

Sensor lost it's continuity as shown 
on a muti-meter. 

Disconnect prob that is open (no 
continuity as shown on a multi- 
meter. Must replace sensor 
(RTD). Do not cut and splice new 
sensor. Install new 2000 ohm 
RTD sensor to under side of heat 
platen and reconnect to the 
controller. 
 

41 

When depressing the 
tactile button 
on digital controller, 
nothing happens. 
 

The tactile buttons under the overlay 
may be not close enough to activate. 
Same goes if the buttons are already 
pressed by overlay without 
depressing button. 
 

Carefully (no too much at one 
time 
to avoid fracturing the traces on 
the controller) tighten the nuts on 
the back of the controller until 
button activate. Same goes in 
reverse if buttons are held down 


Summary of Contents for Apex X1

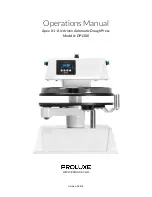
Page 1: ...Operations Manual Apex X1 Air driven Automatic Dough Press Model DP1300 WWW PROLUXE COM Version 52619...

Page 2: ...al and horizontal clearance of the press itself Limited Machine Warranty Proluxe warrants this dough press machine when operated under normal conditions to be free from manufacturing defects in materi...

Page 3: ...rviceable parts inside Refer servicing to qualified personnel Avertissement Pour r duire le risque de choc lectrique ne pas retirer ou couvercle ouvert Aucune pi ce r parable par l utillsateur reporte...

Page 4: ...using upper and lower heated surfaces Controller Operation 1 Viewing the Modes of Operation To view the set points of temperature timer and counter press MODE button to view the desired mode of opera...

Page 5: ...Swing open the lower platen and apply a quick spray of a good water based food release on the lower platen Proluxe offers its own food release spray NATURALLY CLEAR Model No DPPC1 See our catalog and...

Page 6: ...espan the following preventative maintenance should be followed Daily Care 1 Platens Turn your machine off and allow to cool down before attempting to clean These platens should only be cleaned with m...

Page 7: ...ed 2 Control needs to reset Replace digital controller While unit is on unplug unit wait for 1 min Then plug machine on again and depress power button 85 Digital Controller on startup goes through LED...

Page 8: ...erly Replace relay If the controller s heat on LED is not lit indicating the controller is working properly 92 Thickness crank on top of press turns endless Set screws on crank may be loose Make sure...

Page 9: ...e This is a anti tie down safety feature 2 Make sure the roller plunger comes into contact clicking noise This is also a safety feature that both platens are aligned before 2 After activation lower pl...

Page 10: ...9...

Page 11: ...10...

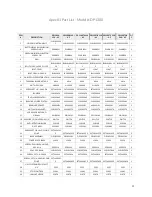
Page 12: ...110249065 110249065 110249065 1 14 BUSHING LOWER PLATEN 110249049 110249049 110249049 110249049 110249049 110249049 1 15 BEARINGS SEALED 62042NSL 62042NSL 62042NSL 62042NSL 62042NSL 62042NSL 2 16 NUT...

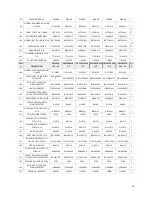
Page 13: ...1013 11013 11013 1 47 FITTING AIR 1 8 PIPE X 1 4 TUBE 90 DEG AQ69P4X2 AQ69P4X2 AQ69P4X2 AQ69P4X2 AQ69P4X2 AQ69P4X2 1 ITEM DESCRIPTION DP1300A 120 AC DP1300B 240 AC DP1300TA 120 AC DP1300TB 240 AC DP13...

Page 14: ...4 79 SWITCH MOM P S OP SCREW ON GE P9XPLOSO P9XPLOSO P9XPLOSO P9XPLOSO P9XPLOSO P9XPLOSO 3 80 CONTACT N O SCREW TYPE GE P9B10VN 110101751 110101751 110101751 110101751 110101751 110101751 3 81 SCREW...

Page 15: ...11045336301 11045336301 1 110 SCREW BOLT HEX HEAD 1 4 20 1 0 STAINLESS STEEL BH14201S BH14201S BH14201S BH14201S BH14201S BH14201S 2 111 PRESSURE APPLYING KNOB MPSK215 MPSK215 MPSK215 MPSK215 MPSK215...

Page 16: ...20AK 110079240AK 110079208AK 110079240AK 1 A3 KITTED LOWER PLATEN ASSEMBLY 11032A 11032A 11032TA 11032TA 11032TA 11032TA 1 A4 KITTED SOLENOID VALVE ASSY 11017452330 K 11017452330K 11017452330K 1101745...

Page 17: ...16...

Page 18: ...s a warranty expeditor in certain instances regarding these compressors The air compressor manufacturer provides a limited warranty and a copy of this warranty is furnished with all compressors sold b...

Page 19: ...before open account status can be extended Unless agreed otherwise all shipments will be made C O D Cash in advance 4 Pricing Prices specifications model numbers capacities and accessories are subject...

Reviews: