11
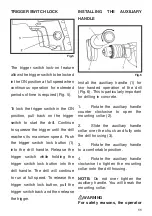
TRIGGER SWITCH LOCK
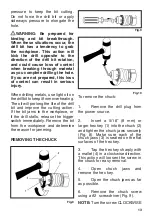
Fig.5
The trigger switch lock-on feature
allows the trigger switch to be locked
in the ON position at full speed when
continuous operation for extended
periods of time is required (Fig. 5).
To lock the trigger switch in the ON
position, pull back on the trigger
switch to start the drill. Continue
to squeeze the trigger until the drill
reaches its maximum speed. Push
the trigger switch lock button (1)
into the drill handle. Release the
trigger switch while holding the
trigger switch lock button into the
drill handle. The drill will continue
to run at full speed. To release the
trigger switch lock button, pull the
trigger switch back and then release
the trigger.
INSTALLING THE AUXILIARY
HANDLE
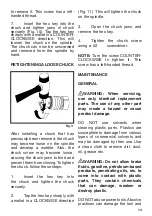
Fig.6
Install the auxiliary handle (1) for
two handed operation of the drill
(Fig. 6). This is particularly important
for drilling in concrete.
1.
Rotate the auxiliary handle
counter clockwise to open the
mounting collar (2).
2.
Slide the auxiliary handle
collar over the chuck and fully onto
the drill housing (3).
3.
Rotate the auxiliary handle
to a comfortable position.
4.
Rotate the auxiliary handle
clockwise to tighten the mounting
collar onto the drill housing.
NOTE: Do not over tighten the
auxiliary handle. You will break the
mounting collar.
WARNING
For safety reasons, the operator
Summary of Contents for PRO-TP800
Page 1: ...1 2 13mm Hammer Drill User s Manual Model No PRO TP800 English 2 I Espa ol 22...
Page 17: ...NOTES...
Page 18: ...NOTES...
Page 19: ...NOTES...
Page 20: ...www promakertools com...
Page 21: ...Taladro Percutor de 1 2 13mm Manual del Usuario Modelo No PRO TP800...
Page 39: ...NOTAS...
Page 40: ...www promakertools com...

