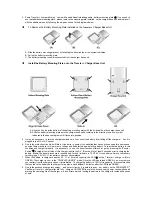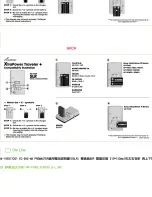
4. Some Tr charger kits may come with an additional interchangeable battery mounting plate
. If y ou need to
use that additional mounting plate, please remove the mounting plate installed on the charger base unit and replace it
with the additional one by following the steps as shown in the diagrams below.
To Remove the Battery Mounting Plate installed on the
Tr
Charger Base Unit.
A. Slide the battery mounting plate out by following the direction the arrow symbol indicates.
B. Pull up the battery mounting plate.
C. The battery mounting is now disconnected from the charger base unit.
Install the Battery Mounting Plate onto the Tr Charger Base Unit.
A. Align the 4 holes at the bottom of the battery mounting plate with the 4 ribs built on the charger base unit.
B. Slide the battery mounting plate onto the charger base unit according to the direction the arrow symbol
indicates in the above diagram until it locks into position.
5. It may be necessary to turn the charger upside dow n to pr event the battery from falling off the charger w hen it is
plugged into a WALL AC socket.
6. Due to the protection circuitry built into a Li-Ion batte ry, some Li-Ion batteries that have not been used for an extended
period of time may have very low or zero voltage and be detected as a defective battery. To re-activate a battery in this
condition and charge it properly , it is necessary to use the boost function of this char ger by pressing the “Booster
Switch”
located at the left side of this charger (next to the DC IN socket) for at least 3 seconds prior to charging the
battery.
Note:
The boost procedure is required only for and limited to a 7.2V/7.4V Li-ion battery and is not necessary
for charging a 3.6V/3.7V Li-Ion battery under any circumstance.
7. When the battery is charged to approx. 90 % of its rated capacity, the LED
on the T r char ger w ill tur n
GREEN. The charger is now in the “TRICKLE CHARGE” mode. Once the LED has turned GREEN, y ou may remove
your battery from the charger and use it immediately . To charge the battery to 100% of its capacity , it is recommended
that you leave the battery on the charger for approx. and additional 30 minutes after the LED turns GREEN.
8. Due to the advanced charge technology and smart circuitry, it is safe to leave y our battery on the PROMASTER
®
XtraPower Tr charger after it is fully charged. HOWEVER to avoid the unnece ssary power consumption and
prolong the operating life of the charger, w e do not recommend leaving the battery in the charger for extended periods
of time.


