background image

Romanian

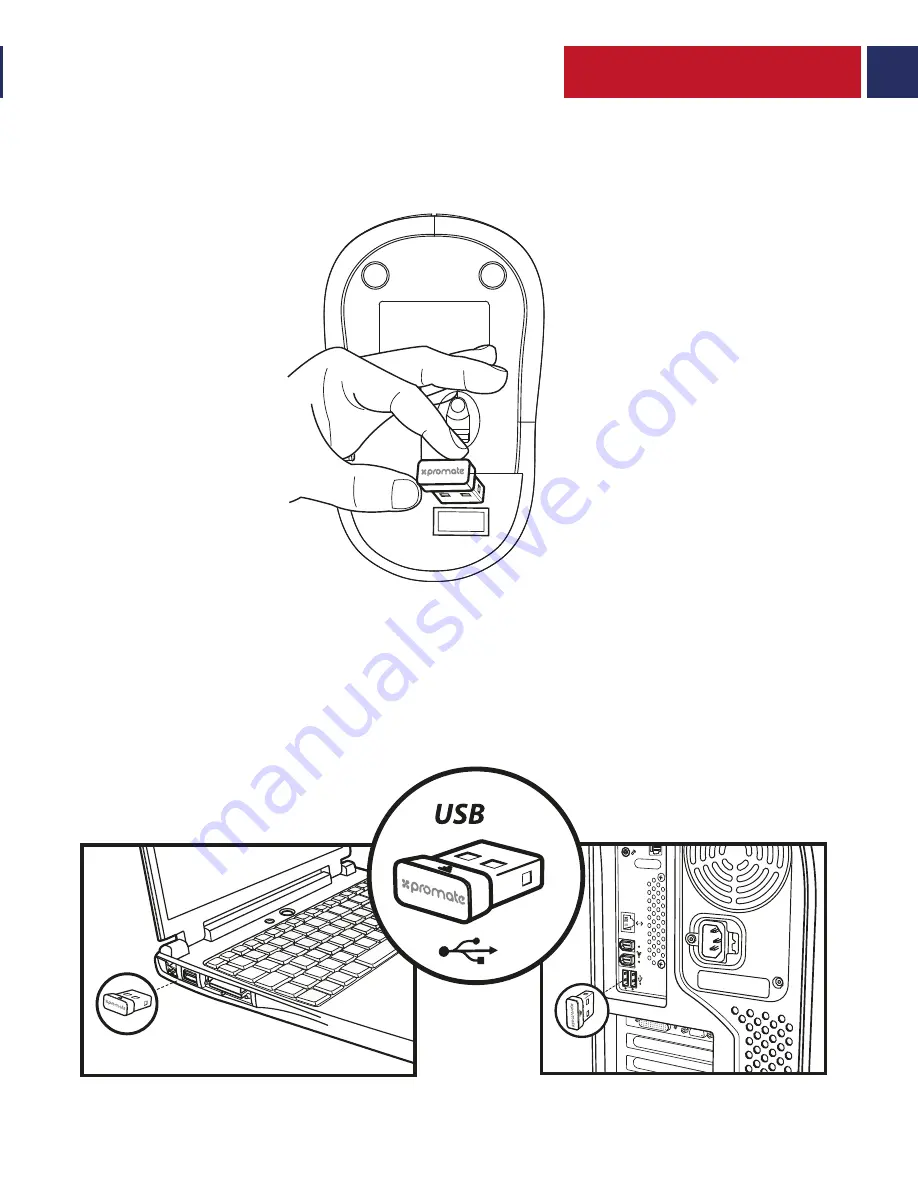
2. Scoateți receptorul Nano-USB

3.  Introduceți receptorul Nano-USB la calculator sau laptop. Driverele se vor 

descărca și instala automat.

13

14

Summary of Contents for Clix-1

Page 1: ...2 4Ghz Wireless Mouse with Nano USB Receiver Clix 1 User Guide 15M WORKING RANGE 1600 DPI ERGONOMIC DESIGN...

Page 2: ...cking The high definition 1600dPi optical sensor tracks the mouse s movements with smooth accuracy for optimal performance and productivity Plug Play Simply insert the wireless USB receiver into your...

Page 3: ...he device in a high temperature environment including intense sunlight or heat 5 Avoid excessive drops bumps abrasions and impacts 6 If there is any reason to believe that there is internal damage to...

Page 4: ...1 Remove the Battery case cover and insert the battery as shown in the image 2 Remove the Nano USB receiver Quick Start Guide 3...

Page 5: ...3 Insert the Nano USB receiver into your Desktop PC or Laptop The drivers will download and install automatically English 4...

Page 6: ...de la bater a e inserte la bater a tal como se muestra en la imagen Gu a de inicio r pido Appearance Interface Description 160174 1 Bot n izquierdo 2 Bot n derecho 3 Rueda de desplazamiento 4 Caja de...

Page 7: ...2 Quite el receptor Nano USB 3 Inserte el receptor Nano USB en su computadora de escritorio o port til Los controladores se descargar n e instalar n autom ticamente Spanish 6...

Page 8: ...e du bo tier de la batterie et ins rez la pile comme indiqu dans l image Guide de D marrage Rapide Aspect Description Interface 160174 1 Bouton Gauche 2 Bouton Droit 3 Molette de D filement 4 Bo tier...

Page 9: ...2 Retirez le r cepteur Nano USB 3 Ins rez le r cepteur Nano USB dans votre PC de bureau ou votre Ordinateur Portable Les pilotes se t l chargeront et installeront automatiquement French 8...

Page 10: ...en Sie die Batteriefachabdeckung und legen Sie die Batterie wie abgebildet ein Kurzanleitung Aussehen Schnittstellenbeschreibung 160174 1 Linke Taste 2 Rechte Taste 3 Scrollrad 4 Batteriefach 1 2 3 4...

Page 11: ...2 Entfernen Sie den Nano USB Empf nger 3 Stecken Sie den Nano USB Empf nger in Ihren Desktop PC oder Laptop Die Treiber werden automatisch heruntergeladen und installiert German 10...

Page 12: ...aixa de bateria e insira a bateria como mostrado na imagem abaixo Guia de In cio r pido Apar ncia e descri o da interface 160174 1 Bot o esquerdo 2 Bot o direito 3 Bot o de rolagem 4 Caixa de bateria...

Page 13: ...2 Remova o receptor de Nano USB 3 Insira o receptor de Nano USB no seu computador ou Laptop Os drivers come ar o a serem baixados e instalados automaticamente Portuguese 12...

Page 14: ...i carcasa capacului bateriei i introduce i bateria a a cum se arat n imagine Ghidul produsului Descrierea aspectului i a interfe ei 160174 1 Buton st nga 2 Buton dreapta 3 Roat derulatoare 4 Cutia ba...

Page 15: ...Romanian 2 Scoate i receptorul Nano USB 3 Introduce i receptorul Nano USB la calculator sau laptop Driverele se vor desc rca i instala automat 14...

Page 16: ...Russian 1 160174 1 2 3 4 1 2 3 4 15...

Page 17: ...Russian 2 Nano USB 3 Nano USB 16...

Page 18: ...Turkish 1 Pil Kutusunun kapa n kar n ve pili resimde g sterildi i gibi yerle tirin H zl Ba lang Klavuzu G r n m Aray z Tan mlar 160174 1 Sol Tu 2 Sa Tu 3 Kayd rma Tekerle i 4 Pil Kutusu 1 2 3 4 17...

Page 19: ...Turkish 2 Nano USB al c y kar n 3 Nano USB al c y Masa st PC veya Diz st n ze tak n S r c ler otomatik olarak indirilip y klenecektir 18...

Page 20: ...Chinese 1 160174 1 2 3 4 1 2 3 4 19...

Page 21: ...Chinese 2 USB 3 USB 20...

Page 22: ...Persian USB 2 USB 3 21...

Page 23: ...Persian 160174 1 2 3 4 1 2 3 4 1 22...

Page 24: ...Arabic Nano USB 2 Nano USB 3 23...

Page 25: ...Arabic 160174 1 2 3 4 1 2 3 4 1 24...

Page 26: ......

Reviews: