October 2021
135
Chapter 5: TOOLS
4
During datalogger, it catches the list of available services of all channels in
the channel plan that are part of the datalogger (if this option was selected
when creating the datalogger or if the "Datalogger PSI" option is enabled in
the Preferences menu). If there is a change of channel plan during
datalogger there will be a pause (if this option was selected when creating
the datalogger). User can pause and resume the datalogger process at any
time by pressing on the key "Pause"
. If the "Attenuation Test" option was
included when creating the datalogger, these measures will also saved.
5
At the end it saves the data and allows watching the results on screen by
channel plan/attenuation test. To change the view of channel plan or
attenuation test data press on the
key. Data about terrestrial and satellite
attenuation will appear as the option TER ICT and SAT ICT respectively.
6
It is also possible to download Datalogger files to a PC by the NetUpdate
software (free download on the PROMAX website). Once downloaded, the
program can generate reports with these files. This is not possible with the
datalogger files exported directly to a USB (without using NetUpdate).
Information of Service lists is in the XML files downloaded to the PC.
►
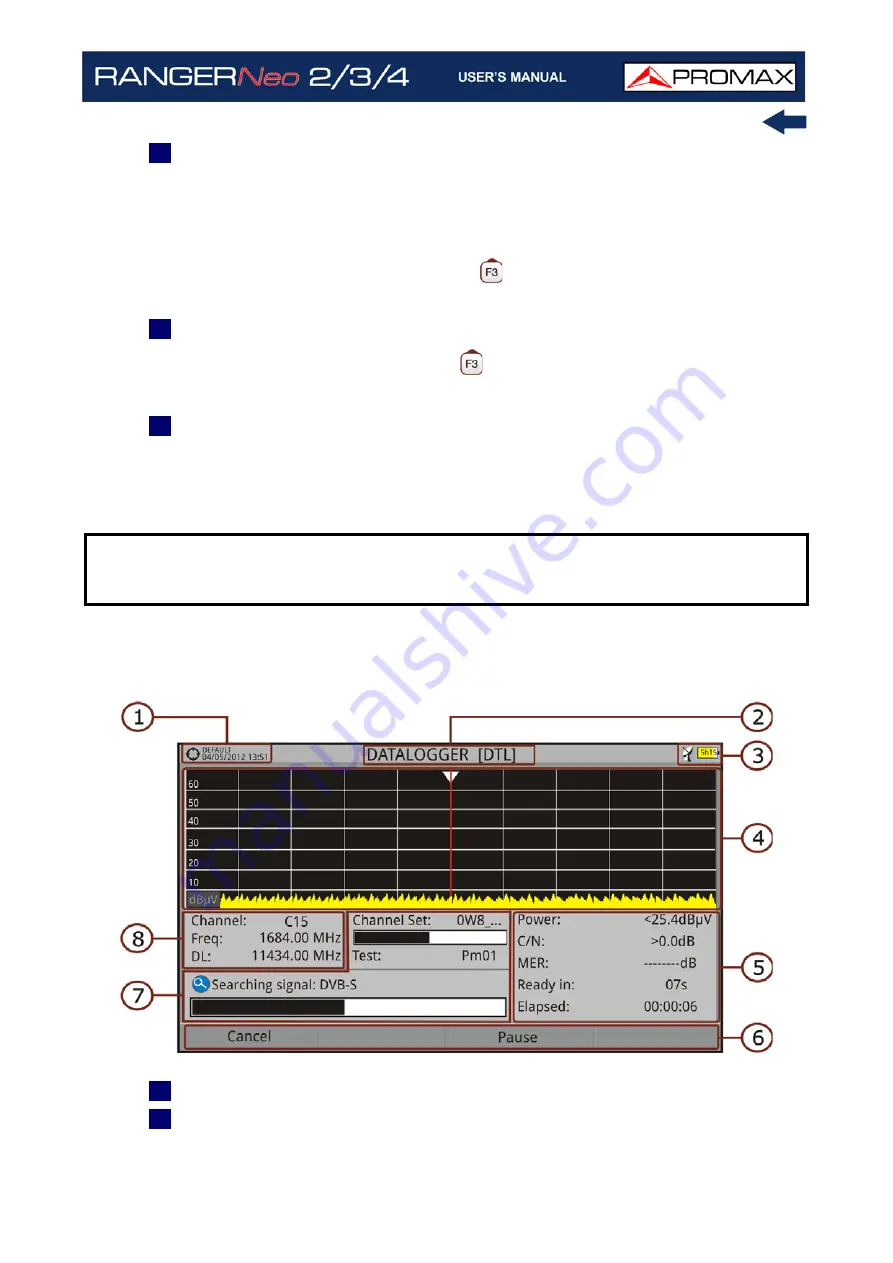
Screen Description (Datalogger)
Figure 98.
1
Selected installation; date and time.
2
Current datalogger name.
NOTE:
To make a datalogger with the Field Strength tool, in first place user has
to enable the field strength tool, and then to create a new datalogger file.
The field strength data will be stored in this datalogger.
Summary of Contents for RANGER Neo 2
Page 1: ...RANGER Neo 2 TV AND SATELLITE ANALYZER 0 MI2130 RANGER Neo 3 RANGER Neo 4 ...
Page 20: ...Chapter 2 SETTING UP 8 October 2021 Figure 4 Side View ...
Page 21: ...October 2021 9 Chapter 2 SETTING UP Figure 5 Top View ...
Page 23: ...October 2021 11 Chapter 2 SETTING UP Figure 7 Side View ...
Page 24: ...Chapter 2 SETTING UP 12 October 2021 Figure 8 Top View ...
Page 26: ...Chapter 2 SETTING UP 14 October 2021 Figure 10 Side View ...
Page 27: ...October 2021 15 Chapter 2 SETTING UP Figure 11 Top View ...
Page 30: ...Chapter 2 SETTING UP 18 October 2021 RF Menu Figure 13 RF Tuning 2 7 Menu Tree ...
Page 31: ...October 2021 19 Chapter 2 SETTING UP Figure 14 Tools Menu ...
Page 32: ...Chapter 2 SETTING UP 20 October 2021 Figure 15 Advanced Menu ...
Page 33: ...October 2021 21 Chapter 2 SETTING UP WiFi Menu Figure 16 ...
Page 34: ...Chapter 2 SETTING UP 22 October 2021 IPTV Menu Figure 17 Figure 18 ...
Page 35: ...October 2021 23 Chapter 2 SETTING UP Installation Management Menu Figure 19 ...
Page 36: ...Chapter 2 SETTING UP 24 October 2021 Preferences Menu Figure 20 ...
Page 37: ...October 2021 25 Chapter 2 SETTING UP Settings Menu Figure 21 Figure 22 ...
Page 336: ...Chapter v RACK OPTION 324 October 2021 Figure 200 Side View Figure 201 Back View ...


