-14-
z
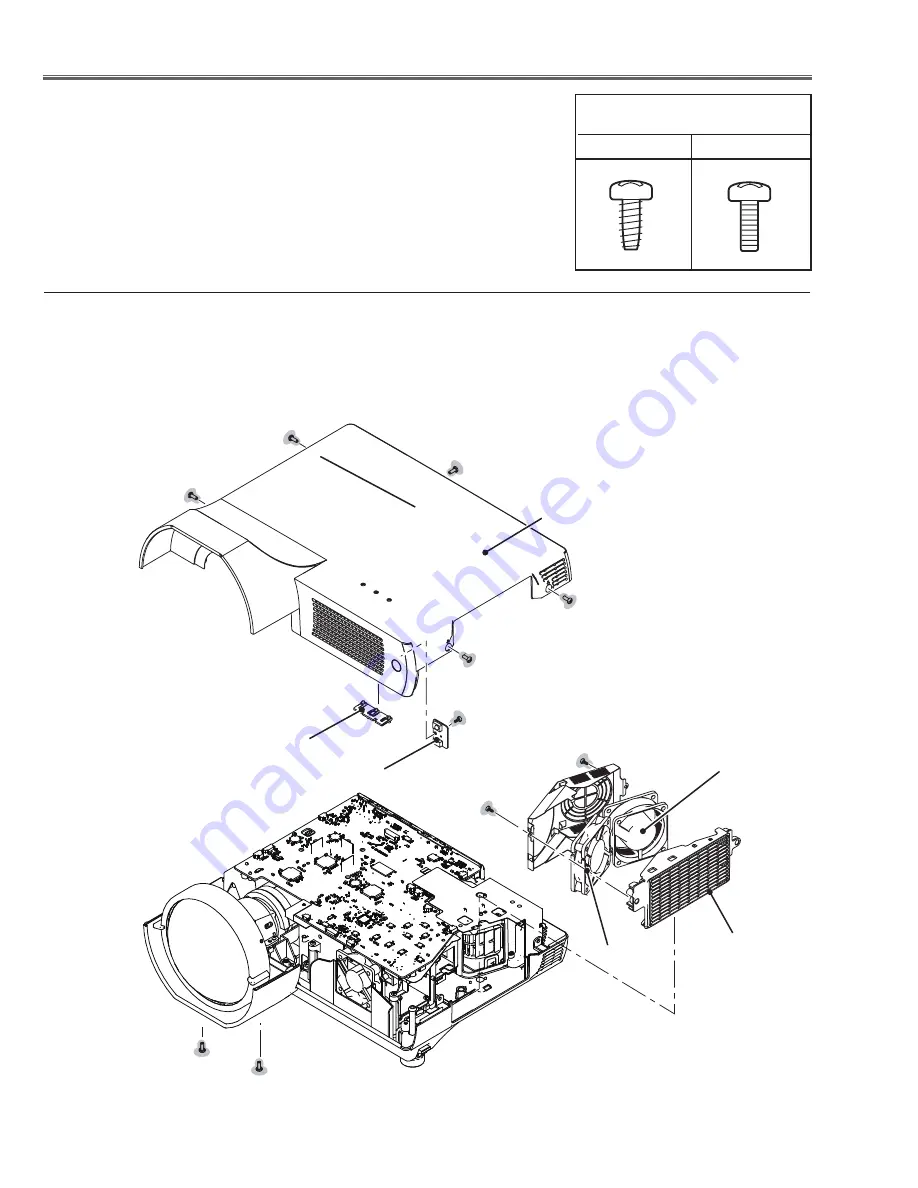
cabinet top & Fans (FN901, FN902), r/c Board removal
Mechanical disassembly
Mechanical disassembly should be made following procedures in numerical or-
der.
Following steps show the basic procedures, therefore unnecessary step may
be ignored.
Caution:
The parts and screws should be placed exactly the same position as the original
otherwise it may cause loss of performance and product safety.
Screws Expression
(Type
Diameter x Length
) mm
T Type
M Type
A (Mx8)x5
Cabinet top
Side grille
FN901
FN90
D (Tx6)
Fig.1
C (Tx6)
R/C board
B (Tx6)
LED spacer
1. Remove 7 screws A (Mx8) to remove the Cabinet top.
. Remove screw B (Tx6) to remove the R/C board.
. Remove screw C (Tx6) to remove the Side grille.
4. Remove screw D (Tx6) to remove the FN901 and FN90.
A
A
A
A
A
A
Summary of Contents for PRM-20
Page 68: ... 68 IC Block Diagrams MP2106 DC DC Converter IC5821 IC5861 FA5502 P F Control IC621 ...
Page 71: ... 71 IC Block Diagrams LM4889 Audio Output IC5031 NJW1156 Audio Control IC5001 ...
Page 74: ... 74 LAN9118 LAN Driver IC8801 IC Block Diagrams MC9328MX21 System Control of Network IC8301 ...
Page 103: ...KM5 2000 KM5 20 S 00 103 ...
Page 104: ... KM5YC KM5ZC January 2009 DC 200 Printed in Japan ...
Page 116: ...A10 SCH_KM5YC SCH_KM5ZC NO DATA ...


