PROMISE Technology
Power On Vess A2200/A2200s
With the power supplies connected, the system can now be powered on.
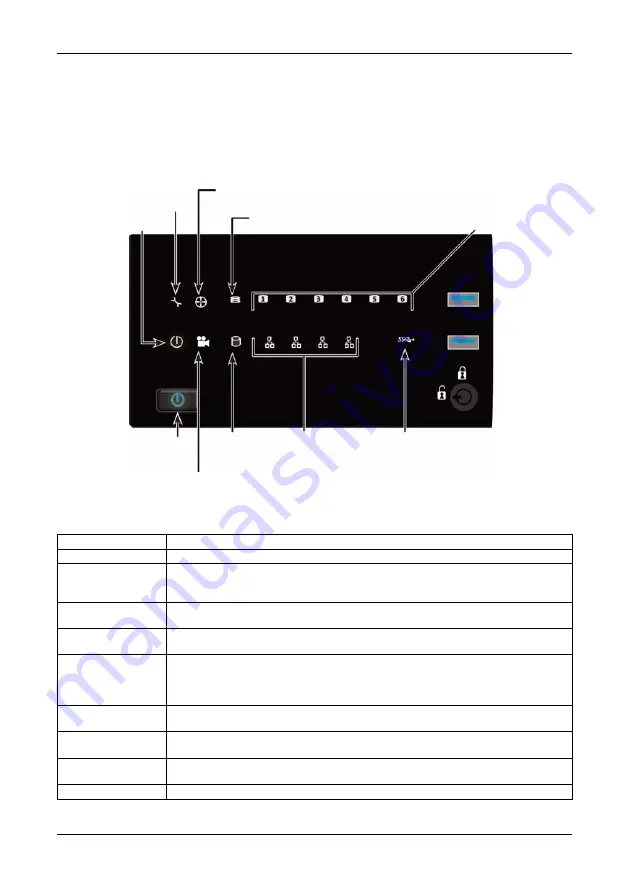
To power on the Vess A2200 or Vess A2200s, press the Power button in the lower left corner of the front
panel (see figure below). Observe the LEDs on the front panel to make certain the boot up proceeds smoothly
(see “Front Panel LEDs” on page 14).
Figure 18: Vess A2200/A2200s front panel components (left side)
Fan Status
System
Status
Global RAID Status
HDD Status LEDs
Power
Network Link/Activity
OPAS USB
HDD Activity
Recording
Power button
Front Panel LEDs
When boot-up is finished and the Vess A2200/A2200s system is functioning normally:
LED Description
Power
Lights BLUE to indicate the system is powered on. Blinks BLUE in shutdown mode.
System Status
Lights GREEN when healthy, RED if there is a critical problem (LD offline, fan
malfunction, voltage out of range, system temperature alert), blinks RED for HDD high
temperature alert remains dark when not ready.
Global RAID Status
Lights GREEN when healthy or RED if any RAID volume is offline, ORANGE for critical
state of any logical drive.
Global HDD Activity
Blinks BLUE to indicate one or more drives are being accessed, remains dark when no
drives are being accessed.
HDD Status
One LED for each HDD carrier. Each LED lights GREEN when healthy, RED if the
RAID member is offline or there is a physical disk error, ORANGE indicates the drive is
rebuilding, and a dark LED indicates either no drive is installed or the drive is not
configured.
Fan Status
Lights GREEN when healthy, RED indicates a fan in the CPU module is not operating
in normal range, ORANGE indicates the CPU fan module is not present.
Network
One LED for each LAN port. Lights BLUE to indicate a valid link, blinks BLUE to
indicate activity on the port.
OPAS USB
Lights GREEN if an OPAS device (USB disk) is detected, RED if the OPAS operation
has failed, blinks GREEN when an OPAS operation is in progress.
Recording
RED indicates application running.
14


