background image

12

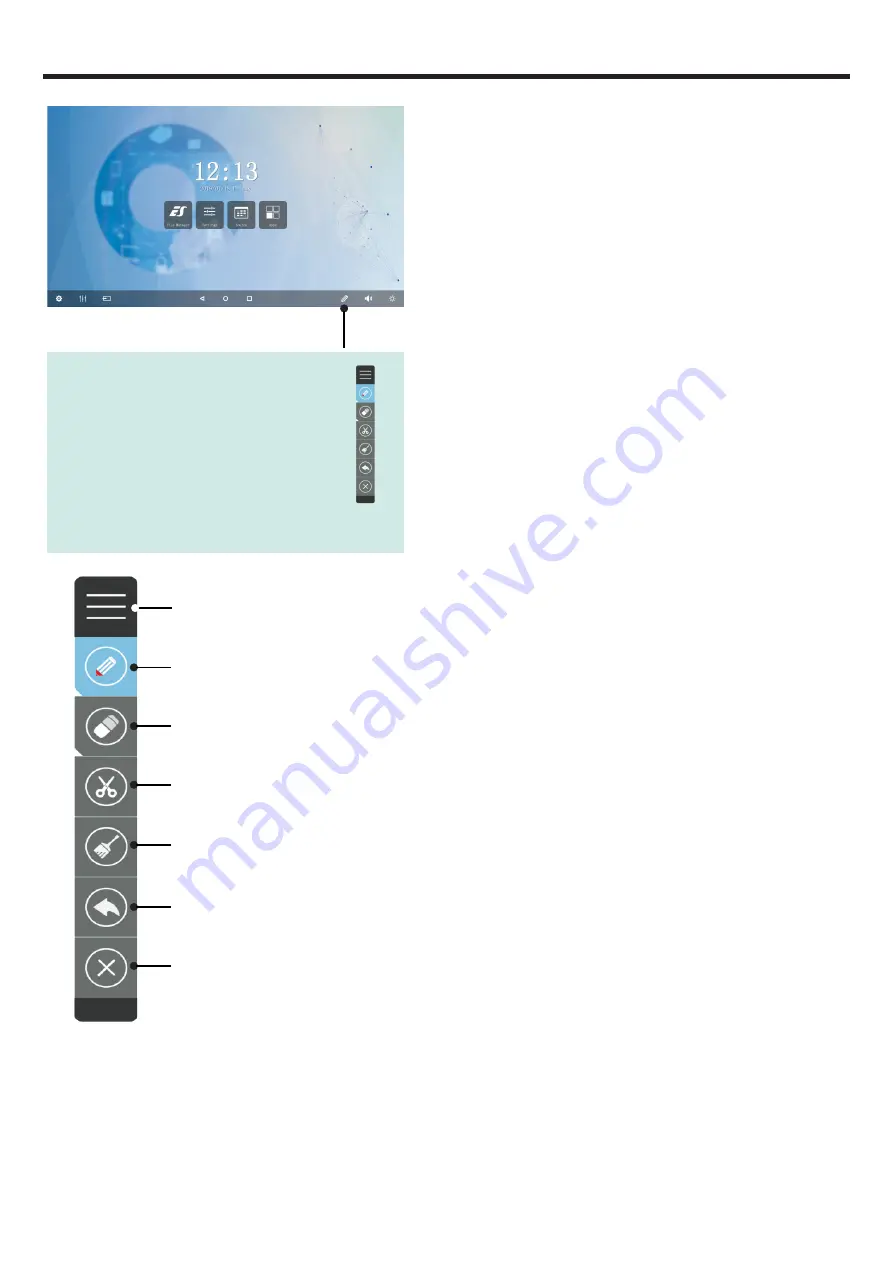
ANNOTATION

Pen: Click to choose a color of the pen. 

Eraser: Click to choose a size of  the eraser.

Screenshot: Click to capture the current screen.

Eraser all: Click to eraser all the annotation on the screen.

Undo: Click to cancel the last operation.

Exit: Click to exit the annotation.

Press and drag to any place of the screen. 

Note: 

Annotations can be used in all input source.

Summary of Contents for PM-TL43A/PCAP

Page 1: ...Interactive Touch Screen INSTRUCTION MANUAL Before connecting operating or adjusting this product please read the manual completely Please keep this manual for future reference ...

Page 2: ...n of Controls 3 Remote Control 4 Connections 5 Basic Operations 6 Operating the navigation bar 7 Android menu settings 8 User menu List 9 Connecting to the internet 11 Annotation 12 Eshare 13 USB multi media player 14 Troubleshooting 17 Specifications 18 ...

Page 3: ...an appliance coupler is used as the disconnected device the disconnected device shall remain readily operable 8 Overloading Do not overload wall outlets extension cords or convenience receptacles on other equipment as this can result in a risk of fire or electric shock NOTE Pay attention to children s safety Keep power socket plug away from children to avoid shock 9 Entering of objects and liquids...

Page 4: ...s stoves or other device including amplifiers that produce heat 19 Panel protection The display panel used in this product is made of glass Therefore it can break when the product is dropped or impacted upon by other objects Be careful not to be injured by broken glass pieces in case the display panel breaks Pay attention to children s safety Do not climb or hang on this product Increase children ...

Page 5: ... DVI device to this jack 9 DP DisplayPort INPUT Connect an external device to DP out jack 10 TOUCH OUT Output for external devices connected to PCx HDMIx or DP ports which support touch systems 11 RS 232C For remote control service and other uses 12 Connect headphones to this jack The screen is the current audio output 13 LAN Connects the external network or the router 14 Power Switch Push I to co...

Page 6: ... function Switch the screen power on or off Display or exit input source menu Mute the sound Volume down Return to previous menu or exit the on screen menu Volume up Display desktop Home page on the screen To confirm or enter a sub menu or toggle between options during menu operation Use Arrow buttons to navigate in on screen menu Display or exit the setting menu screen ...

Page 7: ...le HDMI cable or DP cable Please choose the proper method of connection based on your device Note After installation of the driver it can control the external computer by native touch control Only for PC HDMI DP signal Serial port cable Network connection Audio input devices Before using headphones adjust the device volume to avoid excessive volume as hearing damage may result HDMI devices DP devi...

Page 8: ...wer Switch on the screen on 3 Now the screen is in standby mode Wait a moment until the power indicator lights up then press button to turn on the screen Note Be sure to wait for a few seconds before pressing button If you promptly press button then the screen may not respond or act wrongly 4 Press button to put the screen in standby mode 5 Switch the Power Switch off to cut off the power complete...

Page 9: ...chased Favorite application Return Home page Android Interface Application history Annotation tool Volume bar Andriod menu Brightness bar Source menu Display menu Slide up from the bottom of the screen center by two fingers or long press on the screen by five fingers to call the Navigation Bar ...

Page 10: ...Display System Storage Android system information Default input method Android language Date and time Note To manually set date and time you should toggle Automatic date time to OFF Automatic search for Bluetooth devices Daydream Security and Restrictions ...

Page 11: ... phase Color Temperature Select the color temperature If you select User you can set the level of the red green blue as your desired Zoom Mode Select the aspect ratio display proportions according to your video signal type or personal preference OverScan Adjust the reproduction ratio you may activate this function to obtain a cleaner picture Image NR Turn on or off the noise reduction mode to redu...

Page 12: ...disable the function of the screen buttons Float Menu Turn on off the float menu display Set Password Password settings Change Logo Set logo Note Before setting the logo save the logo picture should be JPEG format and size 512KByte you want to use on root of USB disk and named boot0 jpg Insert the USB disk File format FAT32 into the USB port on the Android board Change Wallpaper Set wallpaper Powe...

Page 13: ...ront of the screen to connect to the internet WIRELESS Turn the Wi Fi on Select te connection you want to connect with Fill in your password Turn on or off the built in WiFi Display all of the WiFi sites avaible Setting Portable WiFi hotspot Add a new network manually Setting Mcast ...

Page 14: ...of the eraser Screenshot Click to capture the current screen Eraser all Click to eraser all the annotation on the screen Undo Click to cancel the last operation Exit Click to exit the annotation Press and drag to any place of the screen Note Annotations can be used in all input source ...

Page 15: ... Only for MacBook and Windows Mirror the screen to multiple mobile devices and touch on the mobile device screen to control the screen just like you are touching on your screen Multiple senders side by side mirroring and touch feedback With wireless annotation tools you can add annotations from mobile devices to the screen wirelessly Stream camera and mic phone of android phone or tablet to the sc...

Page 16: ...ble photos Song Select to play compatible music Video Select to play compatible movie Notes Never remove the USB storage device or turn off the screen while using the USB storage device It is recommended that you back up your USB device data If you want to pull out the USB device please exit USB mode first For instructions on using your USB device refer to the user s manual of your USB device Cert...

Page 17: ...ou can play compatible music in MP3 and AAC format previous photo play pause next photo zoom in zoom out show information rotate clockwise rotate anti clockwise previous song pause play next song repeat mode select repeat a single music file repeat all music files in the selected folder when it plays to the end no repeat when it plays to the end show information show playlist select sound mode ...

Page 18: ...d MKV MOV format previous movie fast reverse play pause fast forward next movie skip to specific point by input time show playlist show information select sound mode select aspect ratio select picture mode adjust the volume A B section repeat playing settings Now AB repeat starts To cancel highlight Section replay and toggle it to OFF ...

Page 19: ... the screen Move the infrared communication equipment away from the touch table until the noise is eliminated General Problem Possible Solutions Some items can not be accessed If a setting option appears in gray this indicates that the settings option is unavailable in current input mode Some display menu items may be different when the unit works in different sources Remote control command is not...

Page 20: ...P Visible screen size 43inches diagonal Power Source AC 100 240V 50 60Hz Current 0 8 A Power Consumption 80W Standby condition 0 5 W Number of pixels Display panel 1920 1080 Dimensions W H D Unit mm 1064 6 652 8 92 9 Weight 46 kg Net Operating conditions Operating temperature 5 C 35 C Storage temperature 15 C 45 C Storage humidity 10 80 Operating humidity 20 80 no moisture condensation Atmospheric...

Reviews: