background image

4

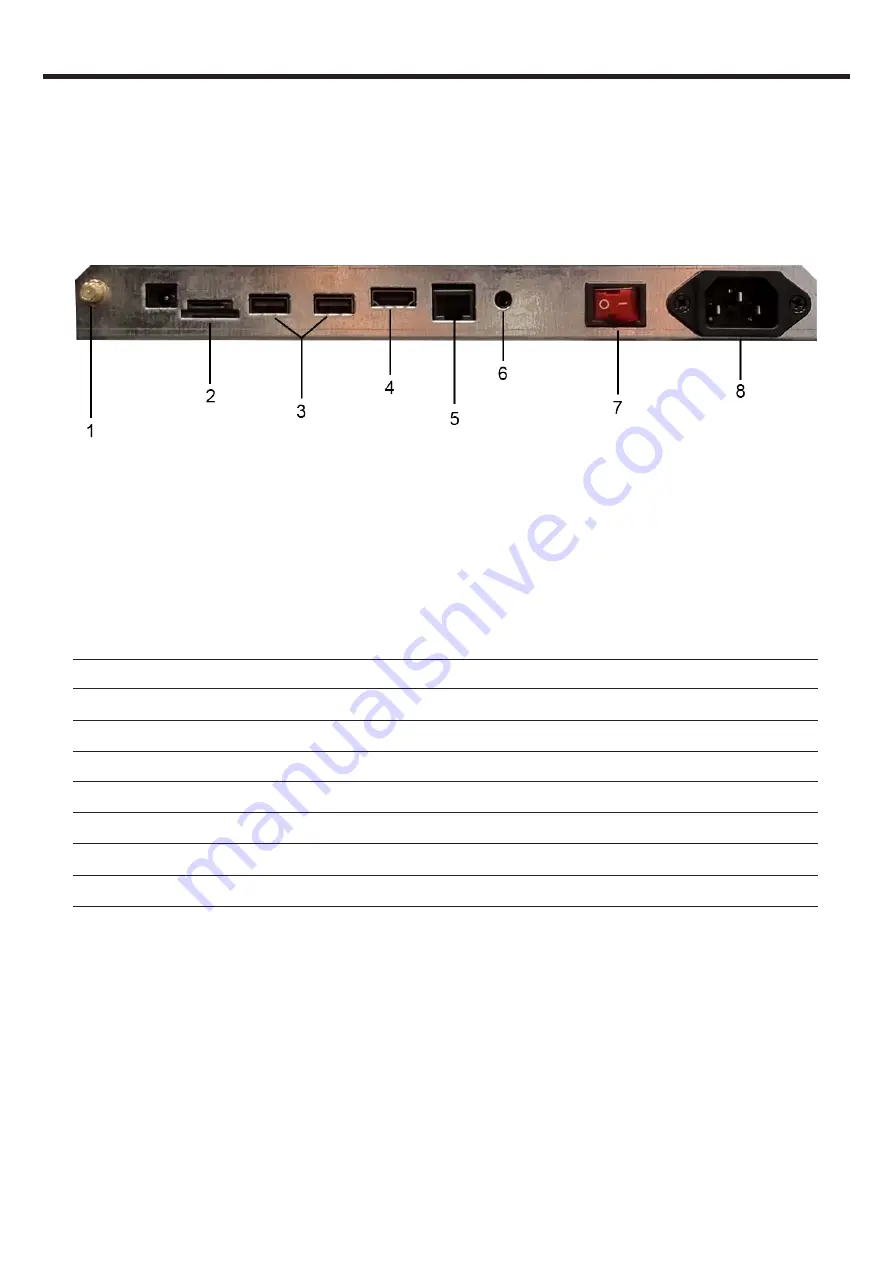
CONNECTIONS

1

Antenna Port

Connect a WiFi antenna for a stronger wireless signal

2

SD

Port for Micro SD card to expand storage space

3

USB 2.0 x2

Connect USB devices to this port for Android

4

HDMI

Connect a HDMI device to this port

5

LAN IN

Connect an external network via Ethernet

6

Earphone Port

Connect speakers or earphones with 3.5mm jack

7

Rocker Switch

Power the unit ON & OFF

8

IEC Power

Connect the IEC power cable to this port

Summary of Contents for Varitilt Standard Plus

Page 1: ...Varitilt Standard Plus User Manual Before connecting operating or adjusting this product please read the manual completely Please keep this manual for future reference ...

Page 2: ...tions Basic Operations Switching the Varitilt ON Adjusting the height Changing the tilt How to charge the battery only applicable if you have a battery unit Switching input devices How to use the Android unit Troubleshooting 2 4 5 5 6 6 7 7 8 10 ...

Page 3: ... Refer all servicing to qualified service personnel Servicing is required when the device has been damaged in any way such as the power supply cord or plug is damaged liquid has been spilled objects have fallen into the device the device has been exposed to rain or moisture does not operate normally or has been dropped 11 Damage requiring service If any of the following conditions occurs unplug th...

Page 4: ...er when the temperature returns to normal Do not leave the unit in a hot or cold location Also do not leave the unit in a location exposed to direct sunlight to near a heater or in high humidity as this may cause the cabinet to deform and the screen to malfunction and affect the screen s performance Environment condition Operating temperature 5 C 35 C Operating humidity 20 80 no moisture condensat...

Page 5: ...nd storage space 3 USB 2 0 x2 Connect USB devices to this port for Android 4 HDMI Connect a HDMI device to this port 5 LAN IN Connect an external network via Ethernet 6 Earphone Port Connect speakers or earphones with 3 5mm jack 7 Rocker Switch Power the unit ON OFF 8 IEC Power Connect the IEC power cable to this port ...

Page 6: ...cker switch on the back of the unit is switched off and the battery is powered off before plugging any cables into them 2 Plug the power cable into the back of the unit then into the battery the socket for the battery is located under the cover labeled AC 3 Switch on both the unit and the battery via the rocker switches 4 Press the battery power button once this should switch on some blue lights n...

Page 7: ...he bottom of the screen to support it in the case of it tilting too quickly Once you are supporting the screen pull out the plunger pin on the other side of the unit You can now tilt the screen to the desired angle 3 Once you have moved the screen to the desired angle keep a hold of the screen and release the plunger pin to allow it to snap back into place Please note You may have to adjust the po...

Page 8: ...labeled IN 15V This port will be found under the cover labeled DC USB on the battery 3 Plug the 3 pin plug into your power source Switching input devices only applicable if a Windows PC is installed 1 On the back of the screen there will be a black switch button attached to one of the bottom corners Press this button once to switch between the devices ...

Page 9: ...n the applications tray icon at the bottom of the screen grey circle with white dots inside Accessing Settings 1 Open the applications tray by clicking the icon on the home screen grey circle with white dots inside 2 Click on the settings icon Connecting to the Wi Fi 1 Open the settings menu 2 Navigate to Network Internet section 3 Click on the Wi Fi option and enable it by pressing the slider but...

Page 10: ...with white dots inside 2 Open Google Play 3 Sign into your google account If you do not have a google account you can create one on the login screen 4 Once logged in use the search bar at the top of the screen to navigate to the desired application page 5 Once on the application page click install Your application should now be installing onto your device ...

Page 11: ...ry not switching on Make sure the battery is charged You can check this by pressing the power button on the battery once The lights next to the power button will light up depending on the battery s power level If no one light shows the battery will need charging Why can t I adjust the height of the unit Make sure the power cables are securely fitted into both the unit and the power source and make...

Page 12: ... uninstall some existing applications to create room for more You can check how much storage space you have left in the settings menu Why is the battery not charging Make sure charger is switched on at your power source The charger consists of two cables The lead that connects to the battery unit needs to be connected into the charging brick Make sure this lead is fully inserted into the brick ...

Reviews: