background image

SECTION 2 

Pronar T285/1 

2.5 

with  skin  wash  the  area  of  contact  with  water  and  soap.  Do  NOT  apply  organic 

solvents (petrol, kerosene). 

  Use the hydraulic oil recommended by the Manufacturer. 

  After changing the hydraulic oil, the used oil should be properly disposed of. Used 

oil  or oil,  which  has lost its  properties,  should  be  stored  in  original  containers  or 

replacement  containers  resistant  to  action  of  hydrocarbons.  Replacement 

containers must be clearly marked and appropriately stored. 

  Do not store hydraulic oil in packaging designed for storing food or foodstuffs. 

  Rubber  hydraulic  lines  must  be  replaced  every  4  years  regardless  of  their 

technical condition. 

2.1.5  LOADING AND UNLOADING LOAD BOX 

  Loading  and  unloading  work  should  be  carried  out  by  someone  experienced  in 

this type of work. 

  Do NOT exceed permissible load weight of trailer because this may cause danger 

to road traffic and cause damage to the machine. 

  Do not carry people or animals either on the trailer chassis or in load boxes. The 

trailer is not intended for transporting people or animals. 

  Individual types of load boxes are adapted to carrying various groups of materials, 

therefore  the  user  is  obligated  to  carefully  read  the  load  box  operator's  manual 

and comply with its recommendations. 

  The load must be arranged in load box in such a way that it does not threaten the 

stability of the trailer, and does not hinder driving. 

  The arrangement of the load in load box may not cause an overload on the axle 

and drawbar of the trailer. 

  Loading and unloading work may be carried out only when the trailer is positioned 

on level and hard surface. Tractor and trailer must be placed to drive forwards. 

  When unloading the load box, do NOT operate the middle frame interlock lever if 

the frame is raised. 

  Ensure that there are no bystanders in the unloading or loading zone. 

Summary of Contents for T285/1

Page 1: ...ne 48 085 681 63 29 48 085 681 64 29 48 085 681 63 81 48 085 681 63 82 fax 48 085 681 63 83 48 085 682 71 10 www pronar pl OPERATOR S MANUAL AGRICULTURAL TRAILER PRONAR T285 1 TRANSLATION OF THE ORIGINAL COPY OF THE MANUAL EDITION 2A 10 2014 PUBLICATION NO 385N 00000000 UM ...

Page 2: ......

Page 3: ...ion Before using the machine the user must carefully read this Operator s Manual and observe all recommendations This guarantees safe operation and ensures malfunction free work of the machine The machine is designed to meet obligatory standards documents and legal regulations currently in force The manual describes the basic safety rules and operation of agricultural trailer Pronar T285 1 If the ...

Page 4: ...articularly important information and instructions the observance of which is essential are distinguished in the text by the sign and also preceded by the word ATTENTION Failure to observe the instructions may lead to damage to the machine as a result of improper operation adjustment or use In order to focus the user s attention on the need to perform maintenance the relevant section of the Operat...

Page 5: ...ction of machine s forward travel Right side side to the right hand of the operator facing in the direction of machine s forward travel REQUIRED SERVICE ACTIONS Service actions described in the manual are marked Result of service adjustment actions or comments concerning the performance of actions are marked ...

Page 6: ......

Page 7: ...ORT BY THE USER 1 13 1 6 ENVIRONMENTAL HAZARDS 1 13 1 7 WITHDRAWAL FROM USE 1 15 2 SAFETY ADVICE 2 1 2 1 BASIC SAFETY RULES 2 2 2 1 1 USE OF TRAILER 2 2 2 1 2 HITCHING AND DISCONNECTING FROM TRACTOR 2 3 2 1 3 PULLING THE LOAD BOX ON AND REMOVING THE LOAD BOX FROM THE TRAILER 2 3 2 1 4 HYDRAULIC AND PNEUMATIC SYSTEMS 2 4 2 1 5 LOADING AND UNLOADING LOAD BOX 2 5 2 1 6 TRANSPORTING THE MACHINE 2 6 2 ...

Page 8: ... 3 16 4 CORRECT USE 4 1 4 1 PREPARING FOR WORK BEFORE FIRST USE 4 2 4 1 1 CHECKING THE TRAILER AFTER DELIVERY 4 2 4 1 2 PREPARE THE TRAILER FOR FIRST HITCHING TO TRACTOR 4 3 4 2 HITCHING AND DISCONNECTING FROM TRACTOR 4 5 4 3 COUPLING AND UNCOUPLING SECOND TRAILER 4 9 4 4 PULLING THE LOAD BOX ON THE TRAILER 4 11 4 5 REMOVING LOAD BOX FROM TRAILER 4 15 4 6 LOADING THE LOAD BOX 4 16 4 7 TRANSPORTING...

Page 9: ...STMENT 5 10 5 2 8 CHANGE OF PARKING BRAKE CABLE AND ADJUSTMENT OF CABLE TENSION 5 14 5 3 PNEUMATIC SYSTEM MAINTENANCE 5 17 5 3 1 PRELIMINARY INFORMATION 5 17 5 3 2 INSPECTING AND CHECKING AIR TIGHTNESS OF PNEUMATIC SYSTEM 5 18 5 3 3 CLEANING THE AIR FILTERS 5 19 5 3 4 DRAINING WATER FROM AIR TANK 5 21 5 3 5 CLEANING DRAIN VALVE 5 22 5 3 6 CLEANING AND MAINTAINING PNEUMATIC LINE CONNECTIONS AND PNE...

Page 10: ...SETTING ADJUSTMENT 5 28 5 7 ADJUSTING LIMIT VALVES AND LIMIT SWITCHES 5 28 5 8 TRAILER LUBRICATION 5 31 5 9 CONSUMABLES 5 36 5 9 1 HYDRAULIC OIL 5 36 5 9 2 LUBRICANTS 5 37 5 10 CLEANING TRAILER 5 37 5 11 STORAGE 5 39 5 12 TIGHTENING TORQUE FOR NUT AND BOLT CONNECTIONS 5 39 5 13 DRAWBAR EYE ADJUSTMENT 5 41 5 14 TROUBLESHOOTING 5 42 ...

Page 11: ...SECTION 1 BASIC INFORMATION ...

Page 12: ...longitudinal member of the lower frame and with serial number 2 The serial number is stamped into the data plate and into the reinforcement of the right longitudinal member of the lower frame figure 1 1 When buying the trailer check that the serial numbers on the machine agree with the number written in the WARRANTY BOOK in the sales documents and in the OPERATOR S MANUAL The meanings of the indiv...

Page 13: ...cial certificate number F Tare weight G Maximum gross weight H Carrying capacity I Permissible hitching system loading J Permissible axle 1 load K Permissible axle 2 load 1 1 2 AXLE IDENTIFICATION The factory number of the axle and its type are stamped onto the data plate secured to the axle profile 1 1 3 LIST OF FACTORY NUMBERS VIN S Z B 2 8 5 1 X FRONT AXLE FACTORY NUMBER REAR AXLE FACTORY NUMBE...

Page 14: ...e for which it is intended in particular for transporting people and animals for transporting loose unsecured toxic materials if there is a possibility of causing environmental damage for transporting machines and equipment with high centre of gravity affecting trailer stability for transporting loads with uneven loading and overloading of axles for transporting unsecured loads which may move in t...

Page 15: ... adjustment plans comply with general safety regulations while working prevent accidents comply with the road traffic regulations and transport regulations in force in a given country in which the trailer is used carefully read the Operator s Manual and comply with its recommendations only hitch the trailer to an agricultural tractor which fulfils all the requirements made by the trailer s Manufac...

Page 16: ...t greater than 6 150 mm Width and height of load box may not exceed dimensions given in table 1 2 The trailer is also designed for work with load boxes made by Pronar the technical parameters of which are detailed in table 1 3 TAB 1 3 Technical data of Pronar K04 load box DATA UNIT VALUE Maximum gross weight kg 16 000 Carrying capacity kg 13 500 Tare weight kg 2 500 Length mm 6 150 Maximum height ...

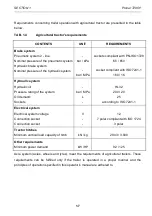
Page 17: ...0 16 Hydraulic system Hydraulic oil Pressure rating of the system Oil demand Sockets bar MPa L HL 32 200 20 25 according to ISO 7241 1 Electrical system Electrical system voltage Connection socket Connection socket V 12 7 polar compliant with ISO 1724 3 polar Tractor hitches Minimum vertical load capacity of hitch kN kg 29 43 3 000 Other requirements Minimum power demand kW HP 92 125 Axle system a...

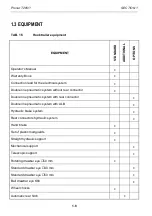
Page 18: ...system without rear connector Double line pneumatic system with rear connector Double line pneumatic system with ALB Hydraulic brake system Rear connectors hydraulic system Hand brake Set of plastic mudguards Straight hydraulic support Mechanical support Telescopic support Rotating drawbar eye 50 mm Standard drawbar eye 40 mm Standard drawbar eye 50 mm Ball drawbar eye K80 Wheel chocks Automatic r...

Page 19: ... allows the possibility of ordering new machines with a different set of optional equipment replacing standard equipment 1 4 TERMS CONDITIONS OF WARRANTY PRONAR Sp z o o Narew guarantees the reliable operation of the machine when it is used according to its intended purpose as described in the OPERATOR S MANUAL The repair period is specified in the WARRANTY BOOK The warranty does not apply to thos...

Page 20: ... the right to warranty service TIP Demand that the seller carefully and precisely fills out the Warranty Book and warranty repair coupons A missing date of purchase or sale point stamp may make the user ineligible for any warranty repair or refund The user is obliged to report immediately on noticing any wear in the paint coating or traces of corrosion and to have the faults rectified whether they...

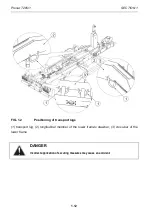
Page 21: ...the drawbar 2 and to the crossbar 3 of the lower frame Use certified and technically reliable securing measures Worn straps cracked securing catches bent or corroded hooks as well as other damage may disqualify use of the given element from use Carefully read the information stated in the Operator s Manual for the given securing measure Chocks or other objects without sharp edges should be placed ...

Page 22: ...TION 1 1 12 FIG 1 2 Positioning of transport lugs 1 transport lug 2 longitudinal member of the lower frame s drawbar 3 cross bar of the lower frame DANGER Incorrect application of securing measures may cause an accident ...

Page 23: ... user must read the trailer Operator s Manual and adhere to the recommendations contained therein Independent transport involves towing the trailer with own agricultural tractor to destination During transport adjust travel speed to the prevailing road conditions but do not exceed the maximum design speed IMPORTANT Before transporting independently the tractor driver must carefully read this opera...

Page 24: ...se food packaging for this purpose Oil which has been used up or is unsuitable for further use owing to a loss of its properties should be stored in its original packaging in the conditions described above Waste oil should be taken to the appropriate facility dealing with the re use of this type of waste Waste code 13 01 10 Detailed information concerning hydraulic oil may be found on the product ...

Page 25: ...system and reduce air pressure completely in the pneumatic brake system e g using air tank drain valve Worn out or damaged parts that cannot be reclaimed should be taken to a collection point for recyclable raw materials Hydraulic oil should be taken to the appropriate facility dealing with the re use of this type of waste During dismantling personal protection equipment shall be used i e protecti...

Page 26: ...Pronar T285 1 SECTION 1 1 16 ...

Page 27: ...SECTION 2 SAFETY ADVICE ...

Page 28: ...to acquaint himself with the construction action and the principles of safe usage of the trailer Be aware of the existence of a minimal risk and for this reason the fundamental basis for using this hook trailer should be the application of safety rules and sensible behaviour The machine must never be used by persons who are not authorised to drive agricultural tractors including children and peopl...

Page 29: ...pleted Be especially careful when hitching the machine to tractor When hitching there must be nobody between the trailer and the tractor Do NOT proceed with disconnecting trailer from the tractor when tipping frame is raised Coupling and uncoupling the trailer may only take place when the machine is immobilised by use of the parking brake If the trailer is positioned on a slope or elevation it sha...

Page 30: ...ar electric power lines While pulling the load box on and removing the load box from the trailer do NOT operate the central frame interlock if the frame is extended Selection of trailer s working mode is only possible when the tipping frame is retracted in rest position 2 1 4 HYDRAULIC AND PNEUMATIC SYSTEMS When operating the hydraulic and pneumatic systems are under high pressure Regularly check ...

Page 31: ...load weight of trailer because this may cause danger to road traffic and cause damage to the machine Do not carry people or animals either on the trailer chassis or in load boxes The trailer is not intended for transporting people or animals Individual types of load boxes are adapted to carrying various groups of materials therefore the user is obligated to carefully read the load box operator s m...

Page 32: ...ad box is empty Do NOT move with raised load box 2 1 6 TRANSPORTING THE MACHINE During travel on public roads comply with the road traffic regulations and transport regulations in force in a given country in which the trailer is used Do not exceed the permitted speed arising from road conditions and design limitations Adjust travel speed to the prevailing road conditions load and road traffic regu...

Page 33: ... the hydraulic pneumatic and electrical systems Before driving off check that the parking brake is released the braking force regulator is positioned in the proper position applies to pneumatic systems with a manual three position regulator The trailer is designed to operate on slopes up to 8 Driving trailer across ground with steeper slopes may cause the trailer to tip over as a result of loss of...

Page 34: ...ic reduction of basic braking effectiveness Prolonged driving across steep ground may lead to loss of braking efficiency During reversing one should use the assistance of another person During manoeuvring the person helping must stay at a safe distance from the danger zone and be visible all the time to the tractor driver Do NOT attempt to board trailer while travelling During travel guards protec...

Page 35: ...y Pressure and tyres should be also checked after the whole day of intensive work Please note that higher temperatures could raise tyre pressure by as much as 1 bar At high temperatures and pressure reduce load or speed Do not release air from warm tyres to adjust the pressure or the tyres will be underinflated when temperatures return to normal Protect tyre valves using suitable caps to avoid soi...

Page 36: ...pair maintenance and cleaning work should be carried out with the tractor s engine turned off and the ignition key removed Tractor and trailer should be secured using parking brake and in addition chocks should be placed beneath trailer wheel Ensure that unauthorised persons do not have access to the tractor cab During maintenance or repair work trailer may be unhitched from tractor but secured wi...

Page 37: ...control valves cylinders and regulators In the event of damage to these elements repair should be entrusted to authorised service point or replace elements with new parts Do NOT install additional appliances or fittings not according to the specifications defined by the Manufacturer The trailer may only be towed when axles and wheels lighting system and brakes are reliable 2 2 DESCRIPTION OF MINIM...

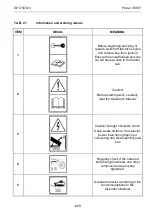
Page 38: ...ing protective clothing and appropriate tools ensuring unauthorised persons have no access to the machine especially children a ban on being on the machine when it is operating 2 3 INFORMATION AND WARNING DECALS The hook trailer is labelled with the information and warning decals mentioned in table 2 1 The symbols are positioned as presented in figure 2 2 Throughout the time it is in use the user ...

Page 39: ...not have access to the tractor cab 2 Caution Before starting work carefully read the Operator s Manual 3 Caution Danger of electric shock Keep a safe distance from electric power lines during tipping or connecting and disconnecting load box 4 Regularly check if the nuts and bolts fixing the wheels and other components are properly tightened 5 Grease the trailer according to the recommendations in ...

Page 40: ...t trailer function hook trailer tipper 10 Transport suspension points 11 Position of the hydraulic support leg control valve 12 Extension withdrawal of the hydraulic support 13 Maximum design speed pressure value should be adapted to tyres Decals items 6 7 8 and 10 are placed on both sides of the trailer Decal position 12 is placed on hydraulic conduit ...

Page 41: ...SECTION 2 Pronar T285 1 2 15 FIG 2 2 Locations of information and warning decals Markings on the figure according to table 2 1 ...

Page 42: ...Pronar T285 1 SECTION 2 2 16 ...

Page 43: ...SECTION 3 DESIGN AND OPERATING PRINCIPLE ...

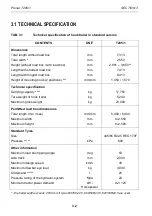
Page 44: ...ion Carrying capacity Tare weight of hook trailer Maximum gross weight kg kg kg 17 760 5 240 23 000 Permitted load box dimensions Total length min max Maximum width Maximum height mm mm mm mm 5 400 6 400 to 2 550 to 2 500 Standard Tyres Size Pressure kPa 445 65 R22 5 REG 170F 600 Other information Maximum load box tipping angle Axle track Maximum design speed Maximum drawbar eye load Oil demand Pr...

Page 45: ... is bolted to the left longitudinal member of the drawbar On the left side of the frame the parking brake is mounted to a bracket 5 Rollers guiding the brake cable and the brake lever are mounted to the lower part of the frame In the rear part of the frame there is mechanical suspension which consists of tandem suspension 8 rigid axle 7 and steering axle 6 with hydraulic turning interlock system T...

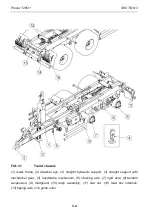
Page 46: ...wer frame 2 drawbar eye 3 straight hydraulic support 4 straight support with mechanical gear 5 handbrake mechanism 6 steering axle 7 rigid axle 8 tandem suspension 9 mudguard 10 lamp assembly 11 star nut 12 load box interlock 13 tipping axle 14 guide roller ...

Page 47: ...SECTION 3 Pronar T285 1 3 5 3 2 2 TIPPING FRAME FIG 3 2 Tipping frame 1 rear frame 2 central frame 3 hook frame 4 tipping cylinder 5 tipping frame lock mechanism 6 hook with lock ...

Page 48: ... tipping cylinder 4 Hook lock automatically falls or rises depending on position of frame Individual frames are connected with the aid of pins seated in sleeves Tipping frame lock mechanism 5 is secured to the left longitudinal member of the central frame FIG 3 3 Tipping frame locking 1 left limit switch 2 right limit switch 3 switching cylinder 4 bolt with nut 5 clearance light I 6 clearance ligh...

Page 49: ...ylinder 3 Right limit switch 2 must be pressed when the hook trailer is set to hook trailer position in this position clearance light I 5 located on indicator plate 7 must be switched on In this position the rear frame remains on the lower trailer frame the central frame is raised by the tipping cylinder Hook frame 3 is operated only when the load box is unlocked The hook has an automatic safety l...

Page 50: ...ne pneumatic braking system with manual braking force regulator 1 air tank 2 control valve 3 braking force regulator 4 pneumatic cylinder 5 line connector yellow 6 line connector red 7 air filter 8 air tank control connector 9 relay valve 10 socket yellow 11 socket red ...

Page 51: ...inder 5 line connector yellow 6 line connector red 7 air filter 8 air tank control connector 9 relay valve 10 socket yellow 11 socket red The pneumatic brakes are activated from the tractor driver s cab by pressing on the brake pedal The function of the control valve 2 figure 3 4 and 3 5 is the operation of the trailer s brakes simultaneously when tractor s brakes are applied Furthermore in case o...

Page 52: ...y applying the brakes now changes its position to allow normal brake operation Three step brake force regulator 2 figure 3 6 adjusts braking force depending on setting Switching to a suitable working mode is done manually by machine operator using the lever 4 prior to moving off Three working positions are available A no load B half load and C full load FIG 3 6 Control valve and brake force regula...

Page 53: ...able hydraulic system is required to operate the hydraulic braking system 3 2 4 PARKING BRAKE The parking brake is for immobilising trailer while standing motionless The brake crank mechanism is mounted on the bracket placed on the left longitudinal member of the lower frame The steel cable is connected with the axle expander lever through the handbrake release with the crank mechanism Tightening ...

Page 54: ...ic system diagram 1 quick coupler plug 2 electro hydraulic valve 3 suspension cylinder 4 raising cylinder 5a limit valve 5b limit valve 6 anti shock valve 7 load box interlock cylinder 8 sensor limit switch 9 switching cylinder 10 hook frame cylinder 11 hydraulic lock ...

Page 55: ...ly withdrawn the rest position of the tipping frame Anti shock valves 6 protect the system against sudden pressure jumps and ensure smoother operation of cylinders Hydraulic interlock of load box ensures that the load box is secured to the trailer chassis during transport as well as during material unloading The interlock is operated from the tractor cab using hydraulic system manifold lever When ...

Page 56: ... hub must be blocked otherwise the trailer will have a tendency to turn uncontrollably to the left or the right during reversing FIG 3 9 Design and diagram of rear axle turning interlock hydraulic system 1 turning interlock cylinder 2 hydraulic conduit 3 hydraulic quick coupler 4 shock absorber Turning interlock hydraulic system shown in figure 3 9 enables interlocking the rear axle The hydraulic ...

Page 57: ...led by means of the hydraulic oil manifold of the tractor s external hydraulic system FIG 3 10 Straight support hydraulic system construction and diagram 1 hydraulic support 2 quick coupler 3 valve 4 5 information decals The straight hydraulic support was used for the trailer Figure 3 10 Lowering the support 1 is carried out by opening the valve 3 Hydraulic oil supplied from hydraulic selective co...

Page 58: ...6 slow moving vehicle warning plate 7 front clearance and left right parking light 8 side parking light 9 7 pole socket 10 front reflector The trailer s electrical system is designed for supply of 12 V DC In order to cooperate correctly with the trailer the tractor should be equipped with a 7 pin electric socket figure 3 12 6 and a 3 pin electric socket figure 3 13 4 Connection of the trailer s el...

Page 59: ...et The electrical system of the hydraulic system figure 3 13 is connected using a connection lead 2 with a 3 pin plug If the tractor is not equipped with such sockets or is equipped with a different type of sockets carry out the sockets installation according to the recommendations of the tractor manufacturer The standard equipment of the trailer includes a 3 pin socket 4 for installing in the tra...

Page 60: ...Pronar T285 1 SECTION 3 3 18 FIG 3 13 Design of electrical lighting system of hydraulic system 1 solenoid valves wiring harness 2 connection lead 3 sensor 4 3 pin socket 5 front clearance lamp ...

Page 61: ...ECTION 3 Pronar T285 1 3 19 FIG 3 14 Electrical system diagram 1 central wiring harness 2 rear wiring harness 3 front wiring harness 4 connecting wiring harness Marking according to table 3 2 3 3 and 3 4 ...

Page 62: ...nd right side parking light LED PL Front clearance lamp and left side parking light LED TOP Front rear clearance lamp and side right parking light LED TOL Front rear clearance lamp and side left parking light LED OBP1 Right clearance lamp LED OBL1 Left clearance lamp LED TAB 3 3 Marking of connections of GP and GT sockets MARKING FUNCTION 31 Weight Power supply 12V not used L Left indicator 54 STO...

Page 63: ...R B White C Black F Violet K Red L Lazurite N Blue O Brown P Orange R Pink S Grey T Green Z Yellow FIG 3 15 Diagram of electrical system of hydraulic system 1 solenoid valves wiring harness 2 connection lead 3 sensor 4 3 pole socket 5 solenoid valve 6 front clearance lamp ...

Page 64: ...Pronar T285 1 SECTION 3 3 22 ...

Page 65: ...SECTION 4 CORRECT USE ...

Page 66: ...Manual and observe all recommendations understand the design and the principle of machine operation IMPORTANT Before proceeding to hitching to tractor the user must carefully read this Operator s Manual and additional publications attached to machine and observe all recommendations External inspection Check completeness of machine standard and optional equipment Check condition of protective paint...

Page 67: ...ive If all the above checks have been performed and there is no doubt as to the trailer s good technical condition it can be connected to tractor Start the tractor check all systems and conduct test run of trailer without load no load in load box It is recommended that the inspection is conducted by two people one of which should always remain in the tractor cab Test start should be conducted acco...

Page 68: ...eration of hydraulic and or pneumatic cylinders or other faults find the cause of the problem If a fault cannot be rectified or the repair could void the warranty please contact retailer for additional clarifications or to perform repair DANGER Careless and improper use and operation of the trailer and non compliance with the recommendations given in this operator s manual is dangerous to your hea...

Page 69: ...ly conduit of cylinder of hydraulic support to socket in tractor cylinder of single acting hydraulic support Set valve 3 to open position O figure 4 1 Set the drawbar eye with the aid of the tractor external hydraulic system manifold lever at such a height that it is possible to hitch the machine Reverse tractor hitch trailer check coupling lock protecting machine against accidental unhitching If ...

Page 70: ...ulic brake system Connect hydraulic system lines The lines are marked with colours The lines marked with the same colour should be connected to one section of the tractor hydraulic manifold Connect the main lead supplying electric lighting system 7 pin and the connecting lead of electrical system of hydraulic system 3 pin to sockets on the tractor If the tractor is not equipped with such sockets o...

Page 71: ...etting Moving lever in direction D gear works in greater setting mode Lever 4 when placed in a central position is in neutral setting releasing or raising support is impossible After finishing hitching tractor to trailer the support should be maximally raised upwards the lever set in neutral setting and the foot secured with cotter pin IMPORTANT Ensure compatibility of oils in tractor hydraulic sy...

Page 72: ...d when hydraulic cylinder suspension blocks are extended In order to disconnect the trailer from the tractor carry out the following actions in the following sequence Immobilise tractor and trailer with parking brake and place chocks under trailer wheels Wheel chocks shall be so placed that one of them is in front of the wheel and the second is behind it Set valve 3 of hydraulic support to open po...

Page 73: ...or cab and secure it against access by unauthorised persons Turn off tractor s engine IMPORTANT Do NOT park the trailer with load box which is disconnected from the tractor and resting on the parking stand 4 3 COUPLING AND UNCOUPLING SECOND TRAILER A second trailer may only be connected if it is a machine built on a dual axle chassis and if it fulfils all the requirements specified in section 1 Co...

Page 74: ...drawbar pin and securing cotter pin Connect lines of pneumatic hydraulic and electrical connections according to instructions contained in section 4 2 FIGURE 4 2 Rear hitch 1 hitch body 2 hitch pin 3 chain with cotter pin securing pin Disconnecting the second trailer Immobilise tractor and trailers with parking brake Turn off tractor engine Ensure that unauthorised persons do not have access to th...

Page 75: ...e Suspension should be blocked using hydraulic ram cylinders Connecting the load box should be carried out on flat even and level ground If the trailer or load box is tilted sideways or is not positioned in the trailer s axis of symmetry while pulling in the load box stop connecting and take the load box off the trailer In order to pull the load box onto the trailer carry out the following actions...

Page 76: ...sition in which it is possible to hook the load box figure 4 3 IMPORTANT Pulling the load box onto the trailer should be carried out on flat even and level ground While connecting load box arrange it in such a way that the longitudinal axis of the trailer is aligned with the longitudinal axis of the load box If not the load box longitudinal members of the frame may not fit on the trailer rollers l...

Page 77: ...the load box in this way When the front of the load box is located above the rollers restart retracting the central frame When the central frame is retracted to its original position move the hook frame maximally forward Set the trailer to tipper function Correct setting of the trailer will be indicated by the indicator light located next to the tipper symbol In this function raising active hook f...

Page 78: ...icular care and with the assistance of a person standing to the side of the trailer who is able to observe the connection stage FIGURE 4 5 Pulling the load box on the trailer stage 3 DANGER When pulling in the load box onto the trailer the drawbar shaft and tractor hitch are subjected to great load Other persons must NOT be in the immediate vicinity of the trailer and especially behind the connect...

Page 79: ...rlock will be unlocked Shift the hook frame maximally to the rear Tilt the central frame to the rear While removing the load box from the trailer pay attention to ensure that the load box longitudinal members are not jammed by the trailer s guide rollers If the longitudinal members are jammed stop tilting the central frame and move the hook frame forward and raise the front of the load box in this...

Page 80: ... walls are properly closed and secured The trailer must be positioned to travel forwards and be hitched to the tractor Loading should only take place when trailer is placed on flat level surface and hitched to tractor Distribute load evenly in the load box using suitable tools crane loader conveyor etc depending on type of load Loading should be carried out by a person experienced in this type of ...

Page 81: ... fresh manure compost dry peat 700 800 800 900 700 750 950 1 100 500 600 Mineral fertilisers ammonium sulphate potash salt super phosphate basic slag phosphate potassium sulphate kainite milled lime fertiliser 800 850 1 100 1 200 850 1 440 2 000 2 300 1 200 1 300 1 050 1 440 1 250 1 300 Building materials cement dry sand wet sand solid bricks hollow bricks stones soft wood hard sawn timber impregn...

Page 82: ... on gathering trailer dry stored clover cut dry stored clover dry straw in round bales damp straw in round bales cut damp straw in bulk trailer cut dry straw in bulk trailer cut dry straw in gathering trailer cut dry straw in stack baled straw lightly crushed baled straw heavily crushed cut cereal mass in bulk trailer cut cereal mass in gathering trailer green fodder in swath cut green fodder in b...

Page 83: ...ssed sugar beet pulp dry sugar beet pulp bran bone meal pasture salt 1 molasses silage pit silo hay silage tower silo 200 225 880 1 000 170 185 450 650 1 100 1 300 380 410 830 1 000 750 800 350 400 320 600 700 1 000 1 100 1 200 1 350 1 450 650 1 050 550 750 Seeds and grains beans mustard peas lentils runner beans barley clover grass maize wheat oil seed rape linseed lupins 750 850 600 700 650 750 ...

Page 84: ...d traffic and cause damage to the machine Individual types of load boxes are adapted to carrying various groups of materials therefore the user is obligated to carefully read the load box operator s manual and comply with its recommendations Light materials with a large volume hay round or rectangular bales straw green fodder etc maybe loaded even above the edge of the load box paying particular a...

Page 85: ...imum carrying capacity must not be exceeded as this can damage the trailer and pose a risk to the operator or other road users Permissible design speed and maximum speed allowed by road traffic law must not be exceeded The towing speed should be adapted to the current road conditions load carried by the trailer road surface conditions and other relevant conditions Trailer may be towed on slopes of...

Page 86: ...n the slope or the slope collapsing Speed must be sufficiently reduced before making a turn or driving on an uneven road or a slope When driving avoid sharp turns especially on slopes When trailer is towed with load box or without load box hydraulic cylinder suspension blocks must be completely raised Please note that the braking distance of the tractor and slurry tanker combination is substantial...

Page 87: ...iler will be indicated by the indicator light located next to the tipper symbol In this function raising active hook frame not active load box interlock will be locked Raise the tipping frame together with the load box If in the initial stage the tipping frame can not raise the load box do the following lower the tipping frame completely set the trailer to hook trailer function Correct setting of ...

Page 88: ...e that during unloading nobody is near tipped load box or load material pouring out 4 9 PROPER USE AND MAINTENANCE OF TYRES When working on the tyres chocks or other objects without sharp edges should be placed under the wheels of the trailer to prevent it from rolling Wheels can be taken off the trailer axle only when the trailer is not loaded Repair work on the wheels or tyres should be carried ...

Page 89: ...utes rest for cooling tyres after driving 75 km or after 150 minutes continuous travel depending on which occurs first Avoid potholes sudden manoeuvres or high speeds when turning 4 10 USING UNDER RUN PROTECTIVE DEVICES Two pairs of hinged tiltable under run protective devices can be installed as trailer additional equipment The under run protective devices fulfil a very important role in road saf...

Page 90: ...ce Lower the under run protective device and press until the bracket pin 3 locks into the latch Secure the under run protective device with pins DANGER Do NOT move off or drive when under run protective device is raised Before driving make sure that under run protective devices are lowered and locked in the lower position Unless necessary do not leave the under run protective device in the raised ...

Page 91: ...SECTION 5 MAINTENANCE ...

Page 92: ... other actions which are not regarded as possible for the trailer operator to perform the user shall invalidate the warranty 5 2 SERVICING WHEEL AXLE 5 2 1 PRELIMINARY INFORMATION Work connected with the repair change or regeneration of axle components should be entrusted to specialist establishments having the appropriate technology and qualifications for this type of work The responsibilities of...

Page 93: ... must be placed to drive forward Place securing chocks under one trailer wheel Ensure that trailer shall not move during inspection Raise wheel opposite to the side where chocks are placed Lifting jack should be placed as close as possible to the place where the leaf spring is mounted on the axle Lifting jack must be suited to weight of trailer Check wheel axle bearings looseness Turning the wheel...

Page 94: ...f hub cover causes penetration of contamination and dampness to hub which causes significantly faster wear of bearing and hub seals Bearing life is dependent on working conditions of trailer loading speed of travel and lubrication conditions Check condition of hub cover if necessary replace with new cover Inspection of bearing looseness may only be conducted when the trailer without load and load ...

Page 95: ...1 Take out split cotter pin 3 securing castellated nut 2 Tighten castellated nut in order to eliminate looseness Wheel should rotate with insignificant resistance Unscrew nut in A direction not less than1 3 rotation to cover the nearest thread groove with alignment to opening in wheel stub axle B Wheel should rotate with insignificant resistance Nut may not be excessively tightened Do not apply ex...

Page 96: ...intensive work check the nut tightening at least every 10 000 km The above actions should be repeated individually if a wheel has been removed from the wheel axle Dismounting wheel Immobilise trailer with parking brake Place chocks under wheel that will not be dismounted Ensure that trailer shall not move during wheel dismounting Loosen wheel nuts according to sequence given in figure 5 2 Place li...

Page 97: ...g 1 10 sequence of nut tightening L spanner length F user weight Tightening nuts Nuts should be tightened gradually diagonally in several stages until obtaining the required tightening torque using a torque spanner If a torque spanner is not available one may use an ordinary spanner The arm of the spanner L Figure 5 2 should be selected according to the weight of the person F tightening the nut Re...

Page 98: ...AIR PRESSURE EVALUATE TECHNICAL CONDITION OF WHEELS AND TYRES Tyre pressure should be checked each time after changing spare wheel and not less than every month In the event of intensive use it is recommended to check air pressure more frequently During this time trailer must be unloaded Checking should be done before travelling when tyres are not heated or after an extended period of parking TIP ...

Page 99: ...every 1 month of use every week during intensive work after changing spare wheel 5 2 6 CHECKING THICKNESS OF BRAKE SHOE LININGS During use of trailer friction lining of brake drums is subject to wear In such a case the complete brake shoes should be replaced with new ones Excessive wear of brake shoes is the condition in which the thickness of linings which are glued or riveted to steel structures...

Page 100: ...nder piston stroke should be between 25 45 mm Braking force decreases also when the operating angle of the brake cylinder piston 5 in relation to the expander arm 1 is wrong figure 5 4 In order to obtain the optimum mechanical operating angle the cylinder piston fork 6 must be installed on the expander arm 1 in such a manner as to ensure that the operating angle at full braking is about 90 IMPORTA...

Page 101: ...er fork 7 fork pin During braking the brake cylinder piston stroke should be within the specified operating range and the angle between brake cylinder piston 1 and expander arm 3 should be about 90º figure 5 5 TAB 5 2 Operating data of pneumatic cylinder NOMINAL STROKE OF CYLINDER L mm MINIMUM STROKE OF CYLINDER LMIN mm MAXIMUM STROKE OF CYLINDER LMAX mm 75 25 45 ...

Page 102: ...eds the maximum value 45 mm the braking system should be adjusted FIG 5 5 Principle of brake system adjustment 1 brake cylinder piston 2 brake cylinder membrane 3 expander arm 4 adjustment bolt 5 cylinder fork 6 position of fork pin 7 brake cylinder bracket A mark on the brake cylinder at brake release position B mark on the brake cylinder at full braking position C position of arm at brake releas...

Page 103: ... adjust the expander arm Dismantle brake cylinder fork pin Remember or mark the original position of pin 6 figure 5 5 brake cylinder fork 5 in expander arm opening 3 Check if the brake cylinder piston moves freely and within the whole nominal range Check if the brake cylinder vent holes are not blocked with impurities and that there is no water or ice inside the brake cylinder Check if the brake c...

Page 104: ...neven trailer wheel braking IMPORTANT The positions for fixing the brake cylinder in the bracket openings and the brake cylinder pin in the expander arm are determined by the Manufacturer and must not be changed Each time when dismantling the pin or brake cylinder the original fixing position should be marked 5 2 8 CHANGE OF PARKING BRAKE CABLE AND ADJUSTMENT OF CABLE TENSION Proper operation of t...

Page 105: ...anism 2 wheel axle 3 handbrake cable I l 900mm 4 handbrake cable II l 2900 5 cable roller 6 shackle 7 U bolt clamp 8 U bolt clampnuts Replacing the parking brake cable Hitch trailer to tractor Park trailer and tractor on level surface Place wheel chocks under trailer wheel Fully unscrew the bolt of the brake crank mechanism 1 Loosen nuts 8 of U bolt clamps 7 located at the ends of cable to be repl...

Page 106: ...lamps may not be less than 40 mm Clamp jaws must be placed at the load bearing cable side see Figure 5 7 The first clamp should be placed directly on the thimble Install bolts and new securing cotter pins Adjust tension of parking brake cables After first loading of the brake check tension of brake cable If necessary correct the tension FIG 5 7 Installing brake cable clamps Adjustment of parking b...

Page 107: ...FORMATION Work connected with the repair change or regeneration of system components brake cylinders lines control valve braking force regulator etc should be entrusted to specialist establishments having the appropriate technology and qualifications for this type of work The duties of the operator connected with the pneumatic system include inspecting and checking air tightness of system cleaning...

Page 108: ...ll reach places of damage on the exterior with a characteristic hiss Lack of system tightness may be exposed by covering checked elements with washing fluid or other foaming preparations which will not react aggressively with system components It is recommended to supply preparations commercially available designed to facilitate discovering air leaks Damaged components should be replaced or repair...

Page 109: ... may only be performed in a specialised workshop 5 3 3 CLEANING THE AIR FILTERS Depending on trailer working conditions but not less than once in three months take out and clean air filter inserts which are located in pneumatic system connection lines Inserts are used many times and are not subject to changing unless they are mechanically damaged DANGER Before proceeding to dismantle filter reduce...

Page 110: ...f the pneumatic connection to resistance point Remove securing slide 1 figure 5 8 Hold the filter cover 2 with the other hand After removing slide lock the cover is pushed off by the spring in the filter housing The insert and the filter body should be carefully washed with water and blown through with compressed air Assembly should be done in reverse order Cleaning the air filter filters every 3 ...

Page 111: ...brackets of right longitudinal frame of lower frame The compressed air in the tank causes the removal of water to the exterior After release valve stem should automatically close and stop airflow from tank In the event that the valve stem resists returning to its setting then the whole drain valve must be unscrewed and cleaned or replaced if it is damaged see section 5 3 5 Draining water from air ...

Page 112: ... tank tightness Cleaning valve every 12 months before winter period 5 3 6 CLEANING AND MAINTAINING PNEUMATIC LINE CONNECTIONS AND PNEUMATIC SOCKETS DANGER Unreliable and dirty trailer connections may cause unreliability and faulty functioning of braking system Damaged connection body or connection socket to second trailer should be replaced In the event of damage to cover 2 or seal 1 figure 5 10 r...

Page 113: ...h special preparations e g silicon grease for rubber elements Each time before connection of the machine inspect technical condition and cleanness of contacts and sockets in tractor If necessary clean or repair tractor socket FIG 5 10 Pneumatic conduits connection 1 rubber seal 2 security cover Inspect trailer connections connection should be inspected every time before connecting trailer to tract...

Page 114: ...ydraulic brake system is unreliable 5 4 2 CHECKING HYDRAULIC SYSTEM TIGHTNESS Required service actions Hitch trailer to tractor Connect all hydraulic system lines according to service instructions Clean connectors and cylinders raising cylinder suspension cylinder supports etc Actuate hydraulic cylinders several times and hold them in the position of maximum extension for about 30 seconds Press tr...

Page 115: ...ion and kept clean Each time before connecting check if socket in tractor or connection of second trailer are maintained in good working condition Tractor and trailer hydraulic systems are sensitive to the presence of permanent contamination which may cause damage to precision system components contamination may cause scratching of hydraulic valves abrasion of piston surfaces etc Inspection of hyd...

Page 116: ...liable lighting system Damaged lamp lenses and burned out bulbs must be replaced immediately before travelling Lost or damaged reflective lights must be replaced Required service actions Hitch trailer to tractor with appropriate connection lead Check if the connection lead is reliable Check connection sockets in tractor and trailer Check completeness and technical condition of trailer lights Check...

Page 117: ...bly WE 549L R10W 1 unit P21W 2 units 1 Rear right lamp assembly WE 549P R10W 1 unit P21W 2 units 1 Licence plate illumination light LT 120 C5W SV8 5 1 unit 2 Front rear clearance lamp and side left parking light W21 9L LED 0 4W 12V 0 8W 24V 1 Front rear clearance lamp and side right parking light W21 9P LED 0 4W 12V 0 8W 24V 1 Front clearance lamp W24 LED 0 4W 12V 0 8W 24V 2 Side parking light W17...

Page 118: ...ropriate moment FIG 5 11 Hook setting adjustment 1 hook 2 bolt connection 5 7 ADJUSTING LIMIT VALVES AND LIMIT SWITCHES Limit valves enable closing the oil flow in the hydraulic system normally closed valve The valve opens the oil flow when the slide is pushed Limit valves 1 figure 5 12 should be regulated by means of adjustment bolts 2 of bumper 3 When the main brake cylinder piston 4 is maximall...

Page 119: ...nd clips in such a manner as to prevent damage to the wiring harness Activation of limit switches 12 13 of switching cylinder 14 should be adjusted by means of bolts 15 Right limit switch 13 must be pressed when the trailer is set to hook trailer position in this position appropriate light located on the indicator plate must be switched on figure 3 3 Left limit switch 12 must be pressed when the t...

Page 120: ...witches 1 limit valve 2 adjustment bolt 3 bumper 4 raising cylinder 5 suspension cylinder 6 load box interlock cylinder 7 counternut 8 limit switch 9 bolt 10 interlock slide 11 counternut 12 left limit switch 13 right limit switch 14 switching cylinder 15 bolt 16 counternut ...

Page 121: ...antle the entire hub remove the bearing and individual sealing rings After careful washing and inspection mount lubricated elements If necessary bearing and seals should be replaced with new parts Lubrication of axle bearings shall be performed at least once in 2 years or every 50 000 km In the event of intensive use lubrication should be performed more frequently Empty grease or oil containers sh...

Page 122: ...he main cylinder and hook frame cylinder 4 B 1M 4 Hook lock pin 1 A 2M 5 Parking brake mechanism 1 A 6M 6 Central frame rotation sleeve 2 B 3M 7 Leaf spring absorber sliding surface 4 B 6M 8 Leaf springs 4 C 6M 9 Hook frame slide sleeve 2 B 3M 10 Tipping frame rotation sleeve 2 B 3M 11 Guide roller slide sleeve 4 B 2M 12 Frame lock sleeve 2 A 2M 13 Lock slide 1 A 2M 14 Expander shaft sleeve 8 A 3M...

Page 123: ...SE FREQUENCY 15 Expander arm 4 A 3M 16 Pin of turn cylinder fixing 2 B 1M 17 Connection pin 2 A 3M 18 Stub axle pin 4 B 3M 19 Side slide 4 A 3M 20 Pin of the load box interlock cylinder 2 A 3M 21 Parking brake guide roller pins 1 4 A 6M Lubrication periods M months D days 1 not shown in figure ...

Page 124: ...Pronar T285 1 SECTION 5 5 34 FIG 5 13 Trailer s lubrication points part 1 ...

Page 125: ...SECTION 5 Pronar T285 1 5 35 FIG 5 14 Trailer s lubrication points part 2 ...

Page 126: ...h the system with the appropriate preparation then comply with these recommendations Attention should be given so that chemical substances used for this purpose do not damage the materials of the hydraulic system During normal trailer use change of hydraulic oil is not necessary but if required this operation should be entrusted to a specialist service point Because of its composition the oil appl...

Page 127: ...fety data sheet should be kept together with grease 5 10 CLEANING TRAILER Trailer should be cleaned depending on requirements and before longer idle periods e g before winter period Before using pressure washer the user is obliged to acquaint himself with the operating principles and recommendations concerning safe use of this equipment Trailer cleaning guidelines To clean trailer only use clean r...

Page 128: ...iate protective clothing and goggles protecting against splashing Washing detergent should be kept in original containers optionally in replacement containers but very clearly marked Preparations may not be stored in food and drink containers Care for the cleanness of elastic lines and seals The plastic from which these elements are made may be susceptible to organic substances and some detergents...

Page 129: ...res should be carefully washed and dried During longer storage of unused trailer it is recommended that every 2 to 3 weeks the machine may be moved a bit so that the place of contact of tyres with ground is changed The tyres will not be deformed and maintain proper geometry Also tyre pressure should be inspected from time to time and if necessary pressure should be increased to appropriate value 5...

Page 130: ... M14 100 135 200 M16 160 210 310 M20 300 425 610 M24 530 730 1 050 M27 820 1 150 1 650 M30 1 050 1 450 2 100 1 resistance class according to DIN ISO 898 standard TIP Hydraulic lines should be tightened with torque of 50 70 Nm FIG 5 15 Bolt with metric thread 1 resistance class d thread diameter ...

Page 131: ...rawbar 3 rotating drawbar eye 4 fixed drawbar eye 5 bolt connection Extent of activity Immobilise trailer with parking brake Place wheel chocks under trailer wheels Unscrew drawbar eye from the drawbar s faceplate 1 Set drawbar eye in new position and tighten with appropriate torque The faceplate 1 design allows 3 possible drawbar eye positions every 72 mm compare figure 5 16 Check degree of drawb...

Page 132: ...ng Noise in axle hubs Damaged hub parts Replace Poor reliability of braking system Insufficient pressure in system Check pressure on tractor pressure gauge wait till compressor fills tank to required pressure Damaged air compressor in tractor Repair or replace Damaged brake valve in tractor Repair or replace Leaking system lines or connections Check system for tightness Incorrect main or parking b...

Page 133: ...erly tightened If necessary replace or tighten Brake system hydraulic lines not connected Connect lines Incorrect placing of line leads in tractor hydraulic system sockets Check connections if necessary correct Damaged hydraulic quick couplers Replace Insufficient quantity of hydraulic oil in tractor s hydraulic system Use tractor having hydraulic oil capacity output according to oil requirements ...

Page 134: ...Pronar T285 1 SECTION 5 5 44 ...

Page 135: ...NOTES ...

Page 136: ......

Reviews: