F
J
K
L
M
N
G
H
I
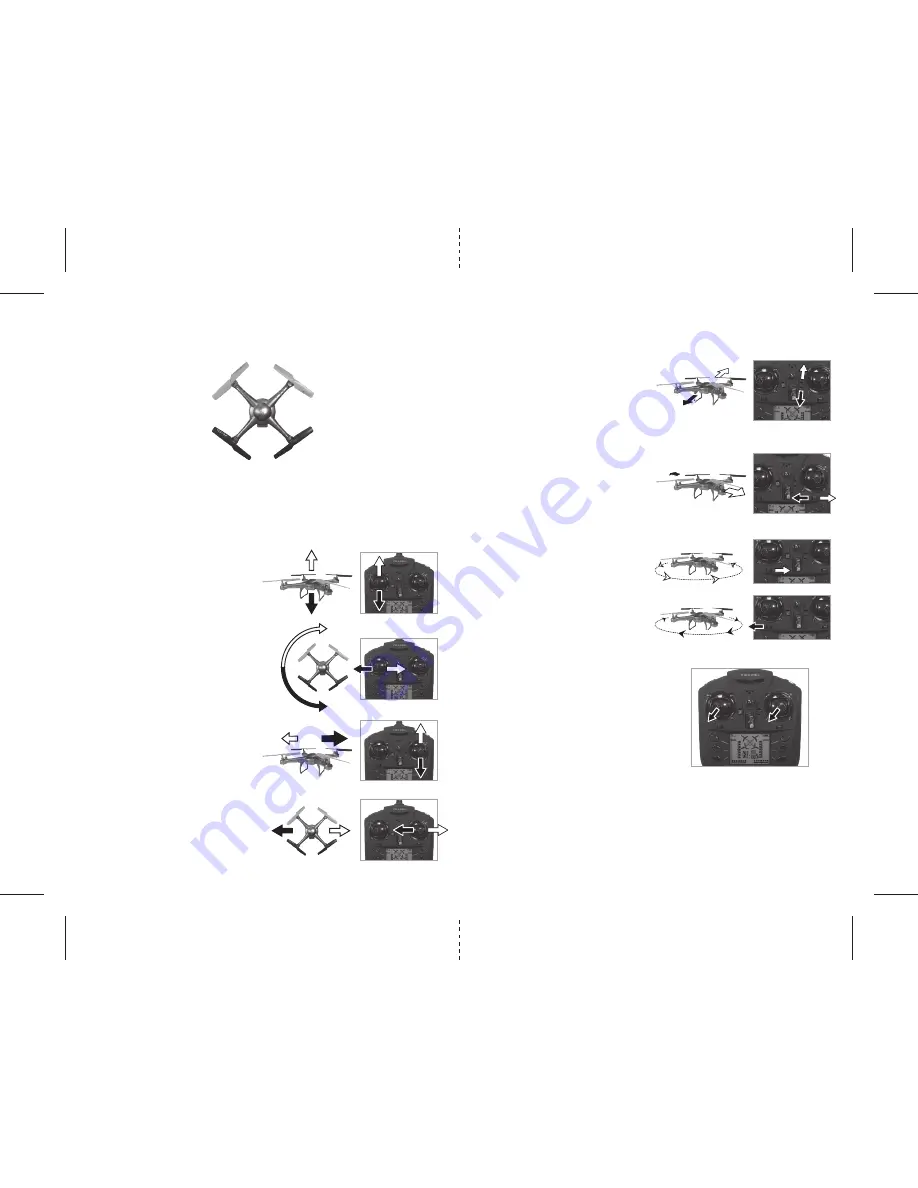
FRONT
E
FRONT
REAR
5
6
Forward/Backward Trim
• If your Cloud Rider™ drifts forward, push and
release the BACKWARD TRIM button back
repeatedly until the motion stops and proper
flight is maintained (see diagram J).
• If your Cloud Rider™ drifts backwards, push and
release the FORWARD TRIM button forward in
the same manner until the problem is resolved.
Right/Left Trim
• If your Cloud Rider™ drifts left, push and release
the RIGHT TRIM button back repeatedly until
the motion stops and proper flight is
maintained (see diagram K).
• If your Cloud Rider™ drifts right, push and release
the LEFT TRIM button in the same manner until
the problem is resolved.
Right/Left Spin Trim
• If your Cloud Rider™ spins left, push and release
the RIGHT SPIN TRIM button back repeatedly
until the motion stops and proper flight is
maintained (see diagram L).
• If your Cloud Rider™ spins right, push and release
the LEFT SPIN TRIM button in the same manner
until the problem is resolved (see diagram M).
LEVEL SURFACE CALIBRATION
If the aircraft becomes unstable during the
course of flying, you may need to re stabilize the
internal gyros.
To do this, Turn Off the controller and disconnect
the Drone battery. Place the Cloud Rider on a flat
level surface. Follow the steps to sync your Cloud
Rider (page 4). Now, pull both the joysticks
downwards and towards the left at the same
time(see diagram N). The lights on the drone will
flash a bit and then remain solid. This indicates
that your drone has been calibrated.
FLYING ENVIRONMENT
The Cloud Rider™ is designed for outdoor use only. When flying, do so in warm sunny weather with no wind
or rain.
WARNING:
Do not fly in extreme temperatures or windy conditions as this may affect the performance of
your Cloud Rider™ and cause damage or injury.
4 CHANNEL FLIGHT CONTROL
Below is a list of basic flight functions for your long-range remote control Cloud Rider™. While learning
to fly your Cloud Rider™ it is best to start with a large space until you get used to the basic controls. As
you master flying your Cloud Rider™ you can move to more advanced maneuvering techniques. Practice
makes perfect! When you have these basic steps down you can move to the next level.
Move the left Throttle stick up to increase the
speed and the Cloud Rider™ will accelerate
and ascend.
Move the left Throttle stick down to decrease the
speed and the Cloud Rider™ will decelerate and
descend (see diagram F).
Move the left Throttle stick left and the
Cloud Rider™ will rotate left.
Move the left Throttle stick right and the
Cloud Rider™ will rotate right (see diagram G).
Move the right Direction Stick up while in flight
and the Cloud Rider™ will move forward.
Move the right Direction Control down while in
flight and the Cloud Rider™ will move backward
(see diagram H).
Move the right Direction Control left and the
Cloud Rider™ will bank to the left.
Move the right Direction Control right and the
Cloud Rider™ will bank to the right (see diagram I).
RECOGNIZING THE FRONT & BACK OF THE CLOUD RIDER™
Even though the Cloud Rider™ has four rotors there is still a front or "forward" facing direction and "back"
or backwards facing direction. The front of the Quadrocopter displays GREEN LED lights and the back of the
Quadrocopter displays RED LED lights when activated (see diagram E).
ADJUSTING TRIM
From time to time you may have to adjust the TRIM buttons to ensure theCloud Rider™ will hover in
mid-air and respond accurately to your commands (make all trim adjustments while the drone is in air).


