background image

V1.0 

4,500 LB 12V DC UTV WINCH 

8798175 

Visit www.princessauto.com for more information 

1. 

Use the correct tool for the job. This tool was designed for a 

specific function. Do not modify or alter this tool or use it for an 

unintended purpose. 
1.1  Only use accessories designed for this type of winch and/or 

cable. Other types of accessories may be incompatible or 

incapable of tolerating the stress while under load. 

2.  Do not use the tool if any parts are damaged, broken or misplaced. 

Repair or replace the parts. 
2.1  A cut strand requires immediate cable replacement. 

3.  All users must understand the operation of all controls and learn 

how to stop the winch quickly in case of emergency. 

4.  Keep hands clear of the winch and cable when spooling the line 

in or out. Hold the cable by the strap. Fingers caught in the hook 

or fairlead may be pulled into the mechanism and crushed. 

5.  Make sure the winch is fixed to a solid part of the vehicle’s structure 

that can withstand the towing capacity. 

6.  Never fully extend the cable while under load. Always leave on 

full layer on the drum.


7.  Do not exceed the winch load capacity. 

7.1  Do not use the winch if damaged or it was subjected to a 

dynamic shock load. Have the winch inspected and repaired 

by a qualified service technician. 

8.  Always use proper couplings when connecting the winch cable 

hook, sling, eyebolt or other accessory to the load. Never 

connect the hook back to the cable. This causes cable damage. 

Always use a sling or chain of suitable strength.  

9.  Do not use inappropriate attachments to extend the length of 

the winch cable. 

10.  Do not lift items vertically. The winch was designed for horizontal 

use only.  

11.  Do not pull the cable around or over corners. 
12.  Stay well away from the winch, cable and load when under 

tension. A cable that breaks under tension can whiplash and 

inflict death or a serious injury. 
12.1  Use a winch cable dampener to absorb the cable’s energy if 

it should it break. 

Summary of Contents for 8798175

Page 1: ...V1 0 8798175 Please read and understand all instructions before use Retain this manual for future reference USER MANUAL 4 500 LB 12V DC UTV WINCH ...

Page 2: ...g Dynamic Control Type Handlebar Switch Fairlead 4 Way Roller Full Load Line Speed FPM 8 6 FPM 2 6 mpm Gear Train 3 Stage Planetary IP Rating IP 68 Dimensions L x W x H 13 x 4 1 2 x 4 1 2 in 330 x 114 x 114 mm INTRODUCTION The 4 500 lb 12VDC Electric Winch is a great choice for an ATV or off road vehicle The 1 3 HP electric motor draws less current to extend battery life The winch has an automatic...

Page 3: ...jury or death if the proper precautions are not taken WARNING This notice indicates a specific hazard or unsafe practice that could result in severe personal injury or death if the proper precautions are not taken CAUTION This notice indicates a potentially hazardous situation that may result in minor or moderate injury if proper practices are not taken NOTICE This notice indicates that a specific...

Page 4: ...ned for the work environment and tool 4 Non skid footwear is recommended to maintain footing and balance in the work environment 5 Wear steel toe footwear or steel toe caps to prevent a foot injury from falling objects PERSONAL PRECAUTIONS Control the tool personal movement and the work environment to avoid personal injury or damage to the tool 1 Do not operate any tool when tired or under the inf...

Page 5: ...shed 5 Make sure the winch is fixed to a solid part of the vehicle s structure that can withstand the towing capacity 6 Never fully extend the cable while under load Always leave on full layer on the drum 7 Do not exceed the winch load capacity 7 1 Do not use the winch if damaged or it was subjected to a dynamic shock load Have the winch inspected and repaired by a qualified service technician 8 A...

Page 6: ...anism or cable 18 Apply blocks to a vehicle while connecting and disconnecting the winch cable 19 Do not use this winch with a recovery strap ELECTRICAL SAFETY WARNING Do not touch or handle a live tool with any part of your body that is wet or damp Wet skin reduces resistance to electrical current increasing the danger of a serious or fatal shock 1 Disconnect tool from power source before cleanin...

Page 7: ...ame or a tool like a heater from the area Sparks may also ignite the gas 2 Lead batteries contain sulfuric acid also referred to as electrolyte or battery acid The acid is corrosive and can cause a skin burn if leaking or splashed The acid may also pose a threat if inhaled or ingested accidentally The acid can destroy normal clothing and injure the flesh underneath Wear splash proof goggles and pr...

Page 8: ...for damage Make sure that all items in the parts list are included ASSEMBLY INSTALLATION Numbered references in parenthesis 1 refer to the included Parts List Letter references in parenthesis A refer to the included Identification Key MOUNTING THE WINCH The winch may be mounted in one of two ways as a single unit using the mounting plate to connect the fairlead to the unit or directly to the frame...

Page 9: ...truding bolts into the pre drilled holes in the mounting location Slide a 3 18 in washer 15 and 5 16 in lock washer 13 over the bolts and tighten to 12 ft lb torque 9 Position the fairlead 10 over the mounting plate s exterior flange and align the bolt holes 9 1 Mount the fairlead if separate to the opening in the structure such as a fender Use the fairlead as a template to mark the two bolt holes...

Page 10: ...Hand tighten the bottom screw 3 1 You may need to apply a strip of tape to the handle bar to prevent the bracket from rotating once it is tightened 4 Remove the mount arm screw Align the mount arm bolt hole with the handle bar switch 8 flange bolt hole Reinsert the screw through both the flange and the arm screw Slide the washer 21 lock washer 20 and nut onto the bolt and hand tighten the screw 5 ...

Page 11: ...cess point Install a rubber grommet or similar device to protect the wires WARNING Do not touch the solenoid terminals or allow a tool to tough them when connected to the battery as this may cause a short circuit resulting in electrocution 1 Mount the solenoid near the winch Check that the blue 37 and yellow 36 wires will reach from the solenoid to the winch through the vehicle s structure 1 1 The...

Page 12: ... 4 1 solenoid connector and the center small solenoid Slide the wire boot aside to make the connection 3 Attach the green Fig 4 3 wire to the left most small solenoid connector 4 The switch connector ends Fig 4 7 are inserted to the solenoid connector ends Fig 4 8 Match both green wires Fig 4 3 and 4 5 and both black wires Fig 4 4 and 4 6 when making the connection 5 The red wire Fig 4 10 connects...

Page 13: ...ity After using the winch for 45 seconds the winch must rest for 14 minutes and 15 seconds Exceeding this may damage the winch mechanism or cause it to overheat and trip the circuit breaker Many things affect the winch duty cycle When the winch s electric motor is too hot to touch with a bare hand allow the winch to rest until the surface temperature drops low enough to touch with a bare hand OPER...

Page 14: ...he way to the rear The word ENGAGED will be at the top of the clutch knob 7 Check that the line is straight without kinks or twisted Do not wrap the cable around the load or wind it around corners or obstacles 7 1 Place a chafe guard around the cable in a location where contact with an abrasive surface is unavoidable 8 Place a dampening device on the cable if you have one available 9 Press and hol...

Page 15: ...minished with each additional layer of cable around the winch s drum Table 1 shows the maximum amount of weight it can pull and the length of cable remaining on the drum Whenever possible remove as much cable off the winch to pull with the maximum power Keep five wraps of cable on the drum at all times to prevent the cable from slipping off Use a snatch block to move a heavier load that is close t...

Page 16: ...Follow instructions for lubricating and changing accessories 4 Only use accessories intended for use with this tool 5 Keep the tool handles clean dry and free from oil grease at all times 6 Maintain the tool s labels and name plates These carry important information If unreadable or missing contact Princess Auto Ltd for replacements WARNING Only qualified service personnel should repair the tool A...

Page 17: ...cess lubrication once the task is complete STORAGE When not in use for an extended period apply a thin coat of lubricant to the steel parts to avoid rust Remove the lubricant before using the tool again Do not apply lubricant to the cable when storing It has different lubrication requirements see Cleaning Cable Cleaning DISPOSAL Contact your local municipality for a list of disposal facilities or ...

Page 18: ...voltage is present replace motor 4 Have technician service winch 5 Replace remote battery 6 Tighten nuts on all cable connections 7 Fully charge battery The engine is running but the cable reel is not running L embrayage n est pas enclenché Move the clutch knob to the engaged position If the problem persists a qualified technician will have to check and repair Motor runs slowly or without normal p...

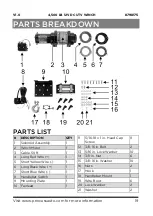
Page 19: ... Motor 1 3 Cable 50 ft 1 4 Long Red Wire 1 5 Short Yellow Wire 1 6 Long Black Wire 1 7 Short Blue Wire 1 8 Handlebar Switch 1 9 Mounting Plate 1 10 Fairlead 1 11 5 16 18 x 1 in Head Cap Screw 8 12 3 8 16 in Bolt 2 13 5 16 in Lock Washer 10 14 3 8 in Nut 6 15 3 8 16 in Washer 10 16 Nuts 2 17 Hook 1 18 Handlebar Mount 1 19 Wire Boot 6 20 Lock Washer 2 21 Washer 2 ...

Page 20: ...8798175 4 500 LB 12V DC UTV WINCH V1 0 20 For technical questions call 1 800 665 8685 ...

Page 21: ...V1 0 4 500 LB 12V DC UTV WINCH 8798175 Visit www princessauto com for more information 21 ...

Page 22: ...8798175 4 500 LB 12V DC UTV WINCH V1 0 22 For technical questions call 1 800 665 8685 ...

Page 23: ... 8798175 Vous devez lire et comprendre toutes les instructions avant d utiliser l appareil Conservez ce manuel afin de pouvoir le consulter plus tard MANUEL D UTILISATEUR TREUIL DE 12 V C C POUR VUT 4 500 LB ...

Page 24: ... Diamètre 3 16 po Longueur 50 pi Matériau Câble métallique Type de moteur Aimant permanent Puissance nominale en CV 1 3 CV Rapport d engrenage 166 1 Embrayage Bobinage libre à commande par came Freinage Dynamique Type de commande Interrupteur de guidon Guide câble Rouleau à 4 positions Vitesse linéaire à la charge maximale pi min 8 6 m min 2 6 pi min Train d engrenage Planétaire à 3 plateaux Indic...

Page 25: ...qui contient les avertissements de sécurité les précautions les instructions de fonctionnement ou d inspection et d entretien DÉFINITIONS DE DANGER Veuillez vous familiariser avec les avis de danger qui sont présentés dans ce manuel Un avis est une alerte indiquant qu il existe un risque de dommage à la propriété de blessure ou de décès si on ne respecte pas certaines instructions DANGER Cet avis ...

Page 26: ...canadienne de normalisation CSA ou l American National Standards Institute ANSI ÉQUIPEMENT DE PROTECTION PERSONNELLE 1 Portez toujours des lunettes antiprojections qui offrent une protection frontale et latérale pour les yeux L équipement de protection des yeux devrait être conforme à la norme CSA Z94 3 07 ou ANSI Z87 1 fonction du type de travail effectué 2 Portez des gants qui protègent en fonct...

Page 27: ... vous pouvez subir des blessures corporelles graves 1 Utilisez le bon outil pour la tâche à effectuer Cet outil a été conçu pour une utilisation spécifique Évitez de modifier ou d altérer cet outil ou de l utiliser à une fin autre que celle pour laquelle il a été conçu 1 1 Utilisez seulement des accessoires conçus pour ce type de treuil ou de câble Les autres types d accessoires peuvent ne pas êtr...

Page 28: ...ssoires inappropriés pour augmenter la longueur du câble du treuil 10 Ne levez pas des articles à la verticale Le treuil a été conçu pour lever à l horizontale seulement 11 Ne tirez pas le câble autour des coins ou sur ces derniers 12 Demeurez à une bonne distance du treuil du câble et de la charge lorsque le câble est sous tension Un câble sous tension qui se rompt peut fouetter et provoquer la m...

Page 29: ...que de choc grave ou mortel 1 Déconnectez l outil de la source d énergie avant le nettoyage l entretien le remplacement de pièces ou d accessoires ou lorsqu il n est pas utilisé 2 Protégez vous contre les chocs électriques lorsque vous travaillez en présence d équipement électrique Évitez le contact entre votre corps et les surfaces reliées à la terre Il y a un risque plus élevé de choc électrique...

Page 30: ... Des étincelles suffisent également à enflammer le gaz 2 Les batteries d accumulateurs au plomb contiennent de l acide sulfurique qu on appelle également électrolyte L acide est corrosif et peut brûler la peau en cas de fuite ou d éclaboussure L acide peut également constituer une menace s il est inhalé ou ingéré accidentellement L acide peut détruire les vêtements habituels et blesser la peau qui...

Page 31: ...iles 3 2 Disposez les fils de connexion de façon qu il ne touche pas l outil et qu ils ne risquent pas de se prendre dans la pièce à travailler Les fils de connexion doivent toujours se trouver derrière l outil DÉBALLAGE AVERTISSEMENT Ne faites pas fonctionner l outil si des pièces sont manquantes Remplacez les pièces manquantes avant l utilisation Le non respect de cet avertissement peut entraîne...

Page 32: ...r le câble d alimentation au treuil et portez des gants pour accéder aux commandes manuelles 2 Veillez à ce qu il y ait suffisamment d espace pour le treuil consultez Spécifications Dimensions et une épaisseur d au moins 3 8 po 3 Marquez les emplacements des trous de perçage à l aide de la plaque de montage n 9 comme gabarit Les trous de coin correspondent aux trous de montage des vis à l arrière ...

Page 33: ... pas complètement Insérez la deuxième vis et serrez la jusqu à ce que le guide câble soit au niveau et la rondelle frein partiellement comprimée Serrez complètement la première vis INSTALLATION DU CÂBLE 1 Tournez l embrayage fig 2 3 pour dégager l enroulement libre 2 Acheminez le câble dans le guide câble n 10 du tambour 3 Depuis le dessous du tambour enroulez le câble avec soin autour du tambour ...

Page 34: ...bride de l interrupteur de guidon n 8 Réinsérez la vis à travers la bride et la vis du bras Insérez la rondelle n 21 la rondelle frein n 20 et l écrou sur le boulon puis serrez la vis à la main 5 Alignez le trou de boulon du bras de montage restant avec les trous de boulon du support supérieur Réinsérez la vis à travers la bride et la vis du bras Insérez la rondelle n 21 la rondelle frein n 20 et ...

Page 35: ...rt circuit et poser un risque d électrocution 1 Installez le solénoïde près du treuil Vérifiez si les fils bleu no 37 et jaune no 36 pourront relier le solénoïde au treuil à travers la structure du véhicule 2 Marquez les trous pour le montage et les avant trous de perçage en vous assurant qu il n y a aucun fil ou composant qui peut subir des dommages derrière le point de fixation Fixez avec deux v...

Page 36: ...fig 4 4 et 4 6 lors du branchement 5 Le fil rouge fig 4 10 raccorde l interrupteur fig 4 9 au fil du commutateur de démarrage à clé du VUT 5 1 Dans l interrupteur du VUT identifiez le fil d alimentation et le fil de retour 5 2 Sélectionnez le fil de retour et raccordez le au fil rouge du contrôleur au moyen d une épissure De cette façon le treuil sera alimenté seulement lorsque le VUT sera mis en ...

Page 37: ...de ce délai peut endommager le mécanisme du treuil ou causer une surchauffe et un déclenchement du disjoncteur De nombreux facteurs ont une incidence sur le cycle de service du treuil Lorsque le moteur électrique du treuil est trop chaud pour être touché à mains nues laissez le treuil refroidir jusqu à ce que la température de la surface ait chuté suffisamment pour être manipulée à mains nues UTIL...

Page 38: ...lingue d extrémité est bien fixée pour prévenir un décrochage pendant le treuillage 5 1 Consultez le Manuel du propriétaire du véhicule pour repérer les points d ancrage permettant de raccorder l élingue d extrémité du câble à un autre véhicule ou à votre propre véhicule 6 Réembrayez l embrayage en tournant le bouton d embrayage complètement vers l arrière Le mot ENGAGED embrayé se trouvera sur le...

Page 39: ...intenir un peu de pression sur le treuil et enroulez le câble Assurez vous que chaque spire de fil s ajuste correctement avec l enroulement suivant Arrêtez lorsqu il restera quelques pieds Enfoncez et relâchez le bouton pour arrêter le treuil Désaccouplez l embrayage et rembobinez les dernières spires manuellement LIMITATIONS DU TREUIL Plusieurs restrictions peuvent avoir une incidence sur la duré...

Page 40: ...ouve près du treuil Cela augmentera la longueur de câble à l extérieur du guide câble et élèvera la puissance de traction du treuil à portée rapprochée CONSOMMATION D ÉNERGIE Le treuil exige une plus grande intensité de courant pour déplacer une charge plus lourde Consultez le tableau 2 pour déterminer l intensité de courant selon le poids de la charge Une moufle mobile augmente la puissance de tr...

Page 41: ...iquez avec Princess Auto Ltd pour les remplacer AVERTISSEMENT Seul un personnel d entretien qualifié doit effectuer la réparation de l outil l appareil Un outil appareil mal réparé peut présenter un risque pour l utilisateur et ou pour les autres NETTOYAGE Nettoyez les surfaces externes au moyen d un chiffon après chaque utilisation Une brosse à dents douce peut être utilisée pour atteindre les su...

Page 42: ... couche de lubrifiant sur les pièces en acier pour éviter qu elles ne rouillent Enlevez le lubrifiant avant de réutiliser l outil N appliquez pas de lubrifiant à un câble qui sera entreposé Les exigences de lubrification sont différentes consultez Nettoyage Nettoyage du câble MISE AU REBUT Recyclez votre outil endommagé dans une installation prévue à cet effet s il est impossible de le réparer Com...

Page 43: ...ez les écrous sur toutes les connexions de câble 7 Rechargez la batterie à fond Le moteur tourne mais l enrouleur de câble ne tourne pas L embrayage n est pas enclenché Déplacez le bouton d embrayage à la position embrayée Si le problème persiste un technicien qualifié devra effectuer une vérification et réparer Le moteur tourne lentement ou sans puissance normale 1 La tension ou le courant est in...

Page 44: ...r de treuil 1 3 Câble de 50 pi 1 4 Fil rouge long 1 5 Fil jaune court 1 6 Fil noir long 1 7 Fil bleu court 1 8 Interrupteur de guidon 1 9 Plaque de montage 1 10 Guide câble 1 11 Vis à tête de 5 16 18 x 1 po 8 12 Boulon 3 8 16 po 2 13 Rondelle frein 5 16 po 10 14 Écrou 3 8 po 6 15 Rondelle 3 8 16 po 10 16 Écrou 2 17 Crochet 1 18 Support de guidon 1 19 Gaine pour fils 6 20 Rondelle frein 2 21 Rondel...

Reviews: