background image

-6-

INSTALLATION

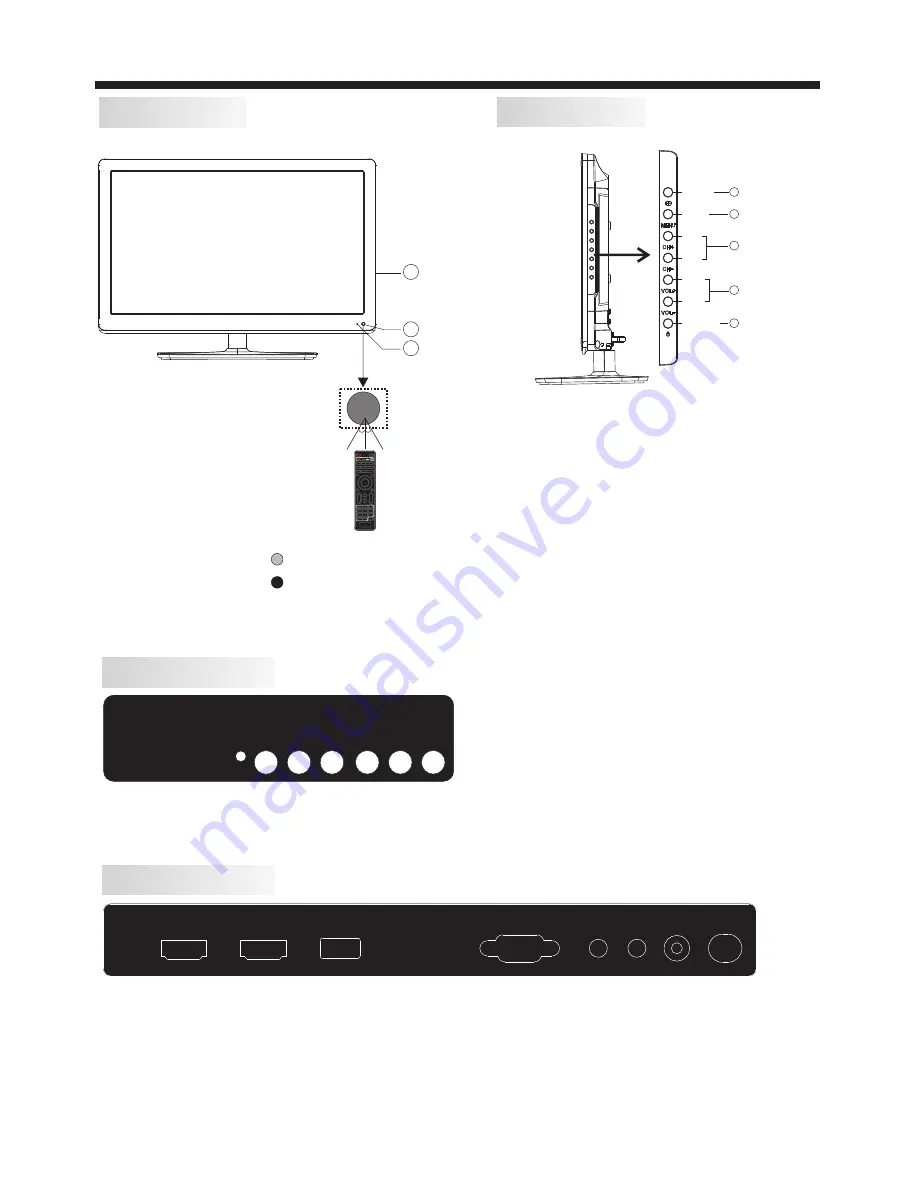
Front panel

P

anel keys


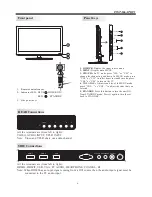
 1:    Remote control sensor.

 2:    Indicator LED:  BLUE       POWER ON.

                                     RED             STANDBY.

 3:    


Side panel keys

1.  SOURCE: 

Display  the  input  source  menu.

2.  MENU: 

Display  main  MENU.

3.  CH+/CH-: 

In TV  mode,  press  "CH+"  or  "CH-"  to 

change  the  channel  up  and  down.  In  MENU  mode,  press 
"CH+"  or  "CH-"  to  select  items  in  standby  mode,  press 
"CH+"  or  "CH-"  to  turn  on  the TV.

4. VOL+/VOL-: 

Adjust  sound  level.  In  MENU  mode, 

press  "VOL+  "  or  "VOL-  "  to  adjust  the  item  that  you 
selected.

5.  STANDBY: 

Press  this  button  to  turn  the  unit  ON  

from  STANDBY  mode.  Press  it  again  to  turn  the  set 
back  to  STANDBY.

REAR Connections

All  the  terminals  are  (from  left  to  right):
VIDEO, AUDIO  INPUT, YPbPr  INPUT 
Note:  Video  and YPbPr  share  one  audio  channel.
          

SIDE Connections

All  the  terminals  are  (from  left  to  right):
HDMI1,  HDMI2,  USB, VGA,  PC AUDIO,  HEADPHONE,  COAXIAL,  RF.
Note: When  HDMI  has  an  input  signal  coming  from  a  DVI  source  then  the  audio  input  signal  must  be 
            connected  to  the  PC  audio  input.

VGA

HEADPHONE

RF

PC AUDIO

COAXIAL

HDMI1

HDMI2

USB

R

VIDEO

L

Pr

Pb

Y

30

30

1

3

2

VOL

CH

YPbPr

CC

MTS

VGA

DTV

STRENGTH

TV

AV

HDMI

EPG

CH LIST

FAV

TV

DISPLAY

S.M

P.M

MENU

CH+

CH-

VOL+

VOL-

2

SOURCE

1

3

4

STANDBY

5

Summary of Contents for PLED1960A-E

Page 1: ...19 LED TV PLED1960A E ENERGY PERFORMANCE VERIFIED RENDEMENT ENERGETIQUE VERIFIE EP4005285 ...

Page 2: ... 1 Contents Safety and warnings 2 3 Introduction 4 Stand installation guide 5 Installation 6 9 Remote Control 10 Operation 11 13 Trouble Shooting 14 ...

Page 3: ...torms or when unused for long periods of time 13 Refer all servicing to qualified service personnel Servicing is required when the Television has been damaged in any way such as power supply cord or plug is damaged liquid has been spilled or objects have fallen into the Television the Television has been exposed to rain or moisture does not operate normally or has been dropped 14 Mains plug is use...

Page 4: ...ould pay special attention to children Serious injury may result if it falls Do not place your television on an unstable cart stand shelf or table Serious injury to an individual and damage to the television may result if it falls or When the television receiver is not used for an extended period of time it is advisable to disconnect the AC power cord from the AC outlet Avoid exposing the televisi...

Page 5: ...cture Size diagonal Power consumption Audio Output Power THD 7 YCb Pb Cr Pr Input Composite Video Input Analog RGB VGA Input 1366x768 19 inches 30W 2x3W Main parameter Integrated ATSC TV tuner for HDTV broadcast reception High brightness provides a vivid and brilliant picture High dynamic contrast ratio for deeper blacks and brighter whites Wide Screen aspect ratio 16 9 for a complete home theater...

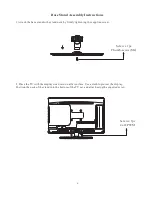
Page 6: ... by firmly tightening the supplied screw 2 Place the TV with the display side down on a flat surface Use a cloth to protect the display Position the neck of the stand into the bottom of the TV set and attach using the supplied screw Screw x 1pc 4x22PWM Screw x 1pc Thumb screw M4 ...

Page 7: ...button to turn the unit ON from STANDBY mode Press it again to turn the set back to STANDBY REAR Connections All the terminals are from left to right VIDEO AUDIO INPUT YPbPr INPUT Note Video and YPbPr share one audio channel SIDE Connections All the terminals are from left to right HDMI1 HDMI2 USB VGA PC AUDIO HEADPHONE COAXIAL RF Note When HDMI has an input signal coming from a DVI source then th...

Page 8: ...75 unbalanced 7 STEPS PC It is recommended that the TV and computer are off before making any of the connections 1 Connect the VGA and audio cable 2 Connect the power cord 3 Power on the TV switch to PC mode 4 Power on the PC VGA HEADPHONE RF PC AUDIO COAXIAL HDMI1 HDMI2 USB ...

Page 9: ... 6 7 8 9 720 400 640 480 640 480 800 600 800 600 1024 768 1024 768 1024 768 1280 1024 70 60 75 60 75 60 70 75 60 31 47 31 47 37 50 37 88 46 88 48 36 56 48 60 02 63 98 RESOLUTION V Freq Hz H Freq KHz 1360 768 60 47 7 1280 1024 75 80 00 10 11 ...

Page 10: ...can support these video formats 480i 576i 480p 576p 720p 1080i You can use the input terminals on TV set rear as follows HDMI Yellow video White audio L Red audio R or Pr Y W R W R G B R Blue Pb Green Y B G VIDEO EQUIPMENT with YPbPr W R G B R W R W R TO AUDIO OUTPUTS VIDEO EQUIPMENT TO VIDEO OUTPUTS VGA HEADPHONE RF PC AUDIO COAXIAL HDMI1 HDMI2 USB R VIDEO L Pr Pb Y ...

Page 11: ...ation Press to change the channel Press to change the picture aspect ratio Normal Wide Auto Press to display the channel list Press to display the channel guide Press to access the favorite channels list Press to directly switch to HDMI mode Press to directly switch to AV mode Press to display the digital TV signal strength Press to directly switch to TV mode Press to directly switch to Component ...

Page 12: ...es can be selected Normal Warm and Cool 2 AUDIO menu In this menu you can ajust the sound effect here Press to select press ENTER to adjust In this menu you can adjust the sleep timer time zone etc Press to select press ENTER to adjust Note 1 Time zone DST and the clock are available in ATSC programming only and the Clock can t be adjust 4 OPTION menu In this menu you can adjust the Menu language ...

Page 13: ... 1 Canada English Switching the English rating control level EXEMPT C C8 G PG 14 18 5 LOCK MENU In this menu you can change the password and adjust the vchip setting Enter the password it will go into the lock menu Factory default password is 6666 5 1 Change Password 1 Old password Input the old password 2 New password Input the new password 3 Confirm password Input the new password again 5 2 Syst...

Page 14: ...contain scenes disturbing to children under 8 who cannot distinguish between imaginary and real situations Recommended for viewing with paren 13ans Over 13 years Could contain scenes of frequent violent scenes and in tense violence 16ans Over 16 years Could contain frequent violent scenes and violence 18ans Over 18 years Only for adult viewing Could contain frequent violent scenes and extreme viol...

Page 15: ...up Press standby key on the remote control for inspecting No color Normal audio Color control Picture breaking up Normal audio or weak Retune channel No color Noise TVsystem Normal audio antenna position direction or connection TROUBLE SHOOTING Trouble phenomenon Symptom Ghost 14 The LCD TV panel is built with very high precision technology giving you fine picture details in vibrant color Occasion...

Page 16: ......

Reviews: