GENERAL OPERATIONS
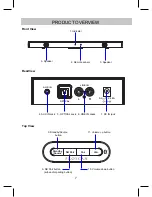
5. Press the button on remote control or press the Standby/Source button on the unit
repeatedly to switch to the desired mode. Or press the AUX, OPTICAL,
button on remote control to turn to desired mode, the indicator on front of the unit will
turn to:
Blue...........................................................................................................Bluetooth Mode
Green...........................................................................................................LINE IN Mode
Purple...................................................................................................OPTICAL IN Mode
Indigo(blue+green).......................................................................................AUX IN Mode
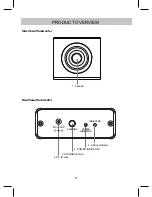
1. Connect the DC 12V, 2.0A Adapter to the DC IN jack on the Main Unit. Plug the
Adapter into the AC outlet with AC100~240V;50/60Hz. The mode indicator on Main Unit
will light up and turn RED.
2. Connect the DC 12V, 2.0A Adapter to the DC IN jack on the SUBWOOFER. Plug the
Adapter into the AC outlet with AC100~240V;50/60Hz. The power indicator on the
SUBWOOFER will light up and turn RED.
4. After a few seconds, the Main Unit will be connected with SUBWOOFER automatically,
the pairing INDICATOR on SUBWOOFER will be solid BLUE.
IMPORTANT NOTE: If the pairing INDICATOR on the SUBWOOFER is off, it means
the Main Unit is not connected with the SUBWOOFER successfully. Please operate
as the steps below:
A: Press and hold the SB Pair button on the Main Unit for 3-5 seconds.
B: Press and hold the STANDBY button on SUBWOOFER to power off, then press
the STANDBY button on SUBWOOFER to power on again, the pairing INDICATOR
on SUBWOOFER will blink several times and then turn off, it means the
SUBWOOFER is connected with Main Unit successfully.
C: Press the SB PAIR button on the Main Unit, the pairing INDICATOR on the
SUBWOOFER will be solid BLUE.
, LINE IN
11
3. Press the Standby /Source button on the Main Unit to pow er on the Main Unit.


