5099N Series User Manual
7
AC & DC dual power input version
5099N-DA/2W/SER
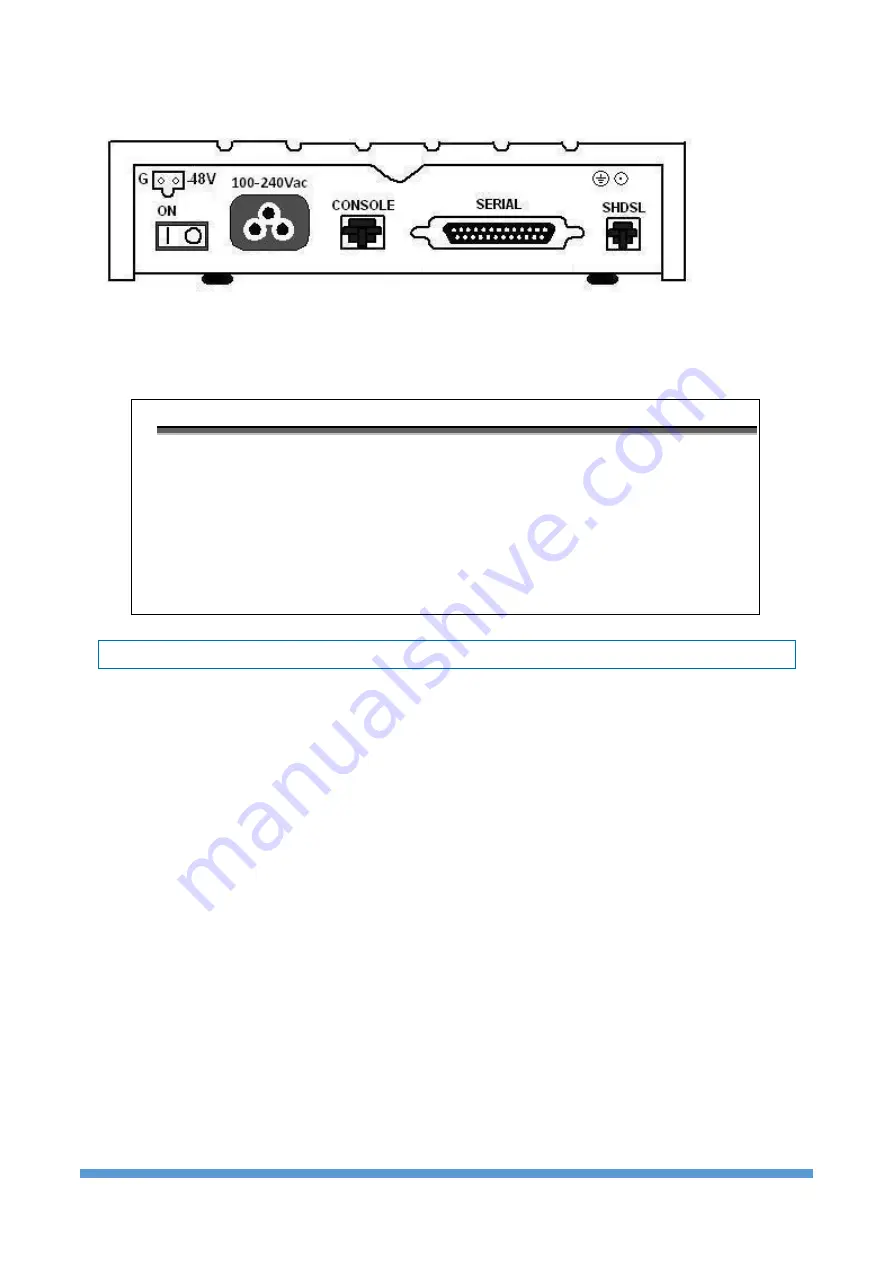
The rear panel of this model is including DC power socket, AC power switch, AC power socket,
RJ-45 for console cable, DB-25(Female) for serial cable and RJ-45 for DSL cable from left to
right.
Connector Description
ON
Power switch. Press 1 for turn on and press 0 for off.
100 -240Vac
IEC-320 C6 AC input connector. It has power adapting function from 100V to 240V
-48V GND
DC power input connector (-48V)
CONSOLE
RJ-45 for system configuration and maintenance
SERIAL
DB-25(F) for RS-530 and V.35 or X.21(with adaptor cable)
SHDSL
RJ-45 for DSL Connection
2.3 Installation
Note:
To avoid possible damage to this NTU, do not turn on the product before hardware
installation.
(a) Plug the power cord in the power socket.
(b) Plug the console port in console if you want to configure the NTU with VT100 program of
NB or PC.
(c)
Plug the E1 cable (75Ω BNC cables for E1 or 120Ω cable for E1)
or/and SERIAL cable
or/and Ethernet cable
(d) Plug SHDSL cable
(e) Power on
Summary of Contents for 5099N Series
Page 1: ...5099N Series G SHDSL bis NTU User Manual V1 00 ...
Page 18: ...5099N Series User Manual 15 For more detail on these sub menus please refer to following ...
Page 21: ...5099N Series User Manual 18 3 4 1 Show Statistic on E1 Interface ...
Page 33: ...5099N Series User Manual 30 ...
Page 34: ...5099N Series User Manual 31 ...
Page 43: ...5099N Series User Manual 40 5 4 1 Configure NTU Interface Setup Interface ...
Page 78: ...5099N Series User Manual 75 For Serial interface mode ...
Page 81: ...5099N Series User Manual 78 When it is upgrading you can see the following ...


