background image

Instruction Manual

Model NO.: PBT-26003

26” LCD TV WITH MPEG4 HD DVBT/C

Summary of Contents for PBT-26003

Page 1: ...Instruction Manual Model NO PBT 26003 26 LCD TV WITH MPEG4 HD DVBT C ...

Page 2: ...on Front View OSD Menu 1 Channel menu 2 Picture menu 3 Sound menu 4 Time menu 6 Setup menu 1 2 3 4 3 8 14 8 9 10 11 12 14 21 Connections 5 6 Remote Control 7 Basic Operation Multimedia Operation 15 17 Recording Operation 18 20 Simple Troubleshooting 5 Lock menu 13 ...

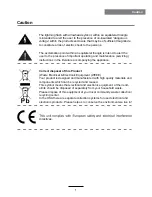
Page 3: ...e USA there are separate collection systems for used electrical and electronic products Please help us to conserve the environment we live in 1 Caution The exclamation point within an equilateral triangle is intend to alert the user to the presence of important operating and maintenance servicing instructions in the literature accompanying the appliance The lightning flash with arrowhead symbol wi...

Page 4: ...e plug out immediately and seek professional help if the mains plug or cable is damaged liquid is spilt onto the set or if it is accidentally exposed to water or moisture anything accidentally penetrates the ventilation slots the set does not work normally Do NOT remove the safety covers There are no user serviceable parts inside You may invalidate the warranty Qualified personnel only are permitt...

Page 5: ... MENU CH Press to scan through channels VOL POWER The effective receiving range for the signal is 5 8 metres from the front of the remote control window and 300 to the left or right side and 200 above or below the remote control window Null Led Indicator Remote Control window Keep clear ...

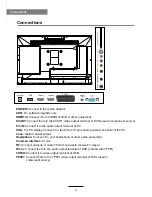
Page 6: ...inal of DVD used in component source USB SCART POWER Connect to the mains adaptor USB For software upgrade only HDMI1 2 Connect it to the HDMI of DVD or other equipment VGA For PC display Connect it to the D Sub 15 pins analog output connector of the PC PC IN Connect it to the audio output terminal of PC SCART Connect them to the SCART video output terminal of DVD used in component source Headphon...

Page 7: ... and adjust the system settings to your preference NUMBER BUTTONS Press0 9 to select a TV channel directly when you are watching TV Return to the previous channel viewed INPUT Press to display the input source menu DISPLAY Press to display the current mode s information MENU System setup menu EXIT Exit the OSD menu FAV Display the favorite program list PVR function REC Press to start record the pr...

Page 8: ...splay REVEAL Reveal any hidden text HOLD Hold or carry on the current subpage SIZE Press to see top half of page double size Press again to see the bottom half of page double size Press again for normal size SUBPAGE Press to enter subpages pressagain to cancel INDEX Go to index POWER MUTE REC INPUT MENU TV TXT CANCEL REVEAL NICAM A2 HOLD SIZE SUBPAGE INDEX PICTURE EPG SOUND SLEEP SCREEN EXIT H C L...

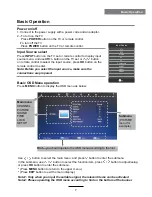
Page 9: ...efore you select the input source make sure the connections are prepared Basic OSD Menu operation Press MENU button to display the OSD menu as below Use Ĥ ĥ Ĥ ĥ button to select the main menu and press button to enter the submenu In the submenu use Ĥ ĥ ĥ or press OK button to enter the submenu Press MENU button to return to the upper menu Press EXIT button to exit the menu display Note1 Only when ...

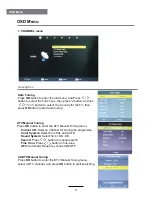
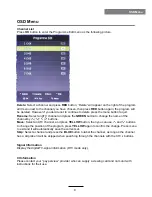
Page 10: ... tuning CADTV Manual Tuning Press OK button to enter the DTV Manual Tuning menu select a DTV channel and press OK button to start searching Press button to manual search Ĥ ĥ Ĥ ĥ ATV Manual Tuning Press OK button to enter the ATV Manual Tuning menu Current CH Select a Channel for storing the programme Color System Select from PAL and AUTO Sound System Select from I BG DK Search Fine Tune Press butt...

Page 11: ...he GREEN button to change the name of the Move Select an ATV channel and press YELLOW button then you can use and buttons to change the position of the program press YELLOW again to confirm the change Press menu to exit and it will automatically save the current set Skip Select a channel and press the BLUE button to label the channel as long as the channel has a skip label it will be skipped when ...

Page 12: ...Contrast Controls the difference between the brightest and darkest regions of the picture Brightness Controls the overall brightness of the picture Color Control the color Sharpness Increase this setting to see crisp edges in the picture decrease it for soft edges Tint Controls the tint NTSC mode only Color Temperature Choose from Medium Cool User and Warm Noise Reduction Choose interference noise...

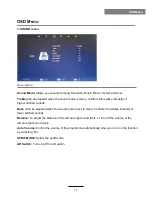
Page 13: ...hed sounds Bass Can be adjusted when the sound mode is set to User Controls the relative intensity of lower pitched sounds Balance To adjust the balance of the left and right sound track or turn off the volume of the left and right sound track Auto Volume Control the volume of the programme automatically when you turn on the function by selecting On SPDIF MODE Select the spdif mode AD Switch Turn ...

Page 14: ...u to select the time zone Sleep Timer Allows you to setup the sleep timer among 10min 20min 30min 60min 90min 120min 180min 240min and off Auto Standby Turn on off the auto standby function when where s no signal OSD Timer Allows you to select the time for OSD menu displays on the screen ...

Page 15: ...ou must enter the present code New Enter the new password Confirm Enter the new password Block Program You must enter the password to view channels that have been locked Use and buttons to select the channel and press the GREEN button on the remote control to lock the channel Parental Guidance Allows you to select the Parental Guidance mode Key Lock Lock the buttons on the TV set when you turn on ...

Page 16: ...he PVR file system Note The options PVR File System are described on pages 29 31 Aspect Ratio Choose from Auto 4 3 16 9 Zoom1 Zoom2 Just Scan and Panorama Blue Screen Turn on off the blue screen function when there s no signal First Time Installation Display the First Time Installation menu Restore Factory Default Press OK button to restore factory default 6 SETUP menu Description Software update ...

Page 17: ...ation 2 Select the file type mains menu you want to view and insert USB device you will find the name of the device display on the screen 3 Press button to select the the USB device and press OK button to enter 1 Press the INPUT button on the remote control to display the input source menu select Media source by the buttons and press OK button to enter the Multimedia menu seen below MAINS MENU PHO...

Page 18: ...utton to cancel the list displaying Info Display the information of the file Rotate Rotate the photo clockwise counterclockwise Zoom Out In Zoom out in the photo Move View Move the photo in Zoom in mode Press button to select the option on the menu and press OK button to change Pause Play pause the music FB FF Fast backward fast forward Prev Next Play the previous next file Stop Stop the music Rep...

Page 19: ...e information of the movie Slow Forward Play the movies at slow speed press button to cancel Step Forward Step quickly through the movie by using this option Goto Time Program the movie form the time you set Zoom out in Zoom out in the movie screen Aspect Ratio Select the aspect ratio of the screen display Move View Move the photo in Zoom in mode Press button to select the option on the menu and p...

Page 20: ...pressing the RED button on the list Note You can display the information of the recorded programme by pressing the GREEN button on the list Select Disk Select the device for the Record files Check PVR File System Check the system USB Disk Display the USB state Format Format the USB device for PVR operating Time Shift Size Display the size of the USB device The device has been formated Speed Displa...

Page 21: ... mode c Press PLAY button to play the programme you are recording from the beginning Note a Display and exit the navigation menu by pressing the Exit buttons b Press STOP button to exit the Timeshift mode c Press PLAY button to play the programme you are recording from the beginning Recording PAUSE Press to enter the timeshift mode press again to play the recording Press PAUSE button to enter the ...

Page 22: ...chedule Press YELLOW button to display the schedule list Remind Press BLUE button to display the remind menu and set the time Timer Recorder Press REC button on the programme to display the Timer Recorder menu When the programme starts the TV will automatically switch to this programme Channel Select the DTV channel you want to record Start Time Select the start recording time End Time Select the ...

Page 23: ...cture quality Check the aerial connections Check that the channel is tuned in properly Adjust the picture settings brightness colour sharpness contrast hue Make sure that the TV is not located close to electrical appliances that may emit radio frequency interference No colour Adjust the colour setting Check that the programme is broadcast in colour Check that the cannel is tuned properly TV does n...

Reviews: