background image

Page 6

3.3   Connecting an Expression Pedal to the Foot Controller

You can connect a standard expression pedal to the jack socket of the foot controller. Simply connect your 
expression pedal to the foot controller by a short mono jack cable.
If you like to use two expression pedals, you will need a Y-cable - also called insert cable. An insert cable has two 
mono plugs on one end. Plug one into each expression pedal. The other end of the cable has a stereo jack. Plug this 
into the expression pedal connector of the X07. (For the technology enthusiasts among you: the potentiometer of 
expression pedal # 1 is located between “tip “ and “shield“. The potentiometer of expression pedal # 2 is between 
“ring“ and “shield“. (The top of a stereo jack cable is called "tip", the center ring is called, “ring“ ). Custom cables 
are available from Prostage.
You can also use a volume pedal as an expression pedal. In this case, you have to connect the output of the volume 
pedal to the foot controller. You will get the best resolution if you use a pedal made for keyboards, with a 10k 
ohm or a 20k ohm potentiometer.

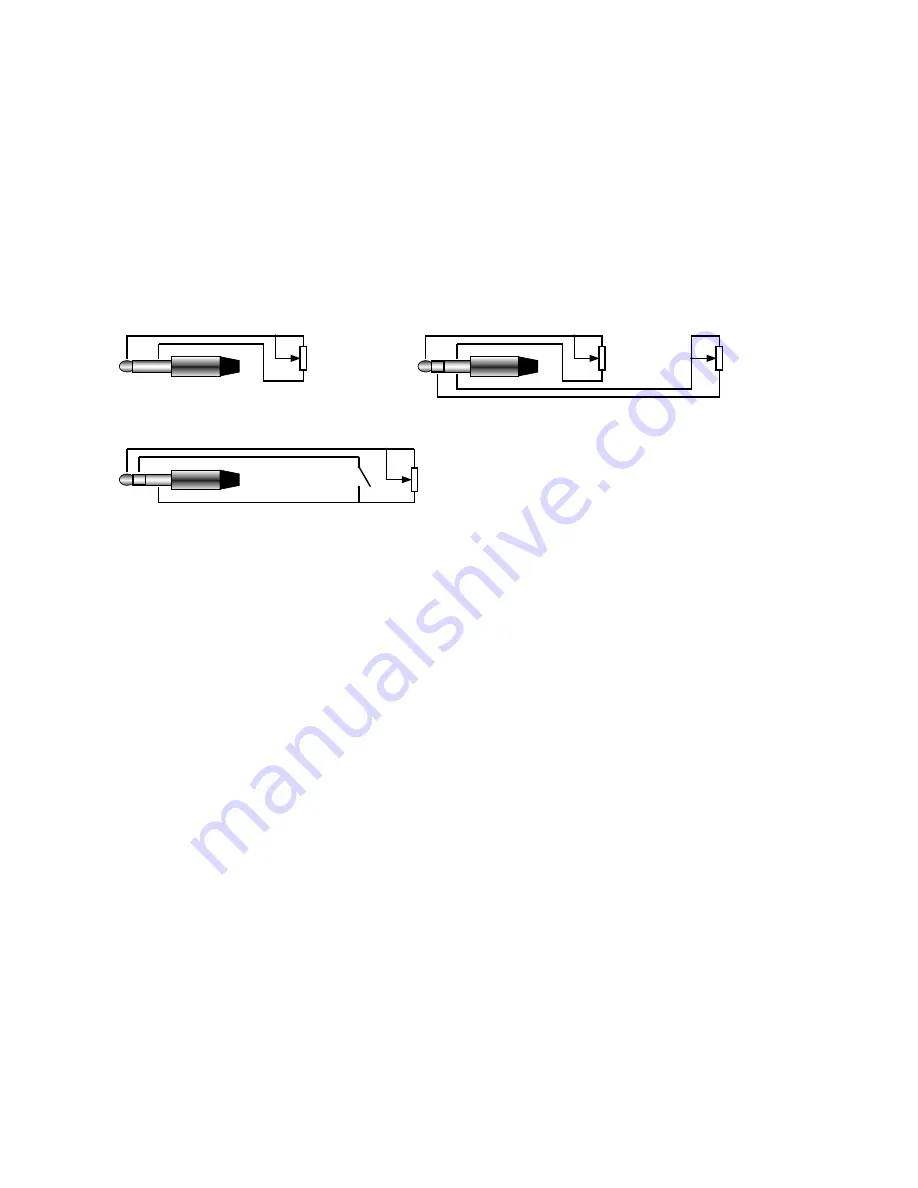
One expression pedal: 


Two expression pedals (Y-Cable):


Exp. Pedal 1 


Exp. Pedal 2 

Exp. Pedal 1

Expression pedal with switch (e.g. to control the Remote WahWah): 


=> The switch is connected as “expression pedal 2”


Switch 

Exp. Pedal 

Hence, the Control Change assignment for the 


switch is set under “CC No. Exp. Pedal 2”.

Instead of an expression pedal, you can also connect a switch, to use it as “Tap” for example.

IMPORTANT =>

 In order to use the expression pedal(s), you have to calibrate them first. You have to repeat the 

following process each time you connect a different expression pedal. Even switches must be calibrated!

3.4   Calibration of the Expression Pedal
Calibration of Expression Pedal No.1 

(connected to Tip):

• On the foot controller, simultaneously press the buttons [4] and [7] for approx. three seconds until the three 

lower LEDs light up. You are now in calibration mode. 

• Move the expression pedal to the position (dead stop) where you like to have the MIDI value 0 (low).
• Press the [1]-button (Pressing any other switch will abort the calibration process).
•  Now the four upper LEDs light up.
• Move the expression pedal to the other dead stop, which is the position where you like to have the MIDI value 

127 (loud).

• Press the [1]-button again.
• LED 2,5,6 lights up.
• Move the expression pedal to the center position.
• Press the [1]-button again. The calibration is now complete. 
=> If you don’t want to calibrate a middle position, or if you calibrate a switch, you can cancel the center position 
calibration (last two steps) by pressing any other button than the [1]-button. Then the expression pedal is calibrated 
linear. You can also calibrate a logarithmic motion curve if you position the pedal a little bit away from the middle 
when calibrating the center position. However, the middle position must differ at least 10% from 0 and 10% from 
127. Otherwise, your chosen center position will be ignored and the expression pedal is calibrated linear.
You can easily check if the expression pedal is calibrated correctly: Move the pedal while watching the red LED on 
the XDS | XLS | XTMpro, which flickers when the expression pedal is sending MIDI commands. If the LED flickers 
throughout the complete motion from top to bottom, the pedal is calibrated correctly.

Calibration of Expression Pedal No.2

 (connected to Ring):

Basically, this works like the calibration of pedal No. 1. But you have to press the buttons [4] and [6] for approx. 
three seconds to enter the calibration mode.

Summary of Contents for X07

Page 1: ...Prostage S L Apdo 57 ES 07560 Cala Millor info prostage eu www prostage eu X07 MIDI Foot Controller Users Manual Firmware Version 1 30 As at 22th February 2014 ...

Page 2: ...6 3 4 Calibration of the Expression Pedal 6 4 Operating Modes Operation 7 4 1 7 Program Changes 7 4 2 7 Instant Access 7 4 3 Programs Instant Access 7 4 4 Instant Access Programs 7 5 Firmware Upgrade 8 6 MIDI Implementation Chart 8 7 Warning Instructions and Warranty 9 7 1 Warnings and Safety Instructions 9 7 2 Warranty Support 9 7 3 Disposal of Old Devices 9 8 Declaration of Conformity 10 NOTE Th...

Page 3: ...ch Programming via System Manager software Up to eight different MIDI messages per preset Program Change or Control Change via the MIDI mapping of the XDS XLS XTMpro Delay tap function 1 2 The Prostage System Prostage stands for professional live equipment The X07 is plug and play This means that you can plug it in and use it without having to configure anything The X07 foot controller is connecte...

Page 4: ...ss Stompbox Mode On Off Switches Instant Access are direct access switches These on off switches work like an analog pedal switch which is connected directly to the amplifier for example to switch between the channels So at the foot controller you can define a switch which is e g firmly assigned to a loop of the XDS XLS XTMpro This switch then simply turns on and off the loop at the looper switche...

Page 5: ...nction 3 2 The Rear Panel StageWire Main Connect the StageWire Main socket via a standard microphone cable with the StageWire socket from the XDS XLS XTMpro The foot controller is powered via the StageWire connection It does not need a separate power supply StageWire Link If you work with multiple foot controllers connect the StageWire Link socket to the StageWire Main socket of the next foot cont...

Page 6: ...ven switches must be calibrated 3 4 Calibration of the Expression Pedal Calibration of Expression Pedal No 1 connected to Tip On the foot controller simultaneously press the buttons 4 and 7 for approx three seconds until the three lower LEDs light up You are now in calibration mode Move the expression pedal to the position dead stop where you like to have the MIDI value 0 low Press the 1 button Pr...

Page 7: ...n about the special features of the Prostage foot controllers in the users manual of the System Manager software The operating modes and features listed below are set using the System Manager software Changes must always be confirmed in the System Manager with Update Foot Controller so that the foot controller adopts the new settings More information about this can be found in the manual of the Sy...

Page 8: ...he latest version yourself All information about this can be found in the manual of the System Manager software 6 MIDI Implementation Chart The X07 foot controller is part of the coherent Prostage system The X07 handles all MIDI data as they are configured by the System Manager software Therefore you will find the MIDI Implementation Chart in the manual of the System Manager software ...

Page 9: ...ture For transportation always carry the devices in a robust packing or rack especially if you change your place of work frequently No containers filled with liquid may be placed on the equipment 7 2 Warranty Support All Prostage PurpleLine units are covered by a 2 year warranty Prostage shall not be liable if the damage was caused by inappropriate use or if the units are not connected as describe...

Page 10: ...ese limits are designed to provide reasonable protection against harmful interference in a residential installation This equipment generates uses and can radiate radio frequency energy and if not installed and used in accordance with the instructions may cause harmful interference to radio communications However there is no guarantee that interference will not occur in a particular installation If...

Reviews: