background image


8


PS-90XD   


            PROSTAR 


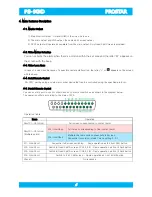
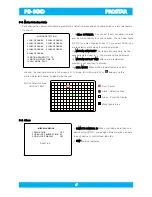
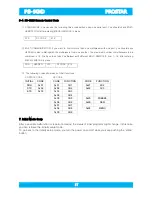
5-2. Camera Name Setup 

1. 1~: 

To change the camera name, you select any channel using 

cursors and push the enter button 

©

. Now you can choose characters 

for the channel you have selected. You move cursors   

Õ

,

Ö

 to place 

the cursor on the character you’d like to choose, and then you push 

the enter button  ▲,▼. You repeat the same process until you finish 

inputting the whole words. 

2. DISPLAY CH_NAME: If you choose OFF the name does not appear 

on the screen. 


5

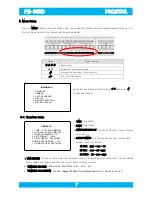
3. Sequencial Display Setup 

1.  FULL:  You  set  the  switching  time  of  channels  for  the  Sequence 

mode. If a camera is set in off mode, the corresponding channel does 

not appear in the Sequence mode.   

2. 4SPLIT: You can include 4SPLIT mode in the Sequence by setting 

time values for it. 

5. LOSS AUTO SKIP : Loss Auto Skip: If it’s ON, video loss channels do 

not appear in the Sequence. If it’s OFF, even the video loss channels 

appear in the Sequence. 


5

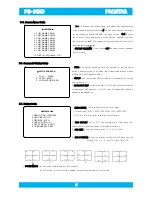
4. Display Setup 

1. RESOLUTION : The resolution sets the main output. 

Choose one of AUTO, 1920X1080, 1650X1050, 1280X1024. 

AUTO is to scale to moitor resolution automatically .   


2.  OSD  DISPLAY:  Set  to  OFF,  the  camera  name,  time,  date,  etc, 

characters on the screen does not display information. 

3. OSD SIZE: Set to font size to one of 1, x1.5, x2 or Auto. 


4. OSD POSITION: Select the place on which you will place the one 

among A, B, C, D, E , and F 6 type of the OSD. 


A                                  B                                  C                                    D                                  E                                  F 

5. 9 SPLIT MODE: You can select 9 Split mode or 6 Split mode.   

9 SPLIT button in front follow this setting, showing 9 split mode or 6 split mode.   

CAM 1 


CAM 2 
 

CAM 3 


01/30 

CAM 4 


10:01 

CAM 1


CAM 2 


CAM 3


01/30

CAM 4 


10:01 

CAM 1


CAM 2


CAM 3


01/30

CAM 4


10:01 

01/30


CAM 1 

10:01
 
 
CAM 2 


CAM 3 


CAM 4 

01/30


C AM 1 

10:01


CAM 2 


CAM 3 


CAM 4 

01/30 


CAM 1 

10:01


CAM 2


CAM 3 


CAM 4

 CAMERA 


1. CH01_NAME: CAM01     
2. CH01_NAME: CAM02     
3. CH01_NAME: CAM03     
4. CH01_NAME: CAM04     
5. CH01_NAME: CAM05     
6. CH01_NAME: CAM06     
7. CH01_NAME: CAM07     
8. CH01_NAME: CAM08     
9. CH01_NAME: CAM09     


10. DISPLAY CH_NAME:    ON 


 DISPLAY 


1. RESOLUTION: 1920X1080   
2. OSD DISPLAY: ON 
3. OSD SIZE : AUTO 
4. OSD POSITION : A 
5. 9 SPLIT MODE : 9 SPLIT 
6. CH BOUNDARY :GRAY 


 AUTO SEQUENCE - 


1.  FULL   : 03SEC 
2.  4SPLIT : 03SEC 
3.    LOSS AUTO SKIP: ON 


Summary of Contents for PS-90XD

Page 1: ...XD PROSTAR User s Manual PS 90XD 9 Channel HD Output Splitter 1920 x 1080 A 703 HagyeTecnotown 250 3 Hagye Dong Nowon Gu Seoul Korea TEL 82 2 972 0230 FAX 82 2 972 0232 http www prostar co kr Prostar...

Page 2: ...4 MAIN FEATURES DESCIPTION 6 4 1 MONITOR SCREEN 4 2 MOTION DETECTION 4 3 VIDEO LOSS ARARM 4 4 Serial REMOTE CONTROL 4 5 Paralell REMOTE CONTROL 5 MENU SETUP 7 5 1 TIME DATE SETUP 5 2 CAMERA NAME SETUP...

Page 3: ...display quality PS 90XD supports such functions as alarm buzzer remote control motion detection etc Main features 9 channels split displayed on a Ful HD monitor 1920x1080 NTSC 720x480 PAL 720x576 NTSC...

Page 4: ...ENCE 1 Sequential Display External Input PLAY 1 Select PB Play back Input MENU MENU 1 Menu Mode Exit from Menu 2 3 Electrical and Physical size and characteristics Name Description Input Resolution NT...

Page 5: ...UENCE Button Play Back from Rear BNC PB1 2 Menu Mode 3 2 PS 90XD Rear Pannel Earth Terminal Paralell Remote control SPOT Output RS 232C Terminal Video Input CH 1 4 Video Input CH 5 8 Video Input CH 9...

Page 6: ...pecified protocol 4 5 Paralell Remote Control You can use this port to control other devices contacts or switches as shown in the diagram below The operation differs according to the state of S15 Oper...

Page 7: ...RRECT You can set time correction values seconds to maintain the most correct time The set values will be added to or subtracted from the current time every day or month 6 TIME DATE OSD SIZE The size...

Page 8: ...s the main output Choose one of AUTO 1920X1080 1650X1050 1280X1024 AUTO is to scale to moitor resolution automatically 2 OSD DISPLAY Set to OFF the camera name time date etc characters on the screen d...

Page 9: ...eactivate it OFF if you are not going to use it If you select AREA you are required to mark areas for motion detection 17 MOTION SENSITIVITY Set the motion sensitivity As the sensitivity gets closer t...

Page 10: ...nment 2 TXD 3 RXD 5 GND 1 data bit 8 2 parity None 3 stop bit 1 4 board rate 9 600 bps 5 flow control Harf Simplex Only Recieve LOOP OUT 75 75 OUTPUT BNC 1 2 3 75 TO MONITOR 2Vpp ESD PROTECTOR ESD PRO...

Page 11: ...ifferent MULTI REMOTE ID from 1 16 after entering MISCELLANEOUS in menu SOH HEADER STX OPCODE ETX The following codes show each of their functions CONTROL CODE OP CODE INITIAL CODE CODE FUNCTION CODE...

Page 12: ...FOR REPAIR THERE ARE NO USER SERVICEABLE PARTS IT MAY EXPOSE YOU TO DANGEROUS VOLTAGES OR OTHER HAZARDS REFER TO QUALIFIED PERSONNEL FOR REPAIR 13 REPLACEMENT PARTS ARE TO BE PROVIDED BY THE AUTHORIZE...

Reviews: