background image

28 MARK68AF1001 Rev 2

Operation

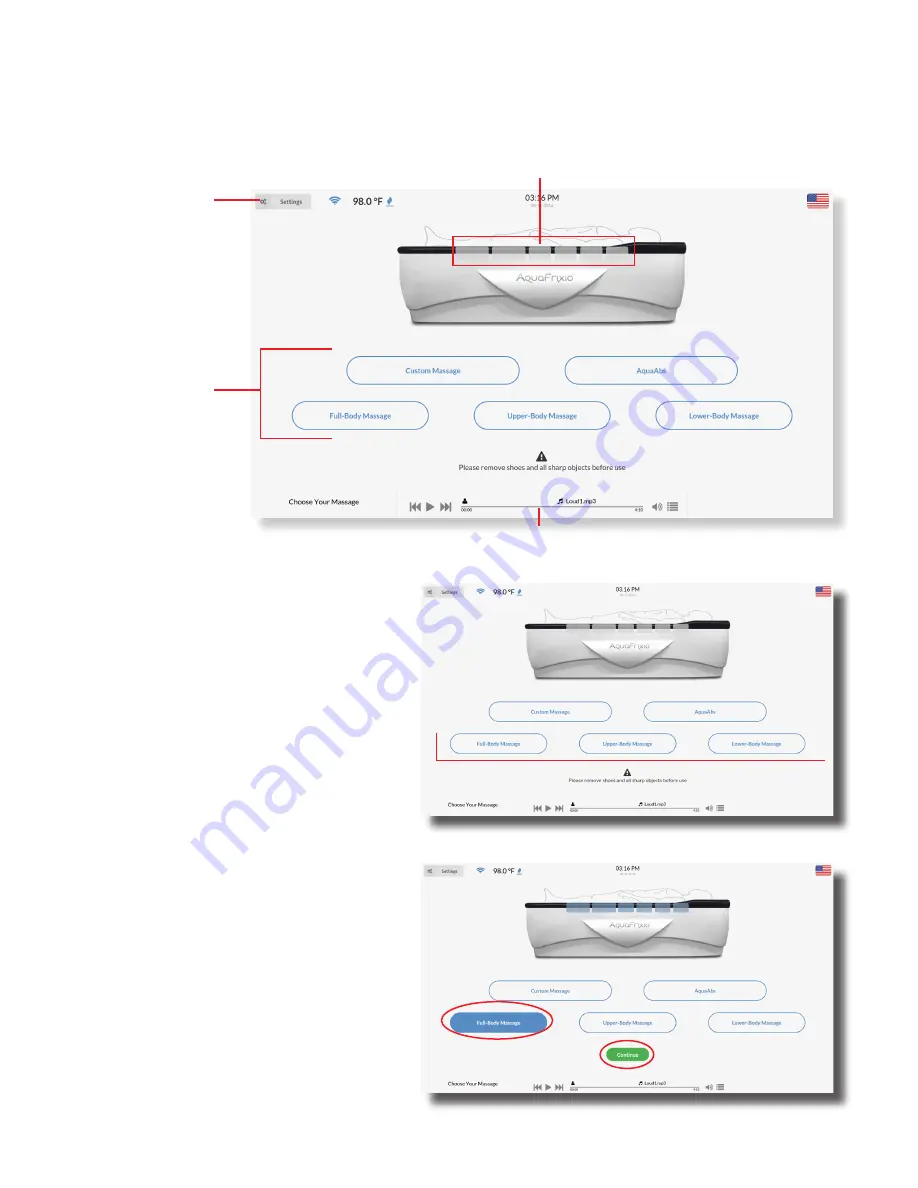
Start Screen

Massages

Massage Types

Pre-Programmed Massages

Full-Body: Equal intervals all 6 zones

Upper-Body: Equal intervals top 3 

zones

Lower-Body: Equal intervals lower 3 

zones

Select your massage type, press con-

tinue.

Music Player

System Settings

Massage Zones

Summary of Contents for AquaFrixio

Page 1: ...User s Manual 220v 20amp 60hz MARK68AF1001 Rev 2...

Page 2: ...maximum life of your unit It is strongly recommended to adhere to these service instructions and intervals Always disconnect the power before starting any maintenance work or cleaning Read all the in...

Page 3: ...oning of the Massage Equipment 10 General Safety Information 11 General Safety Notes 11 Limits of Application 12 Equipment Components Description 13 Device Description 13 Dimensions 14 Equipment Dimen...

Page 4: ...ration 27 Optional External Timer T Max and Quick Start Connection 36 Error Messages 38 Care Maintenance 39 Basic Care Maintenance 39 Maintenance Schedule 40 Cleaning 41 Maintenance by Skilled Persons...

Page 5: ...user manual and any labeling on the equipment All people that will be operating this equipment need to fully read and understand these instructions and any labeling on the equipment A copy of the user...

Page 6: ...rtically stacked either because of the nature of the transport packaging or because of the nature of the items Temperature limit indicates the maximum and minimum temperature limits at which the item...

Page 7: ...nsport materials If a forklift is used the long forks should be used and only from the correct side Only lift the load a few centimeters and move it to the place of installation CAUTION If the short f...

Page 8: ...d airing The room should be the recommended size of 8 x 7 ft in order to allow for good air flow The unit should not be set up in a mobile environment or facility i e trains buses ships The unit also...

Page 9: ...s specified for a safe operating system ProSun certified technicians will not perform any electrical work The recommended electrical plan must be coordinated between the customer and the electrical co...

Page 10: ...ncluded having correct power requirements and having the room in which the unit will be located ready If you will be doing your own installation it is highly recommend that you contact ProSun and set...

Page 11: ...eatment of blood clots Contraindication Peope who wear a heart pacemaker Contraindication Neurological Conditions or other Systemic Disorders such as Cerebral Palsy Seizures Parkinson s disease Diabet...

Page 12: ...he heater without filling the tank with water to the designated fill level see AquaFrixio setup Failure to do so can result in permanent damage to the heater and tank and will void the warranty Heatin...

Page 13: ...massage session B Marine Leather Cushion The elegant marine leather cushion not only look beautiful but is easy to clean in just seconds C Rip Stop Under Sheet The undersheet is made with a rip stop m...

Page 14: ...The below room size is a recommendation for optimal output Product Specifications 86 long 218 cm 40 wide 101 cm 25 high 63 cm 300 lbs empty 136 kg 600 lbs filled 272 kg Weight Capacity of 375 lbs 170...

Page 15: ...e or are missing contact ProSun for replacement Labels on units are differently sized than in descriptions below Each label is listed in the following pages for clear description of what is written on...

Page 16: ...the LED connection on the bottom of the AquaFrixio It advises to disconnect the LED connection prior to disassembly 3 Serial Label The Serial label is located on the back of the touch screen 4 Manufac...

Page 17: ...above sea level adaption may be needed to get normal operation The Electrical requirements for your ProSun unit are Operating any 220 Volt equipment at voltage levels below 208 Volts or above 245 Volt...

Page 18: ...electronics are plugged in no electrical repair should be attempted Always consult the troubleshooting section of this manual prior to any attempted repair or service Never use if water is in contact...

Page 19: ...have a proper outlet installed DANGER Improper connection of the equipment grounding conductor can result in the risk of electrical shock Check with a qualified electrician or service technician if y...

Page 20: ...ent that come in contact with the user must be cleaned and disinfected after each session Infections can be transferred through skin contact The following items should be cleaned after each session Un...

Page 21: ...this user manual and any labeling on the equipment and can properly operate the equipment and instruct them in the established legal and accident prevention regulations Ensure that your staff is prop...

Page 22: ...ed is in use and the pump is on The session time is counting down and can be stopped paused or features can be changed in the computer screen Cool down Mode The massage bed has finished the session an...

Page 23: ...e or Stand Alone C Mode Change the session time cool down time water temperature and turn on and off Quick Start Demo Mode and the general Pin Requirement You can also change your Pin Code or password...

Page 24: ...up the way you have selected and you hit start the Massage session will start If you do not override the delay time then you will have a few minutes to prepare yourself for the session Remove all shar...

Page 25: ...al Pin Requirement You can also change your Pin Code or password here Region Tab Change from Faranheit to Celcius Change your time zone Use the 24 hour clock option Set the date and time automatically...

Page 26: ...ping to protect against scratching We recommend using moving blankets surrounded by plastic wrap Storage temperature can be between 5 F 15 C and 140 F 60 C Let equipment sit for at least 2 hours if ra...

Page 27: ...pper Body Massage Use this button to select an upper body massage F Continue Use this button once you have selected your massage type G AquaAbs Select this button to select AquaAbs Massage We recommen...

Page 28: ...ssages Massage Types Pre Programmed Massages Full Body Equal intervals all 6 zones Upper Body Equal intervals top 3 zones Lower Body Equal intervals lower 3 zones Select your massage type press con ti...

Page 29: ...Custom Massage Enables users to select the zones that the massage will target You are also able to set the pressure and duration per individual zone Timer Adjusts the duration of the massage from 1 6...

Page 30: ...ws user to customize the mas sage pressure and duration for each individual zone Selecting All Zones keeps all zones at the same pres sure and duration Once switched to Per Zone select zone by tap pin...

Page 31: ...he unit for the amount shown in the default session time Remote Mode Uses integrated T Max feature Once selected you will need to reset the unit Select the desired default session time max time The PI...

Page 32: ...re enter a new password If pass word is forgotten contact ProSun to reset Region Adjust Language Temperature units and time settings Stand Alone Commerical Uses Aquafrixio s internal timing system but...

Page 33: ...ore music you can place your own music on an USB Stick and insert the card at the head of the bed Name your mu sic by clicking the pencil MyAquaFrixio The MyAquaFrixio MAF feature is an online platfor...

Page 34: ...hen you will be prompted to enter the password Wi Fi To connect the AquaFrixio to a Wireless network select Set up network Your AquaFrixio must be connected to Wifi to use the portal and receive autom...

Page 35: ...Mode Select components to individu ally test if the parts are in working order Manual mode is meant for testing troubleshooting purposes only Tap the components individually to turn them on If they a...

Page 36: ...ct connections on the back of the board They will be in the outside corners as shown below Step 2 remove the back panel of your Aquafrixio unit Screen Side you will find 2 connections for your T max a...

Page 37: ...ey can bypass the delay time and start their session directly on the screen We recommend using this function for your customer but it is not required If you choose not to use the Quick Start function...

Page 38: ...contact ProSun for more information Water temperature Limit exceeded Your unit has exceed the maximum temperature and will not turn on until the temperature is below 105 degrees faranheit 40 degrees c...

Page 39: ...DANGER High Voltage You can be killed or injured by an electric shock During maintenance and service work there is a risk that you can touch live parts and could receive a fatal shock When performing...

Page 40: ...cy After Each Session Daily Weekly Every 1 to 3 Months Semi Annual 6 months Cleaning of undersheet and pillow top X Cleaning of computer display screen X Cleaning of outside cover plates X Restart the...

Page 41: ...can be used to clean and disinfect the exterior under sheet and pillow top of your unit Do not use this product on the coverplates plastic surface see cleaning instructions above The undersheet can al...

Page 42: ...other high voltage components At this time the certified technician can dust all electronic components Adding Distilled Water Only used distilled water The use of non distilled water will void the wa...

Page 43: ...tripped 2 Tripped Fuse 1 Reset the GCFI on the plug or reset the circuit on the breaker 2 Remove side skirt locate fuse on the box and if it shows white it needs to be reset Unresponsive Touch Screen...

Page 44: ...ng from certified technician Unit appears to be too hot Fans are obstructed Room is too small Ensure all fans are clear of obstructions and dust Check that your room is the correct size as described e...

Page 45: ...ce with current safety regulations The illustrations and specifications are subject to changes in order to improve the device Unauthorized modifications and changes to the device and its controls are...

Page 46: ...ons Optional 1 Remove end skirt on the head side of the bed and locate the small drain pump Attach a garden hose to the out stem on the pump 2 Place end of garden hose into the desired draining locati...

Page 47: ...ell as any customer service calls Product Specifications 86 long 218 cm 40 wide 101 cm 25 high 63 cm 300 lbs empty 136 kg 600 lbs filled 272 kg Weight Capacity of 375 lbs 170 kg ROOM ENVIRONMENT Indoo...

Page 48: ...CE6810140 Bracket Screw x4 M8 Bracket Washer x4 M10 Bracket Washer x4 Skirt Screw x8 Skirt Caps x8 Top Bracket x1 Base Bracket x1 Filler Tube x1 Allen Wrench x1 ACCE1000552 LED Light Remote x1 Water C...

Page 49: ...the delivery driver leaves If there is any damage note the details on the delivery receipt 2 Start by removing the top box from the crate and 3 Use the drill to remove the plywood walls on the crate S...

Page 50: ...frame 6 Use your drill and remove all of the support brackets Once they are all removed you can lift the unit by holding the frame only and move it out of the crate You are now ready to move onto the...

Page 51: ...s side it can be rolled to the desired destination Lift unit until it is on its sides with all four wheels of the moving tool in con tact with the ground NOTE Recommended to perform with 2 people Note...

Page 52: ...After fill tube is attached fill unit with 40 gallons of distilled water Note warranty is VOID if distilled water is not used Important After filling air can be trapped in the plumbing causing irregul...

Page 53: ...il of the frame below the top bracket and attach base bracket Position the Top Bracket which is found on the opposite side of the unit from the CPU box by locating the mounting bracket underneath the...

Page 54: ...it over the base bracket and sliding the top bracket though the slot Insert monitor stand through the top bracket and onto the peg of the base bracket This will hold the side skirt into place At the b...

Page 55: ...RK68AF1001 Rev 2 9 10 11 Slide monitor onto the pole Slide off cover on the bottom of the lower section of the arm Feed wires through the desig nated areas shown and slide cover back on HDMI USB and P...

Page 56: ...m stand Feed wires through the space shown to the right make sure the wires are long enough to plug into monitor Re place the two covers once complete 13a Note In the photo to the left make sure the a...

Page 57: ...n the rest of the skirting it is important to make sure there is no air in the zones Select Full Body Massage on the home screen then press Start If any irregular noises come from the jets or there is...

Page 58: ...pump is located Take the cable that comes from the skirt and connect it to the terminal block located next to the radiator 18 19 Once the cable is connected carefully place the skirt on the unit Ever...

Page 59: ...arrows on both parts allign These cables are located at the bottom head of the unit on the opposite side of the screen Further directions on exposing the LED remote sensor follows once skirt is assem...

Page 60: ...on the bottom of the pad to the velcro strips on the top of the skirt The unit is now ready to be plugged in for use Congratulations The unit is now ready to be plugged in for use Refer to the Operati...

Page 61: ...annual maintenance inspection service Every 12 months or 1500hours The Limited Warranty will be null and void if equipment has been damaged and not reported and repaired or maintenance service has not...

Page 62: ...ts will be sent to you via expedited shipping options After being given a claim number by customer service you will be sent and must sign our warranty documentation and return it to PROSUN prior to th...

Page 63: ...EN BY THE PURCHASER WITHOUT PROSUN S PREVIOUS WRITTEN APPROVAL IN NO EVENT SHALL PROSUN BE LIABLE FOR ANY SPECIAL CONSEQUENTIAL OR INCIDENTAL DAMAGES HOWEVER CAUSED WHETHER FOR BREACH OF WARRANTY NEGL...

Page 64: ...ProSun International LLC 2442 23rd Street North St Petersburg FL 33713 www ProSun com 800 874 2776...

Reviews: