background image

GB

Common security advices

•  Operate the walking frame only if it is in 

a flawless condition.

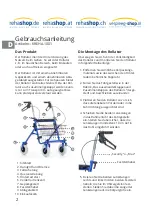
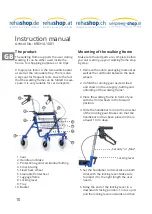
•  Before every use, check if the locking 

lever is tightened and the handlebar is in 

a downwards facing position.

•  Operate the walking frame only with a 

snapped in protection.

•  lt is only recommended to operate the 

walking frame on an even, solid ground.

•  Do not use the walking frame as support 

to get up from a squatting or sitting 

position also do not use it to transport 

people with it.

•  The wheels of the walking frame can get 

stuck if used on uneven grounds like 

grooves or grids. Try to avoid this kind of 

obstacles.

•  Always hold on to the handlebars with 

both hands. lf you only use one hand 

there is always the danger of losing 

balance and falling over.

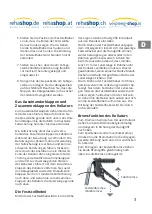
•  Always use the brakes of the walking 

frame slowly and evenly.

•  Activate the handbrake if parking the 

walking frame. This avoids an uninten-

ded rolling away of the walking frame.

•  Make sure to only put weight on the seat 

from above!

•  The maximum weight load of the basket 

is 5 kg.

• 

Worn out wheels can affect the braking 

force of the walking frame. That is why 

you should make sure that the braking 

force of the brakes is in a good working 

condition.

•  Slip hazard on wet, dirty, iced or snow 

covered ground! This causes a severely 

limited braking force. Adjust your hand-

ling to these dangers.

•  lf problems or questions occur, please 

contact your specialist dealer.

13

Summary of Contents for REHASHOP KREHA-1001

Page 1: ...Gebrauchsanleitung Rollator Gebruiksaanwijzing rollator Instruction manual walking frame Mode d emploi d ambulateur D NL F GB REHASHOP Vita Art No KREHA 1001 2 500081 141367 GW...

Page 2: ...ge des Rollator berzeugen Sie sich von der Vollst ndigkeit des Rollators und montieren Sie den Rollator in folgender Reihenfolge 1 Entfernen Sie s mtliches Verpackungs material sowie das zwischen den...

Page 3: ...ntfernen Sie zuerst das Ablagetablett sowie den Einkaufskorb Klappen Sie die rot markierte Faltsicherung nach oben und ziehen Sie zum Zusammen klappen des Rollators die Querstange gerade nach oben Die...

Page 4: ...ts montiert ist sowie aus einem nach oben offenen Kunststoffk stchen auf H he der Gep ckablage Stellen Sie bei der Verwendung der Stockhalterung sicher dass der von Ihnen verwendete Gehstock sicher in...

Page 5: ...rs k nnen sich bei Bodenunebenheiten z B in Rinnen oder Gitterrosten verklemmen Vermeiden Sie deshalb soweit wie m glich Hinder nisse dieser Art Halten Sie sich immer an beiden Halteg riffen fest Sofe...

Page 6: ...aaibaar 6 Voorwiel draaibaar 7 Bagagedrager 8 Fixeerhendel 9 Dienblad 10 Boodschappenmandje Montage van de rollator Controleer bij aflevering of de rollator over eenkomt met datgene wat u heeft bestel...

Page 7: ...vervolgens de rood gemarkeerde inklapbeveiliging naar boven en trek de dwarsliggende versteviging vertikaal naar boven Hoogteverstelling duwgrepen De hoogte van de duwgrepen behoort op de juiste hoog...

Page 8: ...derhoud De rollator kan eenvoudig gereinigd worden met een mild reinigingsmiddel aansluitend met schoon water afspoelen en afdrogen met een zachte doek Uw rollator is vrijwel onderhoudsvrij Sterke ver...

Page 9: ...ht om rioolputten roosters en ande re hindernissen heen om deze obstakels te vermijden Beide handgrepen dienen gelijkmatig te worden belast Als u slechts een hand greep gebruikt bestaat het gevaar dat...

Page 10: ...king frame Make sure that all parts are complete before you start setting up your walking frame step by step 1 Remove the entire packaging material as well as the cardboard between the back wheels 2 U...

Page 11: ...cross bracing in an upright position to finally fold up the walking frame The locking lever With the help of the locking lever the height of the ergonomically shaped handles can be easily and individ...

Page 12: ...and if you wish a mild cleanser You can re move tough dirt by using a car cleanser No water should enter the walking frame tubes during the cleaning process which is why it should only be cleaned in a...

Page 13: ...stacles Always hold on to the handlebars with both hands lf you only use one hand there is always the danger of losing balance and falling over Always use the brakes of the walking frame slowly and ev...

Page 14: ...et freins 3 Syst me anti pliage 4 Traverse transversale 5 Roue arri re fixe 6 Roue avanl mobile 7 Porte bagage 8 Poign es de Fixation 9 Plateau 10 Panier de transport Le montage du d ambulateur Veuil...

Page 15: ...Rabat tez la s curit de pliage vers le haut puis tirez la traverse transversale vers le haut pour le plier La poign e de fixation l aide de la poign e de fixation vous pouvez ajuster les poign es ergo...

Page 16: ...e l eau ou avec un d tergent doux si n cessaire Des salissures tr s r sistantes peuvent au besoin tre trait es avec un nettoyant de voiture Lors du nettoyage du d ambulateur ne laissez pas l eau p n t...

Page 17: ...rr guliers par exemple dans les goutti res ou les cail lebotis vitez ces obstacles autant que possible Tenez le d ambulateur toujours des deux poign es Si vous tenez d une seule main vous courrez le r...

Page 18: ...NOTES 18...

Page 19: ...efon 43 0 121 25 996 Fax 43 0 121 26 073 E Mail info proteno at www rehashop at Vertrieb Schweiz Kaphingst Online AG Bischmattstrasse 11a 2544 Bettlach Telefon 41 0 32 372 75 50 Fax 41 0 32 372 75 51...

Reviews: