background image

     B

OD

Y FA

T

     B

OD

Y FA

T

N

W

O

D


N

W

O

D


E

EN

D

T

MO

ER/


E

EN

D

T

MO

ER/

P

U


P

U


R     

E

C

O

V

E

R

Y

R     

E

C

O

V

E

R

Y

O

M

/

R

E

D

T

E

N

E

O

M

/

R

E

D

T

E

N

E

X2sec

DO

WN

U

P

O

M

/

R

E

D

T

E

N

E

X5sec

M

o

n

it

o

F

u

n

c

ti

o

n

s

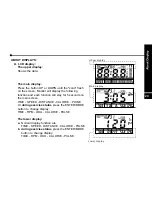
FUNCTION BUTTONS:
A. ENTER / MODE  :
    ENTER  FUNCTION :

a. 

b. 

MODE FUNCTION :

RESET FUNCTION :

R

KM / MILE SHIFTING FUNCTION :

Press the ENTER, UP and DOWN buttons at the same time and 
holding for 5 seconds, all values will be reset to zero except clock 
and ODO.

Press this button to enter setting mode and confirm the setting 
values.

Select functions. (before exercise mode)

Time-Distance-Calorie-Pulse

Select personal data. (In the body fat measurement mode).
Gender-Height-Weight-Age

During exercise status,

 press to switch displays between 

"SPEED,DISTANCE" TO "RPM,ODO".

eset all of the values to zero by press and hold for 2 seconds.

17

Summary of Contents for DOLPHIN V4

Page 1: ......

Page 2: ......

Page 3: ...01 03 04 05 06 07 08 15 16 17 19 20 23 24 30 31 32 33 34...

Page 4: ...ilized on the floor Avoid uneven surfaces e Most exercise equipment is not recommended for small children Children should not use the machine Please keep children away from using this machine f Exerci...

Page 5: ...times per week m Do not over training Incorrect or excessive training may result injury Information on braking system Speed dependent With increasing speed more power is required to drive the bike and...

Page 6: ...to any claim for injuries damage or loss The above warnings are in no way intended to limit or modify the consumer s remedies for breach of warranties pursuant to applicable Federal and State laws of...

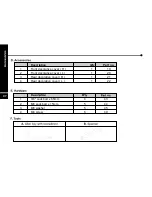
Page 7: ...w clamp ension control 1 ension control cable 1 ulse sensor 2 ulse sensor cable 1 U brace for handlebar 1 T knob 1 M8 small washer 1 M7 socket screw x 20 mm 1 1 Main frame 1 2 F 1 3 R 1 4 S 1 5 H 1 6...

Page 8: ...3 48 2 49 6 50 51 C 52 P 53 S Sliding tube 38 x 38 plug U bracket with bolt nob 3 8 sock bolt x 65mm M8 sock bolt x 15mm 5 M8 washer 5 M8 spring washer M8 nylon nut M4 screw M4 screw M5 screw x 25 mm...

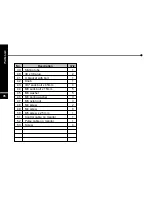
Page 9: ...06 4 42 40 41 46 47 29 8 51 9 53 52 31 32 50 5 35 37 36 38 18 45 1 24 10 9 49 20 2 28 19 15 26 23 7 27 16 25 30 39 11 49 22 3 48 6 33 34 43 44 54 49 40 49 21 43 17 49 13 14 12 49...

Page 10: ...Part no 1 F 1 19 2 F 1 20 ront decorative cover R ront decorative cover L 3 Rear decorative cover R 1 21 4 Rear decorative cover L 1 22 07 2 1 3 8 sock bolt x 65mm 4 43 M8 sock bolt x 15mm 5 44 3 M8...

Page 11: ...before beginning assembly In case of a discrepancy please call the customer service department of the store for help NOTE SOME PARTS MAY BE FACTORY PRE ASSEMBLED Replaced defective components immediat...

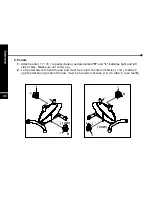
Page 12: ...ndicates right and left side of bike Make sure not to mix up 2 Left pedal has left hand thread and must be turned counterclockwise ccw to attach right pedal has right hand thread must be turned clockw...

Page 13: ...t place as illustrated First fasten with screw 49 a then fasten screw 49 b use tool A 2 Place rear decorative covers 21 22 onto the right place as illustrated First fasten with screw 49 a then fasten...

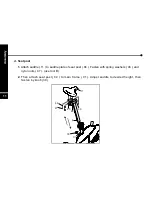
Page 14: ...to saddle plate of seat post 04 Fasten with spring washers 46 and nylon nuts 47 use tool B 2 Then attach seat post 04 to main frame 01 Adjust saddle to desired height then fasten by knob 30 d S 1 11...

Page 15: ...05 3 Connect extension monitor cable 09 and lower monitor cable 10 4 Then attach handlebar post 05 to mainframe 01 fasten with washers 45 and bolts 44 use tool A 5 Insert the tension control 31 onto...

Page 16: ...rew 38 fasten washer 37 and T knob 36 as adjuster The angle of handlebar 06 can be adjusted by loosing the T knob 36 After adjustment fasten the knob firmly f 1 then 2 Insert pulse cable 34 into side...

Page 17: ...ontrol cable 51 2 Connect pulse cables 34 52 together 3 Attach monitor 08 onto monitor plate on handlebar post 05 with screws 53 use tool A NOTE The monitor is powered with battery Battery spec 1 5V U...

Page 18: ...position loose the knob 42 and adjust saddle 11 to a desired position then fasten the knob 2 To Adjust tension turn tension control clockwise to increase tension from 1 low to 8 high and vice versa N...

Page 19: ...ith battery 3 If the display appears blank or display only partial segment remove the batteries and wait 15 seconds then install again 4 Whenever remove batteries all the functions values will be rese...

Page 20: ...N Press the ENTER UP and DOWN buttons at the same time and holding for 5 seconds all values will be reset to zero except clock and ODO Press this button to enter setting mode and confirm the setting v...

Page 21: ...e Distance Calorie Pulse and Gender Height Weight Age c Increase the setting value of year month date hour and minute C a Select function and display on the main screen Time Speed Distance Calorie Pul...

Page 22: ...rate correctly user must exam right after the workout After the button is pressed please hold the heart rate detector appropriately the test will last for 1 minute and the result will show on the scr...

Page 23: ...n will stay for 5 seconds on the main screen TIME SPEED DISTANCE CALORIE PULSE Or during exercise status press the ENTER MODE button to change display TIME RPM ODO CALORIE PULSE The lower display a No...

Page 24: ...00 After finish setting the value it starts countdown While counting down to 0 00 the monitor will beep 12 times and count up from 0 00 Without setting the value the time will count up and the maximu...

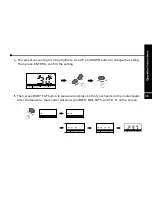
Page 25: ...unt up and the maximum value is 999 KM or Mile x 2 DOWN U P O M R E D T E N E x 3 DOWN U P O M R E D T E N E E CALORIE Shows the calories Press the ENTER button to the setting mode then press UP or DO...

Page 26: ...e value mode the pulse window shows T H R Once your current heart rate is higher than your set value the monitor will glitter to inform you NOTE If no pulse signal input within 8 seconds the pulse win...

Page 27: ...function UP DOWN and ENTER button to confirm your setting hour A Clock and calendar setting When the batteries are installed a Using b Using UP DOWN and ENTER button to confirm your setting minute DO...

Page 28: ...U P O M R E D T E N E c Using UP DOWN and ENTER button to confirm your setting year d Using UP DOWN and ENTER button to confirm your setting month e Using UP DOWN and ENTER button to confirm your set...

Page 29: ...button to stop alarm ringing 2 Change clock and calendar setting Press the UP and ENTER at the same time for 3 seconds during stop status IMPORTANT NOTE When take off or run out of battery the data o...

Page 30: ...U P O M R E D T E N E Pulse c After setting the target value for exercise just pedaling to start workout And the value of setting will begin to counting down Once the value of setting is counting dow...

Page 31: ...cribed as followed The personal data will not be kept in monitor when monitor power off run out of batteries or change unit of measurement a Press the Body Fat button to start b Press the ENTER button...

Page 32: ...button to change the setting Then p ress ENTER to confirm the setting d The preset value of weight is 70 0 Kg 155 0 Lb and glitters Use UP and DOWN button to change the setting Then p ress ENTER to co...

Page 33: ...he setting Then p ress ENTER to confirm the setting f Then press BODY FAT button to measure and place both of your hands on the contact pads After the measure the monitor will show your BMR BMI FAT an...

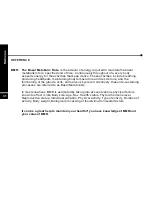
Page 34: ...g of the glands cells and nervous system Collectively these life sustaining processes are referred to as Basal Metabolism In most situations BMR is estimated by taking into account various physical fa...

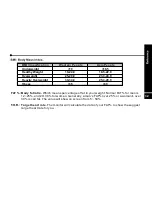
Page 35: ...ver 30 is call fat The value will show on screen from 5 50 T H R Target heart rate The monitor will calculate the data of your FAT to show the suggest target heart rate for you Underweight 19 18 5 Hea...

Page 36: ...33...

Page 37: ...34...

Page 38: ...e copied saved or transferred We reserve rights to revise specification equipment and maintenance informations for our R D team keeps updating our product quality Before printing this manual we have d...

Page 39: ......

Page 40: ......

Reviews: