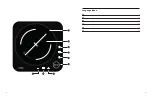
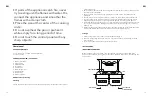
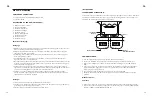
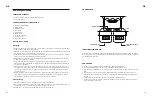
background image

15

14

HOW TO USE:

•  Insert the plug into the Socket (AC 220-240 V, 50-60 Hz).

•  Place an induction-compatible cooking pan in the center of the cooktop plate.

•  Press ON/OFF to start the heating process. The LED screen will display “ON”.

•  Press the “Function” key. The default Power 1300 W will be automatically selected. Press for 

different levels, settings and adjustments.

•  To power off the unit, press the ON/OFF button again.

•  Remove the plug from the socket if the unit is not going to be used for a long period of 

time.

Cooking Mode

Power

•  Press the “Function” key and the display will show the default power of 1300 W.

•  The power can be adjusted by touching the [+] and [-] buttons - 200 W, 500 W, 800 W, 1000 

W, 1300 W, 1600 W, 1800 W and 2000 W.

•  Once the cooking process has finished, press the [ON/OFF] button to switch off the induc-

tion cooktop.

•  The induction cooktop will switch off automatically after 2 hours if no other function button 

is pressed.

Temperature

•  Press the “Function” key and the display will show the default temperature of 180 °C.

•  The power can be adjusted by touching the [+] and [-] buttons - 80 °C, 100 °C, 130 °C,    

160 °C, 180 °C, 200 °C, 220 °C and 240 °C

•  Once the cooking process has finished, press the [ON/OFF] button to switch off the induc-

tion cooktop.

•  The induction cooktop will switch off automatically after 2 hours if no other function button 

is pressed.

Timer

•  Start by selecting the desired cooking mode, and then press the [Timer] button. The LED 

display will flash [0:00].

•  Press the [+] or [-] buttons to set the timer from [0:01] minute to [4:00] hours. Press and 

hold the [+] or [-] buttons for a quick time adjustment.

•  Once the time is set, do not press any buttons. The LED display will flash five times. The 

timer will then be active and the countdown will start.

•  Once the set timing is up, the induction cooktop will switch off automatically.

•  If you press any other cooking-mode button, the [Timer] button or the [ON/OFF] button, 

the cooktop will exit timer mode.

Lock

•  Press and hold the [LOCK] button for 3 seconds to lock the induction cooktop. The display 

will show [LOC].

•  All buttons are deactivated while in lock mode.

•  To exit the Lock mode, press and hold the [LOCK] button for 3 seconds.

NOTE: If the cookware is not induction-ready the cooktop won’t work and will beep. Place the 

cooking pan on the center of the cooktop plate. Once it has been placed, you can switch ON 

the induction cooktop.

Cookware Selection

1.  Material required: Please use only induction-compatible steel, cast iron, enameled iron, or 

stainless-steel cookware. Please use flat-bottom pans/pots with a diameter ranging from 

12 to 24 cm.

2.  Pans/Pots/Utensils should have a flat surface. Do not try to use any other kind of utensils or 

vessels (especially pressure cookers).

3.  While buying your cookware, look for an “Induction Compatible” sign or wording to 

ensure it will work with this cooktop.
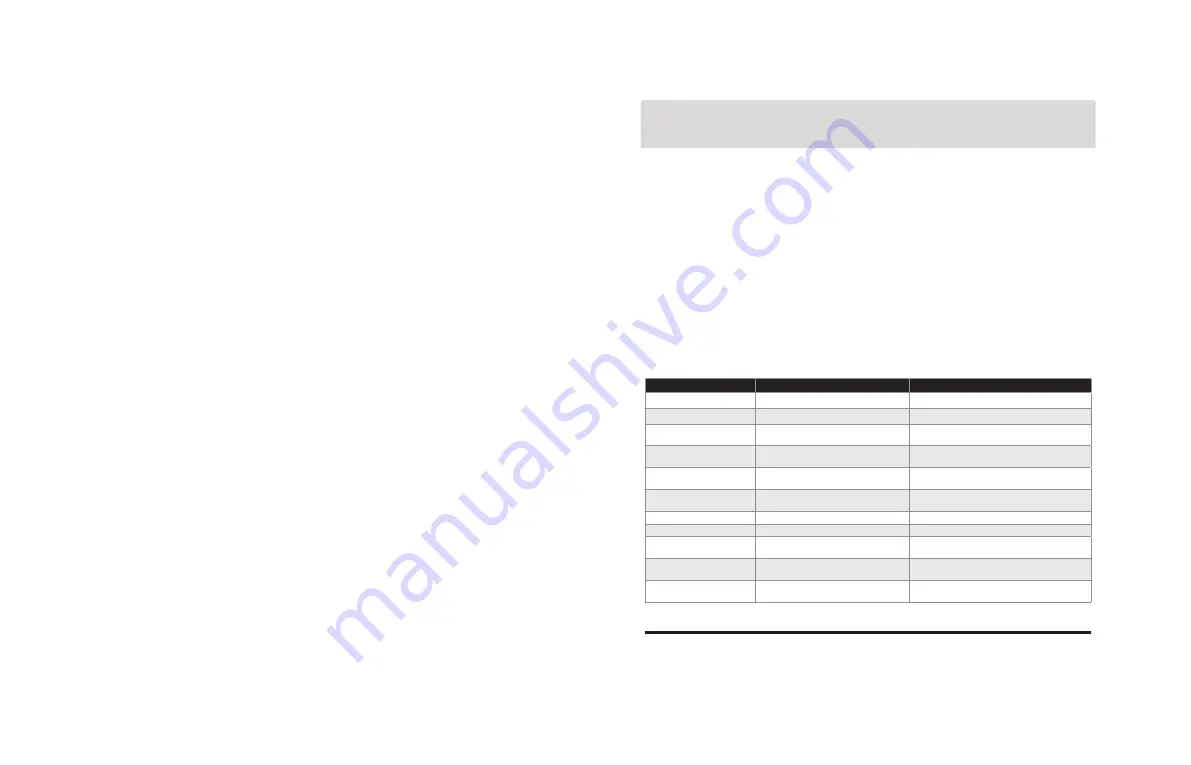
TROUBLESHOOTING

Some issues that arise may be solved by the user. If the problem persists after having tried 

the following solutions, please contact Prozis customer service. 

PROBLEM

CAUSE

SOLUTION 

Error code - E0

No compatible cookware

Check if the cookware is compatible

Error code - E1

Low-Voltage

Please make sure the voltage is > 88 V, 220-240 V~

Error code - E2

High-Voltage

Please make sure the voltage is < 280 V, 220- 

240 V~

Error code - E3

Overheating of the upper plate sensor or 

short circuit

Restart once it has cooled down. If this is not 

possible, please contact Prozis.

Error code - E4

Open circuit of the top plate sensor or no 

connection

Please contact Prozis

Error code - E5

IGBT Sensor Overheating or Short Circuit 

or Fan not connected

Please contact Prozis

Error code - E6

Open IGBT Sensor Circuit

Please contact Prozis

The appliance does not work

The plug is not connected

Connect the appliance to a mains power socket

---- appears in one of the 

displays

Standby mode

This is a normal function of the equipment while it 

is in standby mode. It disappears once unplugged.

Appliance switches off after 

2h and the display shows ----

Normal function

The induction stove switches off automatically after 

2 hours if no other function buttons are pressed.

LOC appears in one of the 

displays.

LOC mode on

To exit Lock mode, press and hold the [LOCK] 

button for 3 seconds.

Warranty statement

All electrical and electronic products commercialized by Prozis via www.prozis.com are cov-

ered by the warranty applicable to the purchase and sale of consumer goods.

EN

EN

Summary of Contents for KOOKA

Page 1: ...User Manual Warranty Statement V 1 08 2021...

Page 2: ...3 2 Language index EN 4 FR 18 DE 34 IT 50 ES 65 PT 81 1 2 3 4 5 6 7 9 8 please don t touch with your hand CAUTION The plate is hot after cooking Function Timer Lock ON OFF Timer Power...

Page 3: ...ispose of it separately and properly instead The packaging that protects the device against transport damage is made from non polluting materials that can be disposed of via local recycle bins Safety...

Page 4: ...heat up a securely closed contain er An explosion could quickly be caused due to heat expansion NEVER heat up an empty container It would very quickly overheat presenting both a risk of fire and of se...

Page 5: ...and other residential type environments Bed and breakfast type environments THIS APPLIANCE IS DESIGNED FOR INDOOR DOMESTIC HOUSEHOLD USE ONLY This appliance is designed to function on AC current only...

Page 6: ...power rating of the appliance Never leave the appliance unattended whilst connected to the power supply even if for a few moments especially when there are children present Do not let the power cord...

Page 7: ...detergent The fan in the air duct can get dirt stuck in it Please remove it regularly with a soft brush Do not use aggressive or abrasive cleaning agents or materials such as scouring milk or steel w...

Page 8: ...the Lock mode press and hold the LOCK button for 3 seconds NOTE If the cookware is not induction ready the cooktop won t work and will beep Place the cooking pan on the center of the cooktop plate On...

Page 9: ...ormal product use 2 Cracks dents scratches and other types of superficial damage that only affect the prod uct s appearance 3 Any malfunction caused by inappropriate use of the product that does not c...

Page 10: ...ut t s par ment et de fa on convenable L emballage qui prot ge l appareil contre les dommages dus au transport est con stitu de mat riaux non polluants qui peuvent tre d pos s dans des conteneurs de r...

Page 11: ...es cuill res et couvercles ne doivent pas tre plac s sur la plaque de cuisson car ils peuvent devenir chauds Ne couvrez pas la bouche d a ration pen dant la cuisson Les aliments surchauff s pourraient...

Page 12: ...re tenues l cart de la plaque induction lorsqu elle est branch e sur le r seau lectrique En cas de doute veuillez consulter un m decin avant d utiliser ce produit afin d viter tout danger ATTENTION Ce...

Page 13: ...r s humide Ne placez pas ou n utilisez pas la plaque d induction sur des surfaces en acier ou en aluminium Ne placez pas l appareil sur des v te ments des tapis etc Cela pourrait bloquer la ventilatio...

Page 14: ...tirant sur le cordon d alimentation Inspectez l appareil et le cordon d alimen tation pour d tecter tout signe d usure ou de dommage avant de brancher l appareil sur le secteur Ne d placez jamais l ap...

Page 15: ...dant le nettoyage afin d viter d endommager l appareil et les r parations correspondantes Assurez vous que l appareil est sec avant de le r utiliser Stockage Laissez l appareil refroidir compl tement...

Page 16: ...e batterie de cuisine recherchez un signe ou une mention Compat ible avec l induction pour vous assurer qu elle fonctionnera avec cette plaque de cuisson R SOLUTION DE PROBL MES Certains probl mes qui...

Page 17: ...4 Utilisation et stockage du produit non conformes aux instructions du manuel d utilisation 5 Ouverture du produit par un tiers qui n est pas autoris proc der sa r paration 6 Modification ou changeme...

Page 18: ...nicht mit unsortiertem Hausm ll sondern separat und ordnungsgem Die Verpackung die das Ger t vor Transportsch den sch tzt ist aus umweltfreun dlichen Materialien hergestellt die in rtlichen Recyclingb...

Page 19: ...glichen Strom schlag zu verhindern Metallische Gegenst nde wie Messer Gabeln L ffel und Deckel sollten nicht auf die Kochplatte gelegt werden da sie hei werden k nnen Die L ftung beim Kochen nicht abd...

Page 20: ...edizinische Ger te haben sollten von der Induktionskochplatte fern bleiben wenn sie an die Stromversorgung angeschlossen ist Im Zweifelsfall konsul tieren Sie bitte einen Arzt bevor Sie dieses Produkt...

Page 21: ...feuchtigkeit Stellen oder verwenden Sie die Induk tionsplatte nicht auf Stahl oder Aluminiu moberfl chen Stellen Sie das Ger t nicht auf Textilien Teppiche und dergleichen Dies kann die Entl ftung blo...

Page 22: ...romversorgung wenn es nicht in Gebrauch ist Trennen Sie die Stromversorgung niemals durch Ziehen am Netzkabel berpr fen Sie das Ger t und das Netz kabel auf Anzeichen von Verschlei oder Besch digung b...

Page 23: ...gsmittel um hartn ckige Verschmutzun gen zu entfernen Stellen Sie sicher dass w hrend der Reinigung keine Feuchtigkeit in das Produkt gelangt um Sch den am Produkt und die damit verbundenen Reparature...

Page 24: ...aille oder Edelstahl Bitte verwenden Sie Pfannen T pfe mit flachem Boden und einem Durchmesser von 12 bis 24 cm 2 Pfannen T pfe Utensilien sollten eine flache Oberfl che haben Versuchen Sie nicht irge...

Page 25: ...n von Oberfl chensch den die nur das Aussehen des Produktes beeintr chtigen 3 Jegliche Fehlfunktion die durch die unsachgem e Produktverwendung d h die den Anweisungen der Bedienungsanleitung nicht en...

Page 26: ...i elettrici o elettronici insieme alla spazzatura domestica indifferenziata Smaltire separatamente ed adeguatamente La confezione che protegge il dispositivo dagli eventuali danni provocati dal traspo...

Page 27: ...te cucchiai e coperchi non devono essere po sizionati sulla piastra calda poich potreb bero riscaldarsi Non coprire la presa d aria durante l uso Il cibo surriscaldato pu iniziare a bruciare Non lasci...

Page 28: ...fine di evitare pericoli ATTENZIONE Questo simbolo evidenzia situ azioni di pericolo che possono portare a lesioni lievi o moderate danni malfunzionamento e o dis truzione del dispositivo PER EVITARE...

Page 29: ...affini Questi potrebbero blocca re la presa dell aria e costituire un pericolo per il dispositivo e per l utente Mantenere uno spazio di almeno 10 cm 4 pollici intorno ad ogni lato del dispositivo per...

Page 30: ...ento Se delle parti del dispositivo dovessero prendere fuoco non provare a spegnere le fiamme con acqua Scollegare il dispositivo e soffocare le fiamme con un panno umido Posizionare la pentola al cen...

Page 31: ...lsante Funzione Verr automaticamente selezionata la potenza predefinita di 1300 W Premere nuovamente per cambiare tra i diversi livelli impostazioni e regolazioni Premere nuovamente il pulsante ON OFF...

Page 32: ...ato Il dispositivo si spegne dopo 2 ore e lo schermo mostra il messaggio Normale funzione Il piano a induzione di spegne automaticamente dopo 2 ore se non si dovesse premere alcun pulsante di funzione...

Page 33: ...rozis attraverso i canali presenti sul sito di Prozis e seguire le istruzioni e i consigli riportati Restituire il prodotto all interno della scatola originale inclusi tutti gli accessori e i document...

Page 34: ...cuchillos tenedores cucharas y tapas so bre la placa de cocci n ya que pueden ES ES PELIGRO PARA NI OS Y PERSO NAS CON DISCAPACIDAD Los materiales de embalaje no son jug uetes Los ni os no deben juga...

Page 35: ...aci n nunca se moje o entre en contacto con humedad durante el funcionamiento Col quelo de manera que no pueda re sultar aplastado o da ado Verifique regularmente si el cable de ali mentaci n est da...

Page 36: ...conectarlo por primera vez compruebe que el voltaje indicado en el dispositivo coincida con las especificaciones de la placa de caracter sti cas del aparato Conecte siempre el aparato en un enchufe co...

Page 37: ...liment aci n aunque sea por unos instantes espe cialmente si hay ni os presentes No deje que el cable de alimentaci n quede colgado donde los ni os puedan alcanzarlo El cable de alimentaci n nunca deb...

Page 38: ...de la salida de aire puede tener suciedad acumulada L mpielo regularmente con un cepillo suave No utilice productos de limpieza agresivos o abrasivos ni materiales como estropajos de acero o limpiado...

Page 39: ...oqueo todos las teclas se encuentran desactivadas Para salir del modo de bloqueo mantenga pulsada la tecla Lock Bloqueo durante 3 segundos NOTA Si los recipientes no son aptos para inducci n la placa...

Page 40: ...ectamente ocasionados por dichas reparaciones que hayan afectado o provocado los da os que son objeto de la reclamaci n de garant a EXCLUSIONES Quedan excluidas de la cobertura los siguientes casos 1...

Page 41: ...rozis est totalmente em conformidade com todas as normas especificadas na legisla o aplic vel bem como com outras cl usulas relevantes A Prozis estar sempre dispon vel para esclarecimentos adicionais...

Page 42: ...de de um choque el trico PT PT PERIGO PARA CRIAN AS E PES SOAS COM INCAPACIDADES Os materiais da embalagem n o s o brin quedos As crian as n o devem brincar com os materiais da embalagem Existe o risc...

Page 43: ...raturas elevadas Se o fizer o leo pode acender e provocar chamas Certifique se de que o cabo de alimen ta o nunca fica molhado ou h mido du rante a utiliza o Certifique se de que este n o est danifica...

Page 44: ...e a sua tens o principal corresponde indi cada na placa de classifica o do aparelho Ligue sempre o aparelho a uma tomada com liga o terra N o utilize um adaptador de tomada nem ligue qualquer outro ap...

Page 45: ...tes N o deixe o cabo de alimenta o pendur ado de forma a que as crian as o possam alcan ar O cabo de alimenta o nunca deve estar perto ou em contacto com pe as quentes do aparelho junto a fontes de ca...

Page 46: ...dem danificar a superf cie do dispositivo Proteja o dispositivo de gua Utilize apenas um pano limpo e seco para limpar o dispos itivo e nunca utilize l quidos corrosivos Utilize um pano ligeiramente h...

Page 47: ...gundos PT PT NOTA Se o utens lio de cozinha n o for apto para indu o a placa n o funcionar e apitar Coloque a frigideira no centro da placa de cozedura Assim que for colocada pode LIGAR a placa de ind...

Page 48: ...ado os danos que constituem o objeto desta reclama o de garantia EXCLUS ES As situa es que se seguem n o se encontram abrangidas por esta garantia 1 Qualquer desgaste de pe as e componentes resultante...

Page 49: ...do Cais n 198 4830 345 P voa de Lanhoso Braga Portugal CONTACTOS A Prozis est sempre dispon vel para esclarecimentos adicionais atrav s do seu canal de comunica o de apoio ao cliente em www prozis co...

Page 50: ...Zona Franca Industrial Plat 28 Pavilh o K Mod 6 9200 047 Cani al Madeira...

Reviews: