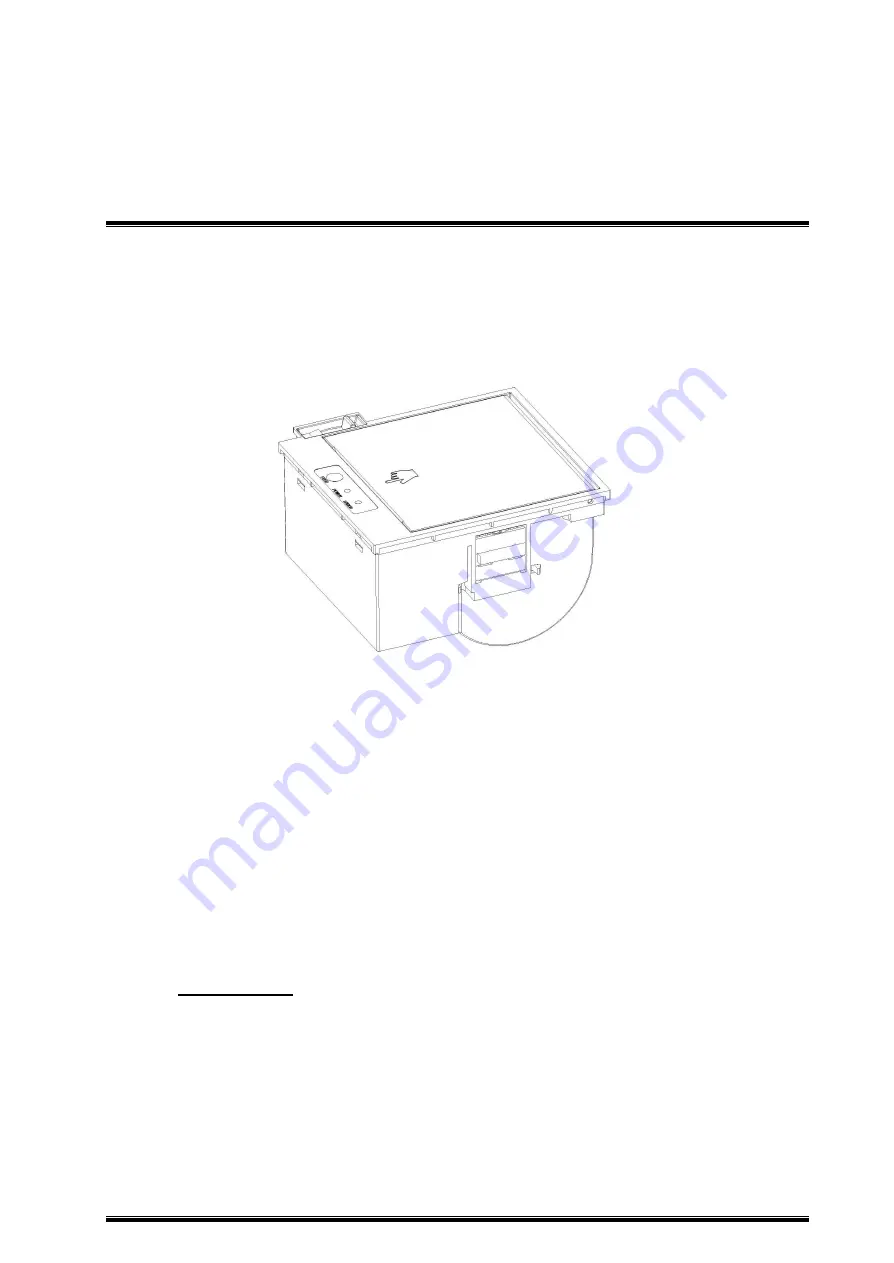
background image

User Manual

PM381

Xiamen PRT Technology Co.,Ltd.

ADD:

4/5F, 8#, Gaoqi Nan Shi’er Road, (AideAirport Industrial Park)

Xiamen, Fujian, China-361006.

Tel.

+86-(0)592-5932525

Fax:

+86-(0)592-5235252

Web:

www.prttech.com

Summary of Contents for PM381

Page 1: ...User Manual PM381 Xiamen PRT Technology Co Ltd ADD 4 5F 8 Gaoqi Nan Shi er Road AideAirport Industrial Park Xiamen Fujian China 361006 Tel 86 0 592 5932525 Fax 86 0 592 5235252 Web www prttech com ...

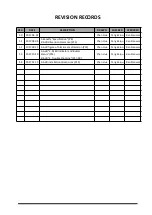
Page 2: ...Add dimension tolerance P13 Chen Hua Yang Kaiqu Ren Xiaowei 1 2 2017 09 13 A Add figure of black mark dimension P13 Chen Hua Yang Kaiqu Ren Xiaowei 1 3 2017 10 19 A Add 2 9 LED Indicator and Buzzer Status P14 B Add 4 Trouble Shooting P17 18 Chen Hua Yang Kaiqu Ren Xiaowei 1 4 2017 12 19 A Add installation dimensions P14 Chen Hua Yang Kaiqu Ren Xiaowei ...

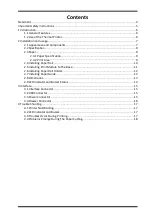
Page 3: ... Installing Paper Roll 10 2 5 Installing Print Module to The Base 11 2 6 Installing Paper Roll Holder 12 2 7 Installing Paper Guide 12 2 8 Dimensions 13 2 9 LED Indicator and Buzzer Status 14 3 Interface 15 3 1 Interface Connector 15 3 2 USB Connector 15 3 3 Power Connector 15 3 4 Drawer Connector 16 4 Trouble Shooting 17 4 1 Printer Not Working 17 4 2 LED Indicator and Buzzer 17 4 3 Troubles Occu...

Page 4: ...d software of the products If more information is needed about the products please contact Xiamen PRT Technology Co Ltd Without any written permission from the company any section of this manual is prohibited to be copied or transferred in any form Warnings This must be complied with in order to avoid any damage to the human body and to the equipment This is showing the important information and t...

Page 5: ...place the printer on or near a heat source 5 Do not use the printer near water Never spill liquid into the printer 6 Do not expose the printer to high temperatures direct sunlight or dust 7 Protect the printer from shock impact and vibration 8 Be certain the power source is within the voltage rating and frequency listed for the printer 9 Switch off the printer power supply when won t use it for a ...

Page 6: ...aphic printing Easy paper Loading 1 2 Use of the Thermal Printer Be careful do not drop or bump the printer on a hard surface Do not expose the module to the direct sunlight Suitable environment for the use of the printer is as follow Temperature 10 50 Humidity 10 RH 80 RH Do not place the module on the copier or beside other equipment that have strong electromagnetic field Do not open the printer...

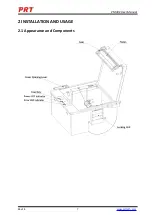
Page 7: ...PM381 User Manual Rev 1 4 www prttech com 7 2 INSTALLATION AND USAGE 2 1 Appearance and Components ...

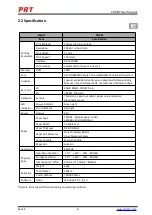
Page 8: ...3 CODE39 etc 2D PDF417 QR code Detection Sensors Thermistor paper out sensor paper near end sensor black mark sensor LED Indicator Power Indicator Green Light Error Indicator Red Light Power Output 24V Paper Paper Type TF50KS E Japan paper co ltd AF50KS E JUJO THERMAL Paper Width 79 5 0 5 mm Paper Thickness 0 06 0 08mm Paper Roll Diameter Outer Diameter 80mm Inner Diameter 13mm Paper Loading Manua...

Page 9: ... Please use the recommended thermal paper or same quality paper otherwise it influences the printing quality and decreases the thermal print head life 2 Do not paste the paper to the core 3 Chemicals or oil may change the color of paper or printed characters may fade 4 Color of paper may be changed by being scratched by nail or hard metal 5 The color of paper fades when temperature is over 70 ther...

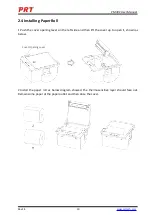
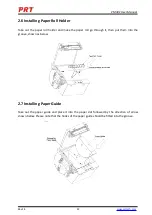
Page 10: ... Push the cover opening lever on the left side and then lift the cover up to open it shown as below 2 Install the paper roll as below diagram showed the thermosensitive layer should face out Remain some paper at the paper outlet and then close the cover Cover Opening Lever ...

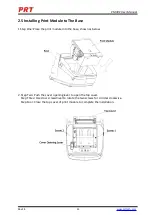
Page 11: ...se 1 Step One Place the print module into the base shown as below 2 Step Two Push the cover opening lever to open the top cover Step Three Use cross screwdriver to rotate the two screws for 4 circles clockwise Step Four Close the top cover of print module to complete the installation ...

Page 12: ...l holder and make the paper roll go through it then put them into the groove shown as below 2 7 Installing Paper Guide Take out the paper guide and place it into the paper slot followed by the direction of arrow shown below Please note that the hooks of the paper guide should be fitted into the groove ...

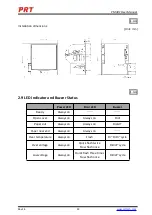
Page 13: ...PM381 User Manual Rev 1 4 www prttech com 13 2 8 Dimensions 1 1 B Overall dimensions Unit mm 1 2 A Black Mark Dimension Remark Black mark is printed on thermosensitive layer ...

Page 14: ...D Error LED Buzzer Ready Always on Open cover Always on Always on Didi Paper out Always on Always on Dididi Paper near end Always on Always on Over temperature Always on Flash Di Di Di cycle Over voltage Always on Quick flash twice Slow flash once Dididi cycle Low voltage Always on Quick flash three times Slow flash once Dididi cycle ...

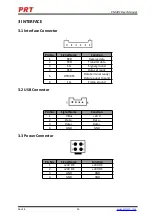
Page 15: ...ata 2 TXD Transmit data 3 SG Signal ground 4 DSR Data set ready 5 DTR RTS Data terminal ready Data request to send 6 FG Frame ground 3 2 USB Connector Pin No Signal Name Function 1 V Bus 24 V 2 Data Data 3 Data Data 4 GND GND 3 3 Power Connector Pin No Signal Name Function 1 24V DC 24V DC 2 24V DC 24V DC 3 GND GND 4 GND GND ...

Page 16: ...nction 1 GND GND 2 DRAWER1 Drawer 1 3 DRAWER_SNS Drawer sensor 4 24V DC 24V DC 5 DRAWER2 Drawer 2 6 GND GND Caution 1 Do not plug unplug the communication connector when the power is on 2 Do not expose the cable to the strong sunlight 3 The communication cable should have outer protection ...

Page 17: ... Close the printer cover Paper Error LED always on and buzzer alarms Paper end Reload the roll paper Error LED blinks and buzzer alarms Thermal print head overheated Turn the printer off and resume when it cools Over voltage Print with specified voltage Low voltage Print with specified voltage 4 3 Troubles Occur During Printing Problem Description Probable Reason Solution Coloured stripe in the pa...

Page 18: ...ear and worm wheel Motor burnt Replace the motor Paper scraps Clean the paper scraps on the transmission system Insufficient cutting Cutter edge abrasion paper too thick Replace the cutter Paper jam Thermal printer head over heat Reduce the density of printing Driving too fast Reduce the printer speed to the limit of thermal printer head Wrong paper feeding position Put the paper parallel with the...

Reviews: