background image

4-10

ROTALIGN 01.2000

1. Prepare the machines

Before using ROTALIGN, make sure the machine is properly prepared
for alignment as described below. See page 6-7 for further informa-
tion.

Ensure that the machine cannot accidently be started before
commencing work.

a. Solid, flat foundation

b. Machine mobility

Start with about 2 mm (80 mils) of shims beneath each foot.
Hydraulic or screw-type positioning aids are recommended for
horizontal movement.

c.

Rigid couplings and coupling play

Rigid couplings must be loosened before measurement so that
they do not distort the alignment condition.

Note: coupling backlash has no affect on ROTALIGN measure-
ment repeatability or accuracy.

d. Shaft play

The ROTALIGN soft foot function can measure radial play when
the shafts are lifted. Axial shaft play

up to 3 mm  (1/8")

can

be tolerated during measurement (although not necessarily for
machine operation!).

e. Soft foot

Soft foot allows the machine to tip into a different position every
time the bolts are loosened, making proper alignment difficult or
impossible. This can be checked with ROTALIGN immediately
before measuring alignment (pages 4-29 and 6-24).

f.

Thermal growth, alignment targets, tolerances

Find out from specifications what these values are for your
machines. They can then be entered into the program as
explained later (pages 4-61 and 6-32).

g. Measurement separation

Since the ROTALIGN system requires no mechanical connections
(such as cantilevered dial indicator brackets) to span over the
coupling during measurement, alignment may easily be per-
formed over laser

receiver separations of up to 10 meters (33

feet). Longer separations are possible when angular misalign-
ment is not too large. Alternatively, use the "Extend" function
and/or additional averaging (see pages 4-46)

Note that over very large distances the shafts and coupling may
sag, and the machines may need to be aligned to take this into
account. Refer to the coupling manufacturer's specifications.

WARNING!

Horizontal machine alignment - prepare the machines

Summary of Contents for ROTALIGN ALI 3.500

Page 1: ...buy your excess underutilized and idle equipment along with credit for buybacks and trade ins Custom engineering so your equipment works exactly as you specify Critical and expedited services Leasing Rentals Demos In stock Ready to ship TAR certified secure asset solutions Expert team I Trust guarantee I 100 satisfaction All trademarks brand names and brands appearing herein are the property of th...

Page 2: ...umber ALI 9 381G Operating Instructions and Alignment Handbook Dear Customer If you have any suggestions for improvement or corrections not just for this manual but also for software or hardware please give us a call or drop us a line We would be glad to make improvements wherever possible We look forward to hearing from you ...

Page 3: ...gauge value entry Thermal growth entry in terms of target coupling misalignment or thermal growth amounts expected at machine feet Alignment tolerance evaluation with a choice of different methods Stationary feet can be designated from either or both machines to be aligned Select from a number of languages in which to operate the computer QUICK CHECK measures alignment with a minimum of adjustment...

Page 4: ... use 1 5 CE conformity 1 5 Safety information 1 6 General 1 6 Intrinsically safe devices 1 6 Laser safety 1 7 Operating information 1 8 Temperature range 1 8 Water and contamination resistance 1 9 Incident light and other sources of interference 1 9 Installing the measurement components 1 9 Measurement distance 1 9 Dust and water seals 1 9 Interfaces 1 9 Chapter 2 Description 2 1 to 2 16 Chapter 3...

Page 5: ...00 ROTALIGN Receiver incl dust cap Mounted on right side of coupling and connected to computer page 2 15 ALI 3 581 2 ROTALIGN Receiver cable 2 m 6 ft Connects receiver to computer page 2 7 ALI 2 891set Compact chain type bracket set in pouch Used to mount the components on the machine shaft page 2 16 The ROTALIGN package T y p e S e t N o P r ü f t e c h n i k A G P O B o x 1 2 6 3 D 8 0 4 5 I s m...

Page 6: ...LI 3 608 Adjustment tube for centering laser beam page 2 15 ALI 2 905 Optics cleaning cloth page 6 36 0 0739 1055 Allen wrench 2 5 mm for access to battery compartments page 2 10 R ROTALIGN Ope ra tin g In stru ctions ALI 3 608 ALI 9 454G Baby LR 14 C AM2 No 4014 1 5 V Nicht ins Feuer werfen Nicht wiederaufladbar May explode in fire Not rechargeable Ne pas jeter au feu non rechargeable ALI 3 588 A...

Page 7: ...on the ROTALIGN components and computer and on alignment theory and practice Then try an actual alignment by following the instructions starting page 4 7 Experts If you have some experience in alignment e g with OPTALIGN and are familiar with computers you may even be able to start right away by following the on screen messages Step by step alignment for a standard horizontal machine arrangement i...

Page 8: ...This symbol denotes general information and tips regarding operation of the ROTALIGN Intended use ROTALIGN to be used exclusively for aligning shafts in industrial environments The device and its accessories must only be operated by specially trained personnel PRÜFTECHNIK assumes no liability when components or operating procedures as described in this manual are altered without permis sion of the...

Page 9: ...s and accessories must be used Any unauthorized modifications to the ROTALIGN its com ponents and the operating procedures described herein shall render all warranty coverage void Intrinsically safe version ROTALIGN is also available in an intrinsically safe version which fulfills the following specification EEx ib IIC T4 approx U S equivalent NEC Article 500 4 Class 1 Division 1 groups D C B A an...

Page 10: ...o maintenance is necessary to keep this product in compliance with the above specifications Do not look into the laser beam at any time including during setup adjustment or operation Risk of injury Since the FDA specification allows maximum exposure of 0 25 seconds the natural blink reaction of the human eye is normally sufficient to avert any danger provided that no optical instruments other than...

Page 11: ...that case give the equipment about 10 minutes to reach the work area temperature If the sensor temperature drops below 0 C 32 F or rises above 60 C 140 F the computer displays TEMPERATURE measurements can still however be made Temperature effects and fluctuations Powerful heat sources or steam located near the laser beam could influence the accuracy of measurements as a result of beam deflec tion ...

Page 12: ...Measurement distance As no mechanical connecting parts are necessary for work with the ROTALIGN system the system can be used to align over distance of up to 10 m 33 ft Dust and water seals The ROTALIGN computer laser and receiver are water and contami nation resistant to specification IP67 This specification requires that each component be able to withstand a water jet spray from any direction th...

Page 13: ...1 10 ROTALIGN 01 2000 This page intentionally left blank ...

Page 14: ...s 2 7 Connecting the receiver 2 7 Connecting PC printer and mains supply 2 8 Batteries and power supply 2 9 ROTALIGN intrinsically safe version 2 9 MAIN Battery six C cells 2 9 Main battery depletion 2 10 Auxiliary battery 2 11 Power saving features and Sleep mode 2 12 Electronic memory 2 12 ROTALIGN components in detail 2 13 Laser 2 13 Laser battery 2 14 Receiver 2 15 Adjustment tube 2 15 Compact...

Page 15: ...ngle of the incident laser beam COMPUTER connects to the receiver calculates the machine align ment from data collected from the receiver during shaft rotation The machines can then be aligned with aid of a live graphical display The ROTALIGN computer can also be connected to a PC with the ROTALIGN Commander software page 6 16 The laser and receiver can be mounted on the coupling or on the inside ...

Page 16: ...link see page 6 23 from the receiver to the ROTALIGN computer and are then used to calculate the alignment diagram Numerous software functions allow the computer to handle a wide range of alignment situations Notes on ROTALIGN operation To ensure proper and safe operation of the ROTALIGN system there are a few operating rules which must be observed The ROTALIGN must not be operated with the housin...

Page 17: ...r a printed copy of the screen See page 3 7 DIMension key Use this key to enter machine dimensions directly into the screen see page 4 16 Enter key Confirms displayed value and proceeds to next value See page 4 22 Results key Calls alignment result diagram into the display See page 4 49 M Measure This key is used to enter the alignment measurement mode See page 4 23 Function softkeys Labelled at t...

Page 18: ...s e g to quickly change a dimension from the Results screen even from several menu levels within a function Also important is the MENU key described on page 3 3 and 4 6 which similarly exits from any point in the program Resetting the ROTALIGN computer The ROTALIGN computer like all computers can lock up when a mathematical error occurs Should this occur and normal operation come to a halt reset t...

Page 19: ... is low The auxiliary battery should be replaced after each time it has been relied upon CHARGE lights to show that the mains adapter charger is connect ed If a lead acid rechargeable battery is fitted 5 hours are required for a full charge See page 6 17 SLEEP lights to indicate that the computer has entered its sleep mode after a given time of nonuse see below thereby conserving a considerable am...

Page 20: ... below Do not twist the plug while inserting it into the socket This could result in damage to the pins When inserting the plug align the notch in the plug with the groove in the socket Push the plug into the socket until it clicks into place When removing hold the plug at the rubber base and pull gently PRÜFTECHNIK recommends that the receiver be left in place at all times even when in the transp...

Page 21: ...er and mains supply A 9 pin serial port RS232 is installed in the ROTALIGN unit for connecting to a PC Using this port measurements can easily be documented and backed up on a PC From the main menu reached by pressing the Menu key select the RS 232 CONFIG option Select the necessary buttons for the desired configuration A 25 pin parallel port for connecting to a printer is also installed Select th...

Page 22: ...based on an operating cycle of 25 measurement 25 computation and 50 sleep mode ROTALIGN intrinsically safe version The ROTALIGN package is available in an intrinsically safe version ALI 3 500Ex with all electrical components also suffixed by Ex In this case use only alkali mangan batteries or the rechargeable battery ALI 3 572 page 6 17 DO NOT USE lithium batteries or nickel cadmium rechargeable b...

Page 23: ...battery for longer than absolutely necessary If replacing the C size batteries replace all of them at once with new ones Remove them as soon as they become depleted or if the computer is not to be used for an extended period to prevent battery leakage Used batteries should be disposed of in an environmentally sound manner in accordance with applicable regulations Panel opened with a 2 5 mm Allen k...

Page 24: ...r PRÜFTECHNIK recom mends auxiliary battery replacement whenever the computer has used it under full load i e after the MAIN LED has lit When the auxiliary battery is low the red AUX LED glows O N O F F C L R D I M M E N U M 0 3 8 4 1 2 7 9 5 6 E N T E R E N T E R E N T E R D U R A C E L L D U R A C E L L AL KA LIN E D U R A C E L L AL KA LIN E MN 16 04 6L R6 1 9 0 V M A IN M A IN A U X A U X B A ...

Page 25: ... product and any of its functions such as loss or alteration of stored data etc The ROTALIGN COMMANDER software program can be used to back up data to a PC See page 6 16 for details ATTENTION Power saving features and Sleep mode The ROTALIGN computer automatically monitors its operation so that it can save battery power by shutting itself down temporarily when not in use This is not operational wh...

Page 26: ...page 1 7 for details The beam is adjusted during setup by changing its vertical and horizontal angles with thumbwheels so that the beam strikes the receiver lens straight on As with all the ROTALIGN components the laser is water and dust resistant The internal optics and electronics are internally sealed preventing possible contamination e g via the two thumbwheel slots Note the battery compartmen...

Page 27: ...tery compartment cover of the laser housing as shown above Used batteries should be disposed of in an environmentally sound manner Be aware that when NiCad rechargeable batteries are used as replacements their voltage tends to drop quite rapidly as they become depleted This may limit the effective warning time see note above so a fully charged spare should be held in reserve Under no circumstances...

Page 28: ... rotation measurements Target Aperture The receiver has two indicator LEDs on its front side one green and the other red to indicate beam adjustment see page 4 25 The receiver is powered by the ROTALIGN computer via a cable through which measurement data also pass An infrared link is also available See appendix page 6 23 for details Adjustment tube ALI 3 608 To help align the laser beam with the r...

Page 29: ...ounting instructions on page 4 11 Other accessories See page 6 15 for a list of popular ROTALIGN accessories The ROTALIGN product catalog illustrates and describes some additional accessories available for ROTALIGN It is available under order number ALI 9 300 Among the most useful accessories are the various brackets specially designed for mounting ROTALIGN on specific machine configura tions Thes...

Page 30: ...to 3 8 Configuration and data management overview 3 2 Configuration 3 3 USER SETUP 3 4 Data Management 3 5 NEW 3 5 OPEN 3 5 FILE TYPE 3 5 SAVE 3 6 SAVE AS 3 6 DELETE 3 6 EDIT FILE INFO 3 6 REPORT 3 6 PC COMM 3 6 PRINTER CONFIG 3 6 RS232 CONFIG 3 6 REPORT 3 7 Screen hardcopy 3 7 PC COMM 3 7 PRINTER CONFIG 3 8 RS232 CONFIG 3 8 CHANGE APPLIC 3 8 Chapter 4 Horizontal Alignment 4 1 to 4 66 Chapter 5 Ve...

Page 31: ...ud rate parity data bits and stop bit for RS232 interface CHANGE APPLIC page 3 8 Application menu RESUME return to last point before switch off page 2 12 Horizontal machines see page 4 6 QUICK CHECK for basic horizontal check see page 4 3 Vertical machines see page 5 1 FILE see above CONFIG see above All of the above ROTALIGN configuration and data management options can be reached from the Menu T...

Page 32: ...ypical time is 30 minutes Enter the new value and press ENTER Note the sleep mode function is deactivated when external power is connected to the computer SENSORPORT selects the computer socket to which the sensor receiver is connected The socket at the top of the computer is Default the serial port upper right hand side is COM e g for the IR link page 6 23 Softkeys CONTRAST changes the screen con...

Page 33: ...equired line with the arrow softkeys and press EDIT NAME softkey to call up the Text Editor Press ENTER to select a letter and CLR to delete letters Press the OK softkey when finished Max lengths General names 16 characters Comments 26 characters Machine names 10 characters File names 8 characters spaces not allowed Changing the data in the User Setup file will not change the contents of a particu...

Page 34: ... 16 for further information File type Horiz or Vert machine NEW clears all current data ready for a new alignment job and puts you in the dimensions mode If the current data have not previously been saved then the message appears Current data not saved Save as name Press OK to save the data under the suggested name or ESC to ignore and lose the data OPEN loads a stored file The same save query app...

Page 35: ... in length spaces are not allowed Enter the new name using the text editor as described on page 3 4 If the file already exists you will be requested to press the OK softkey to overwrite the old file Press the ESC softkey to cancel the save A warning appears when the memory is nearly full DELETE opens a window listing all files Use the arrow keys to move up and down through the list Press the Delet...

Page 36: ...d to ROTALIGN and the printer configuration correctly set see page 3 8 PC COMM File type horiz or vert machine Note only the files are shown for the current application i e vertical or horizontal REPORT REPORT prints an alignment report showing machine setup and dimensions measurements and movements There are two types of report either text TEXT REPORT or a printout of text with graphics GRAPH REP...

Page 37: ...to return to the introductory screen page 4 14 From the introductory screen you can switch to QUICK CHECK page 4 3 Horizontal page 4 6 and Vertical page 5 1 applications PRINTER CONFIG Use PRINTER CONFIG to select the printer type and connection If your printer name is not shown either select a similar model from the same manufacturer or find out with which type your printer is compatible commonly...

Page 38: ...orizontal machines 4 6 The Menu 4 7 Horizontal machine alignment flow chart 4 8 Horizontal machine alignment 4 9 1 Prepare the machines 4 10 2 Mount the brackets 4 11 3 Mounting laser and receiver 4 12 Connecting the receiver 4 13 4 Switch on the computer 4 14 Select horizontal alignment 4 15 5 Machine dimensions 4 16 Machine setup 4 17 Coupling type 4 19 Enter the dimensions 4 21 6 Laser beam adj...

Page 39: ...ZOOM 4 52 Vertical movement 4 53 Horizontal movement 4 54 10 Alignment completion 4 55 Save 4 55 Save as 4 55 Switching off 4 56 Further reading 4 56 Options during Results 4 57 Results Setup Options 4 57 History 4 58 Coupling Targets 4 59 Thermal growth 4 61 Tolerances 4 62 TABLE TOLERANCES 4 63 MAX COUPLING VALUES 4 64 Static feet 4 65 Chapter 5 Vertical Alignment 5 1 to 5 18 Chapter 6 Appendix ...

Page 40: ...le plane type QUICK CHECK displays the alignment horizontally and vertically in terms of Coupling angle in mrads milliradians Coupling offset in mm or mils Front and back feet positions on right hand machine If you have any other requirements e g to save results set up tolerances etc you can switch from the QUICK CHECK results screen to the comprehensive horizontal machine mode at the touch of a b...

Page 41: ...orce on the shafts Mount the laser and receiver on the coupling with the laser on the left stationary machine page 4 12 Connect the receiver to ROTALIGN switch on and select QUICK CHECK 2 Enter Dimensions Type in the three dimensions as shown and press ENTER to confirm the entry Errors can be corrected with the CLR key See page 4 21 to change mm inches STATIONARY MACHINE MOVEABLE MACHINE quick che...

Page 42: ... makes a series of measurements at least 5 are required Once these conditions have been met the results screen appears 4 Results LEFT AND RIGHT FOOT POSITIONS LEFT MACHINE RIGHT MACHINE OFFSET ANGLE VERTICAL VIEW FROM SIDE HORIZONTAL VIEW FROM ABOVE Switches to main horizontal alignment mode page 4 6 Note 1 mrad 1 micron mm 1 mil inch Remember Remove all components from the shaft before restarting...

Page 43: ...s CURVE FIT RANGE EXTEND AVERAGE Pass mode uncoup shafts START depending on mode Dial gages see page 4 39 SOFT FOOT see below SOFT FOOT page 4 29 Select a foot loosen press OK and retighten Machines to check must be 4 feet type Right hand softkey switches between machines if both moveable Refer to the soft foot appendix for interpretation of the results COUPLING TARGETS p 4 59 Enter target values ...

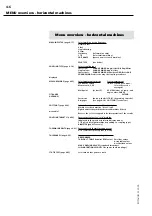
Page 44: ...u at any time press the MENU key Press MENU again to return to where you came from Note this option is not available in QUICK CHECK mode Below is the menu for horizontal machines for vertical machines only the right hand column of options is available Horizontal Horizontal and machines vertical machines page 4 17 page 4 19 page 4 33 page 4 29 page 4 59 page 4 61 page 4 62 page 4 65 page 3 3 page 3...

Page 45: ...ME press ENTER to return UP DOWN select type CPLG TYPE OK returns to Edit dimensions Normal 4 feet 6 Feet Single bearing V form Stationary left only Select coupling type page 4 19 Short flex Single plane Spacer shaft CHANGE MODE OK returns to Select coupling type TYPE MODES Short flex Angle offset Gap offset Single plane Angle offset Spacer shaft Alpha beta Offsets a b Results page 4 49 MOVE HISTR...

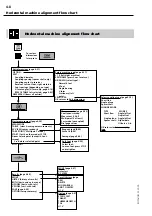
Page 46: ...es are provided to their complete descriptions which are also included in manual The flow chart on the opposite page gives a complete overview As this is the main instruction procedure it is important to acquaint yourself with this chapter before moving to vertical machines or special cases Step by step 1 Prepare machine for alignment 2 Mount the brackets 3 Mount laser and receiver 4 Switch on the...

Page 47: ...oot allows the machine to tip into a different position every time the bolts are loosened making proper alignment difficult or impossible This can be checked with ROTALIGN immediately before measuring alignment pages 4 29 and 6 24 f Thermal growth alignment targets tolerances Find out from specifications what these values are for your machines They can then be entered into the program as explained...

Page 48: ...side 4 Catch the chain loosely on the anchor peg 5 Turn the bracket thumbscrew to tighten the assembly onto the shaft 6 Small clips are provided to secure the loose ends of the chain back onto itself Now the bracket should be tight upon the shaft Do not push or pull on the bracket to check since that would only loosen its mounting Important The brackets MUST be correctly mounted to ensure accurate...

Page 49: ...hat the yellow knobs on both components are loosened enough to let you slide the housings onto the support posts Both laser and receiver should be at the same height as low as possible yet just high enough for the beam to clear the coupling flange as shown below Mount just high enough to clear coupling 12 3 6 9 E N T E R M M A IN A U X B A B A T T C H A R G E S LE E P Tighten the yellow knobs to l...

Page 50: ...will help avoid damage to cable pins plugs and sockets If it is discon nected screw it in to the receiver socket observing the proper key way orientation Attach the plastic cable clip to the lower portion of the support post as shown This helps avoid measurement disturbance and damage to the cable or socket if the cable is pulled Important pull don t twist the cable when disconnecting PRÜFTECHNIK ...

Page 51: ...tures Under each screen picture in this chapter is a brief description of each softkey with a page reference if required Those often used are described starting on the following pages In this introductory screen the 1 and 0 keys change the screen contrast The identification number located in the lower left adjacent to the version number is required when registering the software upgrade Select Unit...

Page 52: ...important is the MENU key described on page 4 7 and 3 2 which similarly exits from any point in the program and returns to the main menu Resetting the ROTALIGN computer The ROTALIGN computer like all computers can lock up when a mathematical error occurs Should this occur and normal opera tion come to a halt reset the computer by pressing the ON OFF CLR and ENTER keys at the same time Press all at...

Page 53: ...to edit see page 4 21 Clear all values and return to default setup Edit a previously entered value see page 4 21 see below With OPTION you can UP DOWN Select the machine types 4 feet 6 feet single bearing V form stationary left machine only You can make the right machine stationary with static feet page 4 65 L R Select left or right machine CPLG TYPE Select the coupling type short flex single plan...

Page 54: ...orizontal machine and coupling types and you can give each machine a reference name The setup determines how calculations will be made during program operation Here is the first screen showing the right hand machine Proceed as follows Normal 4 feet 6 feet Single bearing V form see following page Stationary left machine only 1 Select the right machine type the machine with the receiver mounted from...

Page 55: ...he menu V form machines When you select a V form machine the angles of both sides of the V mounting are requested in the Dimensions screen The V form symbol is as viewed towards the laser Angle to nearest side of right machine this screen depicts the front in this case A 0 surface is vertical 90 is horizontal Angle to rear side of right machine Note 90 and 0 together give a horizontal vertical cor...

Page 56: ...uring alignment so that one machine does not influence the other SPACER SHAFT is a coupling with two bending planes and a spacer Note the length of the spacer must be entered when entering machine dimensions Select the appropriate coupling type with the softkeys Sign convention Vertical Offset is positive when the coupling plane center of the right machine lies above the shaft line of the left mac...

Page 57: ...tion de pends on which type of coupling you have thus CHANGE MODE Select the appropriate format and when finished press OK to return to the Menu Angles are given in millirads mrad where 1 mrad 1 micron mm 1 mil inch With spacer shafts the results will be given in terms of angles a and b or offsets A and B Sign convention is explained on the facing page A B a b Horizontal machine alignment machine ...

Page 58: ...rs when working in inches enter whole inches and fractions next page Press ENTER after each entry and use the CLR key to make corrections To enter or edit an entry use the left and right arrow softkeys to highlight the desired dimension Next press either the EDIT softkey or the first digit of the value to be entered Pressing the EDIT softkey will open a dialog box containing the existing value if ...

Page 59: ...r housing Confirm with ENTER For spacer couplings measure from the midpoint between the two couplings 3 Enter receiver to front foot right machine i e the distance from the marking on the receiver to the pair of feet on the right machine nearest the coupling Confirm with ENTER 4 Enter front foot to back foot right machine Confirm with ENTER Entering inch fractions For example to enter a distance o...

Page 60: ... as shown below Do not look into the laser beam aperture 2 With the receiver cap still mounted adjust the height of the laser and or receiver to bring the laser beam level with the center of the receiver aperture Fine adjustment can be made by turning the thumbwheel on top of the laser housing If approximately 10 seconds after pressing the M key or entering Soft Foot mode the ROTALIGN fails to est...

Page 61: ...sonably centrally AND perpendicularly i e straight on see discussion on opposite page This is particularly important with large machine mis alignments and one way to check this is with the adjustment tube see below Fix the tube onto the receiver and direct the beam through the front aperture If the beam is not centered on the inner target the laser must be either moved along its support posts or t...

Page 62: ...he current beam position is shown as a dot on this target diagram which should fall within the inner circle If not use the laser thumbwheels to bring the dot into the inner circle QUICK CHECK page 4 3 shows points for both detectors simultaneously Make sure that the receiver lens is clean Otherwise measure ment accuracy may be reduced 6 As explained on the previous page the beam should not only be...

Page 63: ...In TRACE mode entered by pressing the TRACE softkey in the XY View screen a line representing the laser beam is traced between the two sensors Although it cannot be used while taking actual measure ments this mode provides quick insight into angularity and offset conditions and is also of use while aligning the laser and receiver If while rotating the shafts the traces on the left front sensor F N...

Page 64: ...bly in line the beam could be centered on one detector and off center on the other Red Green 1 2 3 Position detector END area Note in the Pass measurement mode the green LED lights up for one second after each laser pass to confirm that the measurement was accepted See page 4 36 Tip slide the laser up and down on its posts and rotate the bracket around the shaft to center the laser on the front of...

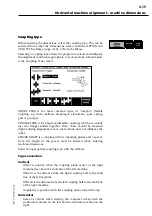
Page 65: ...ot bolt is loosened This option is provided primarily to calculate equivalent dial values from a laser based measurement An added feature is that dial values can be entered and the graphical result calculated 7 Measurement Once the laser beam is adjusted the alignment can be measured There are several measurement modes to choose from the default being Continuous Sweep This is the standard and simp...

Page 66: ...ot movements the results need to be interpreted and translated into the thicknesses of the shim to be placed under the feet How straightforward this is depends on the type of soft foot you have The two main types are Parallel soft foot One or more feet are too short or too long This usually results in the machine rocking on the longer feet This is corrected by placing a shim under ONE of the short...

Page 67: ...ions have not yet been entered the program will issue the warning Missing dimensions a Press OK and the Dimensions screen appears page 4 16 b Press OPTION to check the machine types You must select 4 feet machine types for the machine s to be checked c When finished with machine setup press MENU again and reselect SOFT FOOT For maximum accuracy during soft foot measurement and espe cially when cou...

Page 68: ...the left side of the window displaying the fraction of measurements made see page 4 44 8 Repeat this procedure for each foot and for each movable machine selected with the right hand softkey if shown With four values per machine the shimming corrections can now be determined The CLR key resets all readings Determining soft foot corrections The two basic types of soft foot parallel and angular are ...

Page 69: ...s significantly higher than the others then angular soft foot can be suspected The problem foot or machine frame is probably bent or distorted in some way In this case loosen the bolt and examine the foot more closely Use a feeler gauge to establish the variation of the gap and use these measurements to sketch the shape and dimensions for a stepped shim If the soft foot is purely angular then the ...

Page 70: ...ne of the first four softkeys is pressed the program immedi ately goes into the Measurement Mode as described starting on the next page Note warnings If you have too few measurement points or the rotation angle is less than 75 one of two warning messages will appear when you complete the measurement or try to view the results NOT ENOUGH POINTS SMALL ROTATION ANGLE The computer requires at least 5 ...

Page 71: ...tal machine alignment measurement Coupling gap of 0 06 mm open upwards Right machine offset at coupling 0 55 mm away from viewer HORIZONTAL Shows extent of rotation 180 in this case Right machine offset at coupling 0 21 mm downwards VERTICAL No of pts measured Coupling gap of 0 18 mm open towards viewer CENTERED Indicates Continu ous Sweep mode 118 indicates angle is too small or too few points Re...

Page 72: ... the four clock positions and press the corresponding key 0 for 12 00 3 for 3 00 6 and 9 A result can be calculated from just three points but four naturally give better accuracy If your machine is arranged horizontally you can set the shaft positions with the inclinometer clock displayed on the screen 4 Rogue measurements can be selected with the arrow softkey and deactivated with the softkey see...

Page 73: ...TAKE POINT key before you begin to rotate the shafts to the next position PASS MODE UNCOUPLED This mode is used when either 1 The shafts are uncoupled or 2 One or both of shafts cannot be rotated Proceed as follows 1 If the shafts are rotatable but uncoupled mount the laser and receiver on chain brackets in the normal way 2 If a shaft cannot be rotated the ALI 2 230 magnetic sliding bracket must b...

Page 74: ...ounted on magnetic sliding bracket 3 Mount the laser and receiver If one shaft is nonrotatable then mount the receiver on it if possible If neither shaft can be rotated the laser and receiver can both be mounted on magnetic sliding brackets Note this is regarded as a method of last resort F Note ...

Page 75: ... receiver lights for one second to confirm that the measurement was accepted 7 Repeat at a series of angles alternating movement of the laser or receiver in a fashion similar to shown above The exact pattern is not critical 8 Press STOP Measurement is now complete 9 You can select and deactivate rogue points with the arrow softkey and key see page 4 41 for details Shield the laser beam with hand w...

Page 76: ...P softkey to enter the dial setup dimensions and or to select a different dial configuration screen Study the configuration diagrams and use the arrow key to select the one which matches your setup Then enter the two distances DIAL COUPL distance from radial dial to coupling center DIAL HEIGHT height of axial dial from shaft center OR for reverse dial indicator option LENGTH R1 R2 distance between...

Page 77: ...ne for any machine select the DIAL GAUGE option from the MEAS MODE screen Enter the gauge configuration and dial dimensions as described on the previous page Press OK to return to the main screen Enter the Axial and Radial clock dimensions using the arrow key to navigate through the values Misalignment is calculated after the values have been entered You can now align the machines using the dial m...

Page 78: ...ppears Once this appears points may be activated or deactivated 2 Use the ARROW softkey to highlight the rogue point with a cross 3 Press the key The point will be deactivated and displayed as a small circle The status line and clock in the top right corner will also be updated to show which points are still valid 4 The deactivated points can be remeasured Note however that the circles representin...

Page 79: ...ed point is indicated by a white circle Horizontal machine alignment measurement Press the CLR key to delete all current measurement values Although this clears the measurement values from memory thereby speeding up transitions between options in measure mode the measured results remain visible in the Measure screen They may also be viewed in the Results and Table screens ...

Page 80: ...ired to make measurements 7 Shaft rotation in terms of a clock position as viewed from receiver towards laser horizontal machines 8 Appears only if measurements are currently being made 9 Displays laser trace across sensors 10 Appears only if measurement data are available Inside the receiver are two detectors one behind the other which allow ROTALIGN to determine the angle at which the beam enter...

Page 81: ... For the Continuous Sweep and Pass measurement modes the average value is fixed at 8 samples Furthermore the average value set in this option is also used in Soft Foot and Move modes Note the AVERAGE function is not operative in the normal XY view in the Measurement screen Press the AVERAGE softkey to set the number of points to be averaged This value can be set from a minimum of 8 to a maximum of...

Page 82: ...rfect alignment the ellipse is reduced to a point In the situation shown both angularity and offset contribute to shaft misalignment Based on the orientation and shape of the YY ellipse shown here both angularity and shaft offset can be assumed to play a role in this shaft s alignment prob lems CURVE FIT XY VIEW RAW DATA Horizontal machine alignment options during measurement Press the RAW DATA so...

Page 83: ...ers out of the receiver range during rotation the laser must be repositioned The ROTALIGN EXTEND option guides you through the necessary adjustment Once the laser receiver pair are back in contact with one another the shaft alignment procedure can be continued This option is available in the Measure at and Multipoint modes for horizontal and vertical shafts If the LASER END message appears on the ...

Page 84: ... laser beam The laser beam should fall within the two centering circles in the ROTALIGN display 5 Once the beam has been centered press the STOP EXTEND softkey The ROTALIGN display returns to the MEASUREMENT mode The two centering circles are however now slightly offset with reference to the crosshairs as can be seen below 6 The laser beam should again be positioned inside the two centering circle...

Page 85: ...of rotation Measure mode used arrow is a Moved result Average You can also DELETE a highlighted measurement no confirmation is given Return to the Measurement screen with OK The most recent measurement points are still displayed on the target diagram unless you have 1 deleted that set from the table 2 selected more than one set in the table for averaging or 3 turned off the computer in the meantim...

Page 86: ...lign ment viewed from above with 4 machine feet Show horiz or vert graph only page 4 52 Store results in a table as a history of the machine page 4 58 Move and align machine page 4 51 Save results to a file page 4 55 Softkeys in Results screen page 4 57 LEFT MACHINE vertical position viewed from side and resting on feet RIGHT MACHINE vertical alignment viewed from side resting on feet HORIZONTAL A...

Page 87: ...d on display mode selected in COUPLING TYPE page 4 19 The target symbol appears in Results when set See page 4 49 THERM GROWTH Set thermal growth values for nonstatic feet horiz and vertically The target symbol appears in Results when set See page 4 61 TOL Set tolerances TABLE tolerances are based on machine size and RPM Press EDIT key to enter RPM Select TABLE TYPE Excellent Acceptable and User d...

Page 88: ...tion may be hampered by the fact that the machine changes its position on its own every time the anchor bolts are loosened and tightened Therefore please use the soft foot function as directed on page 4 29 and correct the situation before beginning an alignment In the Results screen see previous pages press the softkey marked MOVE An intermediate screen shown below appears briefly while the ROTALI...

Page 89: ...tion of measurements made Note while in MOVE mode sleep time is automatically extended to 50 000 seconds This helps to ensure that the ROTALIGN will not enter SLEEP mode while the machines are being repositioned After making the desired adjustments press the STOP softkey to return to main MOVE screen ZOOM The two options available in the ZOOM mode allow you to focus in on either the vertical V ZOO...

Page 90: ...n intermediate window appears while the ROTALIGN restarts the sensor If the laser receiver pair has been moved to within 15 of the 12 00 or 6 00 position and the laser is on and centered ROTALIGN automatically enters the active measurement mode If either or both of the criterion mentioned above is not fulfilled you will be prompted to press the START softkey before ROTALIGN enters the active measu...

Page 91: ...ress the START softkey see page 4 51 before ROTALIGN enters the active measure ment mode 5 Loosen the machine anchor bolts after ROTALIGN has entered the active measurement mode ROTALIGN cannot otherwise measure any small displacements that may occur during loosen ing 6 Move machine horizontally while viewing the screen Temptation may be great to move the machine with a few hefty blows of a sledge...

Page 92: ...ve confirmation before the file is overwritten F Note Horizontal machine alignment alignment completion SAVE 10 Alignment completion This completes the horizontal machine alignment If you have had difficulties with a particular alignment common causes are Soft foot page 4 29 Beam play Pipe strain Oil film thickness variation in white metal bearings Incorrect or loose bracket mounting on the shaft ...

Page 93: ...to save them with the following screen You may either save the file under the current name SAVE save it under a new name SAVE AS not save it at all NO SAVE or return to the program CANCEL You have approximately 10 seconds decide before the computer switches off without saving But don t worry the current measurements and results remain in memory after ROTALIGN switches off and can be recalled by pr...

Page 94: ...ts This is not actually directly accessible from the MENU Results Setup Options Press OPTION from the Results display or select either Coupling Targets or Thermal Growth from the MENU to show the following screen Display Horizontal or Vertical tolerances and targets Setup Tolerancing page 4 62 Set expected thermal growth at feet page 4 61 Select which feet are static non moveable page 4 65 Set col...

Page 95: ...ts screen to show this list of results OK Returns to the original results display you had before HISTRY was pressed ADD TO Adds the latest result to the table HISTRY SHOW Displays selected line graphically GRAPH Arrow Selects and highlights one result line key DELETE Deletes the selected line without confirmation H V Switches between horizontal and vertical results HISTRY ...

Page 96: ... parameters in the middle is the coupling diameter L R switches between left and right machine relative to the machine to be aligned Press the softkeys and type in the data pressing ENTER after each entry To exit this screen press ENTER ROTALIGN returns you to the Results Setup Options page 4 57 The Coupling Target function is used if it is known that changes in the alignment condition i e gap and...

Page 97: ... the Coupling Targets screen the results are somewhat different Operating specifications Left machine Right machine horizontal gap 0 2 mm horizontal gap 0 0 mm horizontal offset 0 3 mm horizontal offset 0 2 mm vertical gap 0 2 mm vertical gap 0 0 mm vertical offset 0 3 mm vertical offset 0 2 mm ROTALIGN combines the operating specifications then incorporates these values in the results screen The ...

Page 98: ... feet thermal growths can be entered The computer uses the entered values to determine how the machine should be aligned cold Here is the Thermal Growth screen Select either horizontal or vertical movement with the H V key and type in the expected foot movement with the indicated softkeys press ENTER after each entry To exit this screen press ENTER to return to Results Setup Options page 4 57 V fo...

Page 99: ...ffset values are however directly dependent on spacer distance when the spacer shaft coupling type is entered in the Dimensions screen Gap values are dependent on coupling diameter for short flex and single plane coupling types If a spacer length of 100 mm had been used in the figure on the following page instead of the 200 mm distance the offset values would be one half that of the values shown T...

Page 100: ... and Acceptable values only The machine operating RPM must be entered either enter the value directly from the keypad or press EDIT and enter the RPM value This will then appear in a line below the table with its calculated tolerances The RPM value can also be entered in the Dimensions screen in the box above the machine but only if a tolerance mode has been selected beforehand OPTION takes you ba...

Page 101: ...e in values for the machine and press enter after each entry EDIT is used to correct the highlighted value Press OK when finished to return to the previous screen MAX COUPLING VALUES With this option the coupling tolerances based on the selected coupling type can be entered page 4 19 Use the softkeys to select the dimensions to be edited and key in the maximum coupling values press OK when finishe...

Page 102: ...y defined as static are indicated with circles in the softkey bar Select deselect the required feet with the indicated softkeys The computer will make the necessary deselec tions With Static feet you can reverse the default machine configuration i e make the left machine moveable and the right machine stationary If you try to make an invalid selection the program issues a warning In such instances...

Page 103: ...4 66 ROTALIGN 01 2000 This page intentionally left blank ...

Page 104: ...ical machine alignment flow chart 5 2 Vertical machine alignment 5 3 1 Set up ROTALIGN 5 4 Shaft numbering 5 4 Fit the laser and receiver 5 5 2 Enter dimensions 5 5 3 Measure 5 6 4 Results 5 9 5 Fit shims 5 9 6 Remeasure 5 10 7 Move Horizontally 5 10 8 Final check 5 10 OPTION Nonsymmetrical flange shape 5 11 Altering a rectangle or ellipse 5 11 Adjusting center position 5 11 Moving or deleting bol...

Page 105: ... delete bolt OK returns to previous menu Move center Up Down Left Right STEP SIZE small med large XL OK returns to previous menu Results page 5 9 SAVE page 3 6 0 ve ve shim calculations MOVE press START then STOP Measure page 5 6 TABLE page 4 48 XY VIEW page 4 43 Arrow selects point CLR key deactivates selected point MEAS MODE Vertical and horizontal shafts Measure at 1 2 3 4 5 6 7 8 5 6 Horizonta...

Page 106: ...rizontal machines with the laser below and the receiver above Measurements are then made at a series of 90 or 45 rotational positions Based on these measurements and the flange shape and size the computer calculates the offset correction Alignment is achieved by inserting shims of thickness determined by the computer between the flanges at each bolt The vertical alignment procedure is described in...

Page 107: ... beginning at your chosen start point Number the points counter clockwise looking down onto the shaft with 1 as your first followed by 3 5 and 7 see diagram on previous page Impor tant the laser receiver pair must be exactly in line with mark at number 1 During measurement you will align the numbers on the shaft with the reference point on the coupling housing c Note if you have restricted rotatio...

Page 108: ...ese positions Continue below Fit the laser and receiver Fit the ROTALIGN laser and receiver on the coupling See page 4 12 for mounting and connection details The laser mounts on the lower machine which is defined as the stationary machine The mounting brackets MUST be correctly mounted to ensure accu rate measurement Switch on ROTALIGN and select the VERTICAL application from the introductory scre...

Page 109: ... now ready to make measurements 3 Measure a Press the M key Before making measurements you must ensure that the mea surement mode is properly set Press the Meas Mode softkey to display the three measurement modes Important Only the uppermost measurement mode may be used with vertical machines OPTION EDIT Only the uppermost measurement mode Measure at 1 2 3 4 5 6 7 8 is available for vertical machi...

Page 110: ...lay to the YY display See page 4 43 for a complete description of the XY VIEW option CENTERED Measurements are now sufficient for a result Screen after five measurements d Turn the shaft to each measurement position rotating the shaft clockwise and press the corresponding numeric key Note if rotation is restricted measure at the points to which you can turn e g 3 4 5 6 and 7 At least three points ...

Page 111: ...d points can be remeasured Note howev er that the circles representing the deactivated points remain on the screen 4 Restore deactivated points by pressing the key again If more than one point is active for a given measurement they will be averaged Press the CLR key to delete all current measurement values Status line and clock show which points are still valid after deletion Point deactivated Cir...

Page 112: ...y negative shim values i e shims removed The minimum change can be displayed by pressing the softkey again The final option available under the softkey normalizes the smallest shim thickness to zero and makes all other shims positive 0 Browse through the list with the arrow keys The corresponding bolts are highlighted in the table 5 Fit shims Position the shaft so that the number 1 is aligned with...

Page 113: ...N will not be recording any slight movements Position the machine laterally while following the horizontal movement coordinates on the screen The shim values will also be seen to change slightly When satisfied with the horizontal offset values tighten down the bolts and press STOP 8 Final check After pressing STOP the display shows the position after MOVE If this is within machine tolerances the a...

Page 114: ...nt to back or X AXIS along the front dimensions then press EDIT to change them Adjusting center position Press ADJUST CENTER to move the central axis to a new position Use the arrow keys to move the center to a new location shown by the X and Y coordinates lower right Press STEP SIZE to make the center move inward X large 100 1000mm large 10 100mm medium 1 10mm or small 0 1 1mm steps The available...

Page 115: ...ts coordinates Press EDIT X POS and enter its X position noting that the zero position is in the lower left hand corner of the diagram Repeat for EDIT Y POS The bolt will then be moved on the diagram You can create a new bolt by going to the dashed line at the bottom of the table 9 in the above example and entering its coordinates with EDIT X POS and EDIT Y POS The new bolt will then appear on the...

Page 116: ... axis the electronic inclinometer built into the receiver can be used to detect the rotational position during measurement and so either the Multipoint or Continuous Sweep measurement mode may be used to align the shafts These two modes are described in detail starting on page 4 34 The Measure at 1 8 measurement mode may also be used but does not incorporate the advantages offered by the inclinome...

Page 117: ...ge dimensions 1 Press the OPTION key The vertical distance between bolts is now highlighted in the displayed end view of the flange 2 Enter the vertical distance between the centers of the flange bolts Press ENTER to confirm the entry Note for this and all other entries the EDIT key may be pressed if desired in order to display a description of the required dimension in the status line at the top ...

Page 118: ...rizontally a wider choice of measurement methods is available a Press the M key to open the measurement screen then press the MEAS MODE softkey to obtain the following display The lower two options rely on the inclinometer in the receiver to determine rotational position these are therefore reserved for horizontal shafts b Press the corresponding key to select the desired measurement method Center...

Page 119: ...ssary to set the column heading to Shim 0 which means that shimming is calculated such that one bolt requires zero shimming and all remaining bolts are shimmed by positive amounts The solid line joining the bolts in the diagram indicates that the vertical axes of the bolts now function as corners with the original bolt flange dimensions appearing as a dashed line 5 Fit shims Loosen the bolts and f...

Page 120: ... note the order of the bolts for correct orientation refer to step 4 above if necessary Jack bolts or other mechanical or hydraulic adjustment methods are recommended for best results The Average function set in the XY VIEW screen is automatically used during Move measurements With this option you can set the number of measurements up to 2048 to be taken and averaged during readjustment see page 4...

Page 121: ...5 18 ROTALIGN 01 2000 This page intentionally left blank ...

Page 122: ...ter 5 Vertical Alignment 5 1 to 5 18 Chapter 6 Appendix 6 1 to 6 42 What is alignment 6 3 Comparison of alignment methods 6 4 How accurate should alignment be 6 5 Suggested Shaft Alignment Tolerances 6 6 Machine preparation 6 7 Shims 6 9 The ROTALIGN measurement principle 6 10 Troubleshooting guide 6 11 ROTALIGN error messages 6 13 The ROTALIGN case 6 14 ROTALIGN accessories 6 15 ROTALIGN accessor...

Page 123: ...les of thermal growth entries 6 32 Thermal growth for stationary machine 6 33 Special case parallel growth 6 34 Technical specifications 6 35 Warranty service and care 6 36 Warranty 6 36 Service and care 6 36 Index 6 38 Chapter 6 Appendix ...

Page 124: ...ertical angularity Horizontal offset Horizontal angularity These four degrees of freedom must be measured in order to achieve correct alignment ROTALIGN displays four values which combine to correct all these parameters simultaneously by raising or lowering the front and back feet of the machine and moving the front and back ends of the machine left or right Precut shims available from your ROTALI...

Page 125: ...chieve shaft alignment accuracy of 1 100 mm 1 2 mil To do so however bracket sag must always be measured first and the mounting ar rangement must be very rigid The mea surement values must be recorded cor rectly without mixing up signs or transposing values of course and then the alignment corrections must be cor rectly calculated from the indicator readings Laser optics This approach has the high...

Page 126: ...riate factor For example a machine running at 1500 rpm has a coupling of diameter 75 mm At this diameter the maximum allowable gap would be 0 07 mm x 75 100 0 0525 mm or 5 100 mm For spacer shafts the table gives the maximum allowable offset for each 100 mm or inch of spacer shaft length To take an example a machine running at 6000 rpm with a 300 mm spacer shaft installed would allow a maximum off...

Page 127: ...0 0 09 0 06 1800 3 0 2 0 3000 0 06 0 03 3600 1 5 1 0 6000 0 03 0 02 7200 1 0 0 5 Angularity 600 15 0 10 0 gap difference at coupling edge 750 0 13 0 09 per 100 millimeters diameter 900 10 0 7 0 or per 10 diameter 1200 8 0 5 0 1500 0 07 0 05 1800 5 0 3 0 3000 0 04 0 03 3600 3 0 2 0 6000 0 03 0 02 7200 2 0 1 0 Spacer shafts and membrane disk couplings Offset 600 3 0 1 8 per 100 millimeters spacer le...

Page 128: ...ulic or screw type positioning aids are available The ham mer method is not only inexact but it can also damage the machine housing and bearings by chatter marking Rigid couplings Rigid couplings typically found on turbines must be loosened before measurement so that they do not distort the alignment condition How this is done depends on the type of machine Steam turbines with single bearing shaft...

Page 129: ...uickly See page 4 29 Shaft play Excessive radial play of the shaft within the bearing will lead to poor alignment results The RO TALIGN Soft Foot function can measure radial play when the shafts are lifted A small amount of axial shaft play up to 3 mm 1 8 will have no adverse effect on accura cy Coupling play Thanks to its five axis detector system ROTALIGN can distin guish between coupling torsio...

Page 130: ... springs Commercial precut shims fill these requirements best while saving a major portion of alignment time compared with shims hand cut from rolls of sheet stock PRÜFTECHNIK offers two different types of shims in a wide range of metric thicknesses and sizes to fit most machine feet Check with your ROTALIGN dealer for inch thicknesses and other custom shims Complete set of shims PERMABLOC LAMIBLO...

Page 131: ...s described on page 4 34 are available to handle special situations such as uncoupled shafts and limited rotation The computer then uses the minute displacements measured by the detector to calculate the current alignment condition It displays the resulting machine alignment diagram complete with coupling align ment values and position values for the machine feet The former allow the operator to c...

Page 132: ...b During rebooting press and hold the CLR key until the computer ID the letters ID followed by the 8 digit CPU number appears on the screen then release the key c From the three item menu select DEVICETEST by pressing 2 d From the eight item menu select MRAM by pressing 1 e From the eight item menu select INIT ALL by pressing 3 f Press CLR to clear all stored measurements setups and results Press ...

Page 133: ... with Soft foot function page 4 29 Is the foundation stable If suspect split the coupling and measure with Pass mode page 4 36 Is the coupling too stiff e g membrane coupling See page 6 7 4 Are the receiver and laser lenses clean page 6 36 Difficulties in alignment 1 Poor measurement see reasons listed above 2 Are corrections being made in the wrong direction See the rules on pages 4 34 and 4 50 3...

Page 134: ...asurements see page 4 44 LASER END Laser is not centered on the receiver and is hitting the outer area Use the RANGE EXTEND function de scribed on page 4 46 SENSOR Receiver is not connected or the cable is damaged See page 4 13 Missing Dimensions Results cannot be calculated without entering the machine dimensions See page 4 16 Syntax Error Unacceptable dimension entry Clear with arrow and CLR key...

Page 135: ...ion lock If the case is packed very full push the two halves of the case together snugly to assure proper functioning of the combination lock Depending upon local market requirements the ROTALIGN case may also be supplied without a combination lock A B The ROTALIGN case The ROTALIGN case has two key locks and a 3 digit combination lock Write down the key number in the boxes at left The combination...

Page 136: ...NDER 2 upgrade ALI 3 471 ROTALIGN Upgrade Package ROTALIGN infrared interface see page 6 23 for details Accessory mounting brackets bracket parts see following pages and the Laser Alignment System product catalog ALI 9 300 available free of charge ALI 2 230 Magnetic sliding bracket individual ALI 2 109set Extra thin bracket two pairs in different sizes ALI 2 112set Compact magnetic bracket set of ...

Page 137: ...al machine measurement data to form a 6 machine train The ROTALIGN Commander 2 Set ALI 3 591set includes PC program ALI 3 591 Installation manual ALI 9 545G Registration card ALI 9 546 PC cable 2 m 6 6 SYS 2 711 2 Cable adapter 25F 9M ALI 3 264 ROTALIGN Upgrade program ALI 3 490 Upgrade instructions ALI 9 472G ROTALIGN operating instr ALI 9 381G Included with the ALI3 591uset upgrade set is the PC...

Page 138: ... of damage If a lead acid rechargeable battery is fitted the supply charger will simultaneously run the computer and recharge the battery the lead acid battery recharges in 5 hours Charging continues also when the computer is switched off The ALI 3 576 charger can be used to charge either one ROTALIGN computer or two ALI 4 610 external receiver batteries but not the computer and one battery at the...

Page 139: ... 36 However the ROTALIGN magnetic sliding bracket offers an elegant solution to this dilemma The bracket fits onto the coupling flange as shown and simply slides around to the required measurement positions Its powerful magnets ensure the mounting stability needed for accurate measurement The magnetic sliding bracket for station ary shafts is suitable for all shaft diameters over 80 mm 3 1 8 Anyti...

Page 140: ...aser on the shaft that can be rotated any quick fit bracket can be used on the rotating side Accuracy achieved from nonrotating shaft alignment methods is always less than that of the ROTALIGN when both shafts are rotated and the usual chain type brackets are used Therefore nonrotating measurement should be seen only as a method of last resort Extra thin bracket ALI 2 109set ALI 2 109Lset The extr...

Page 141: ...h other ROTALIGN brackets ROTALIGN accessory brackets 115 mm 4 1 2 Wipe any traces of grease or oil from the mounting surface to avoid bracket slippage which would reduce measurement accuracy Mount the bracket on the coupling flange Although the bracket fits onto even very small shaft coupling configurations all four magnets should contact the mounting surface completely for maximum holding power ...

Page 142: ...ALIGN brackets are used However once the coupling bolt is removed this bracket can be placed upon the coupling flanges as shown below The ROTALIGN laser and receiver simply slide onto their support rods and are fixed into place by the upper bracket arm The entire assembly is then positioned on the coupling so that the laser beam passes directly through the bolt hole The spring bridge allows easy a...

Page 143: ...6 22 ROTALIGN 01 2000 This page has intentionally been left blank ...

Page 144: ...stem the Sensorport in the CONFIG options must be set to COM page 3 3 The external receiver battery has two strong permanent magnets built flush into one side of its housing These let you mount the battery quickly and easily onto any ferromagnetic shaft or coupling surface BATT MAIN AUX CHARGE SLEEP Computer External receiver battery Receiver ALI 4 610 Connections Infrared interface ALI 4 608 Cabl...

Page 145: ... foot readings until the shaft alignment is improved This may be checked by removing the suspected source of strain then taking a second set of readings for comparison Sometimes ROTALIGN will register little or no soft foot yet feeler gauge measurements indicate quite a substantial gap beneath the machine feet This can occur if either the base or machine feet bend without bending the machine housi...

Page 146: ...f soft foot 0 4 4 4 4 4 4 4 4 4 4 4 4 4 4 4 0 0 0 0 0 100 100 100 100 100 88 88 88 88 88 88 88 88 88 88 92 92 92 92 92 88 88 88 88 88 0 0 0 0 0 0 0 0 0 0 84 84 84 84 84 0 0 0 0 0 80 4 76 Foot notation clockwise A D ROTALIGN Soft foot readings Feeler gauge readings ROTALIGN readings show near perfect rock tempting the inexperi enced aligner to shim feet B and D In this case that would be a mistake ...

Page 147: ...0 of the feeler gauge amount and recheck all four feet Example 3 Identical ROTALIGN readings to example 2 Feeler gauge are used to examine feet B and D Feeler gauges indicate equal rock but definite slope from foot C to foot A This suggests that foot C is out of plane relative to feet A B and D Conclusion remove 80 100 mm from foot C or add 80 100 mm to feet A B and D Then recheck all four feet 80...

Page 148: ...e bend in foot B Conclusion step shim 0 1 mm at foot B and recheck all four feet Example 5 100 100 100 100 100 4 4 4 4 4 96 96 96 96 96 24 40 12 0 0 0 0 0 48 24 4 56 56 56 56 56 60 60 60 60 60 0 0 0 0 0 0 0 0 0 0 0 0 C D A B C D A B Feeler gauge readings are taken to examine the foot with the high ROTALIGN reading and a bent foot is found It is possible that other feet have problems which are bein...

Page 149: ...f parallel gap at foot C as well would prove induced soft foot Conclusion relieve external forces probably caused by horizontal offset misalignment or by pipe strain Feeler gauges are used to examine the foot with the largest ROTALIGN reading but no gap is found Conclusion squishy foot do not add or remove shims rather eliminate the cause of the spring action Recheck all four feet Example 7 0 0 0 ...

Page 150: ...ermine the type of soft foot It never hurts to examine the other feet as well but concentrate on finding and fixing the largest single problem 3 Correct the condition diagnosed usually by shimming only one foot if any 4 Go to step 1 5 If both machines have been checked for soft foot and are within tolerances perform final alignment If the adjoining machine is not stationary page 4 17 then it can a...

Page 151: ...CE TYPE OF MACHINE AND COUPLING Left machine PUMP Stationary Right machine MOTOR Normal 4 feet Coupling Type Short flex Display mode gap offset Here is an example of a ROTALIGN graph report see page 3 6 The print report is identical but without the diagrams Each report normally takes two pages PUMP MOTOR DIMENSIONS Coupling diameter 100 mm Coupling center to receiver 150 mm Receiver to front foot ...

Page 152: ...S SWEEP MEASURED VALUES AT COUPLING gap vertical 0 47 mm offset vertical 0 36 mm gap horizontal 0 45 mm offset horizontal 0 73 mm SUMMARY OF VALUES AT COUPLING gap vertical 0 47 mm offset vertical 0 36 mm gap horizontal 0 45 mm offset horizontal 0 73 mm REQUIRED FOOT CORRECTIONS LEFT MACHINE NONE REQUIRED FOOT CORRECTIONS RIGHT MACHINE Front foot vertical 0 6 mm Back foot vertical 1 54 mm Front fo...

Page 153: ...g diagram of cold alignment condition i e before the machines are started Hot steady state operation shaft line All values are expressed here in 1 100 mm Sign convention Machine moves upwards as it warms up Machine moves downwards as it warms up The individual values for entry into the ROTALIGN computer are simply read from the diagram the distance between the cold shaft line to the hot shaft line...

Page 154: ...ne dimensions of foot separation and distance from front foot to receiver must then be entered into the dimension screen The menu item static feet is used next to designate the front and rear feet of the stationary machine as immovable Expected thermal growth values for the stationary machine feet are then entered as usual see bottom of previous page The computer calculates the alignment correctio...

Page 155: ...state operation shaft line The motor right is unaffected by thermal growth but must be positioned during cold alignment such that it compensates the expected parallel offset due to thermal growth of the pump Contrary to the standard procedure described on the previous page the desired offset could also be attained in this special case by using the thermal growth function and entering a negative ex...

Page 156: ...ction keys hard keys External interface Parallel printer interface Cen tronics and RS232C serial Memory Nonvolatile up to 99 measurement sets with labels comments etc Power supply 6x 1 5 V IEC LR 14 Size C alkaline standard NiCad rechargeable optional Optional Lead acid block battery rechargeable by computer Optional ALI 3 576 mains adapter for 110V 220V switchable output 400 mA min at 12 V 5 Auxi...

Page 157: ...y the colored label shown at left located on the back of the receiver housing Please return ROTALIGN to your authorized PRÜFTECHNIK distribu tor for calibration checking All optical surfaces laser aperture receiver lens must be kept clean Use the ALI 2 905 cleaning set or a fine dusting brush such as that normally used to clean other optical devices avoid vigorous polish ing to preserve the anti r...

Page 158: ...6 37 ROTALIGN 01 2000 This page intentionally left blank ...

Page 159: ...OOM Brackets descriptions types 2 16 6 18 6 22 mounting 4 11 C Cables and connections 2 7 2 8 4 13 Case 6 14 CE conformity 1 5 CHANGE APPLIC 3 2 3 8 CHANGE MODE 4 20 Charger 2 4 6 17 CIRCLE SQUARE vert mach flange 5 14 CLR 4 22 4 42 COM port see RS232 Components 2 13 adjustment tube 2 15 compact chain type bracket 2 16 laser 2 13 laser battery 2 14 other accessories 2 16 receiver 2 15 Computer 2 3...

Page 160: ...ABLE tolerances 4 64 Installing components 1 9 Intended use 1 5 Interfaces 1 9 2 7 2 8 Intrinsic Safety 1 6 2 9 L L R left right machine 4 17 4 59 LAMIBLOC 6 3 LANGUAGE 3 2 Laser 2 13 adjustment 4 23 4 25 mounting 4 12 optics 6 4 safety 1 7 LASER END LASER OFF 6 13 LEDs computer 2 6 laser 2 13 receiver 2 15 LENGTH R1 R2 dial gauges 4 39 LPT COM 3 8 LPT port see printer M M key see Measure key Mach...

Page 161: ...xplanation of screen 4 5 4 49 4 50 horizontal machine 4 49 4 50 key 2 4 2 5 4 49 5 9 vertical machine 5 9 RESUME 2 12 Rigid couplings 6 7 ROTALIGN Commander 4 15 6 16 ROTALIGN keyboard 2 4 ROTALIGN Upgrade Manager 6 16 Rotation of shaft 4 5 4 34 4 38 5 7 5 15 RPM revolutions per minute 4 62 4 63 RS232 CONFIG Serial port 3 6 3 8 RUNTIME configuration 3 3 S Safety 1 6 1 7 SAVE save 3 6 4 55 4 56 SAV...

Page 162: ... 4 63 Technical data 6 35 Temperature 1 8 4 44 6 13 Thermal growth 4 61 6 32 Tolerances 4 49 4 50 4 62 4 63 6 5 6 6 TRACE XY VIEW 4 26 Troubleshooting guide 6 11 U Uncoupled shafts see pass mode Units 3 3 UNSELECT TABLE 4 48 Upgrading software 3 11 USER SETUP 3 3 3 4 V V form machines 4 18 V ZOOM see ZOOM Vertical alignment horiz machine 4 53 Vertical machine alignment Fit shims 5 9 Move 5 9 Measu...

Page 163: ...are registered trademarks of PRÜFTECHNIK Dieter Busch AG PRÜFTECHNIK products are the subject of patents granted and pending throughout the world Contents subject to change without further notice particularly in the interest of further technical development Reproduction in any form whatsoever only upon express written consent of PRÜFTECHNIK Copyright 1994 by PRÜFTECHNIK AG Be sure to visit our Int...

Page 164: ...quipment Have surplus equipment taking up shelf space We ll give it a new home Learn more Visit us at artisantg com for more info on price quotes drivers technical specifications manuals and documentation Artisan Scientific Corporation dba Artisan Technology Group is not an affiliate representative or authorized distributor for any manufacturer listed herein We re here to make your life easier How...

Reviews:

Related manuals for ROTALIGN ALI 3.500