background image


If you are using different slicers from Slic3r PE or PrusaControl, or you just want to 
tweak and play around with different values, you can manually change the settings in 
gcode script. 

However, i

f you do not understand the concept of gcodes yet, or 

never played with editing it, stop reading here and skip to another chapter.


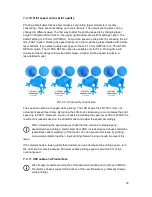
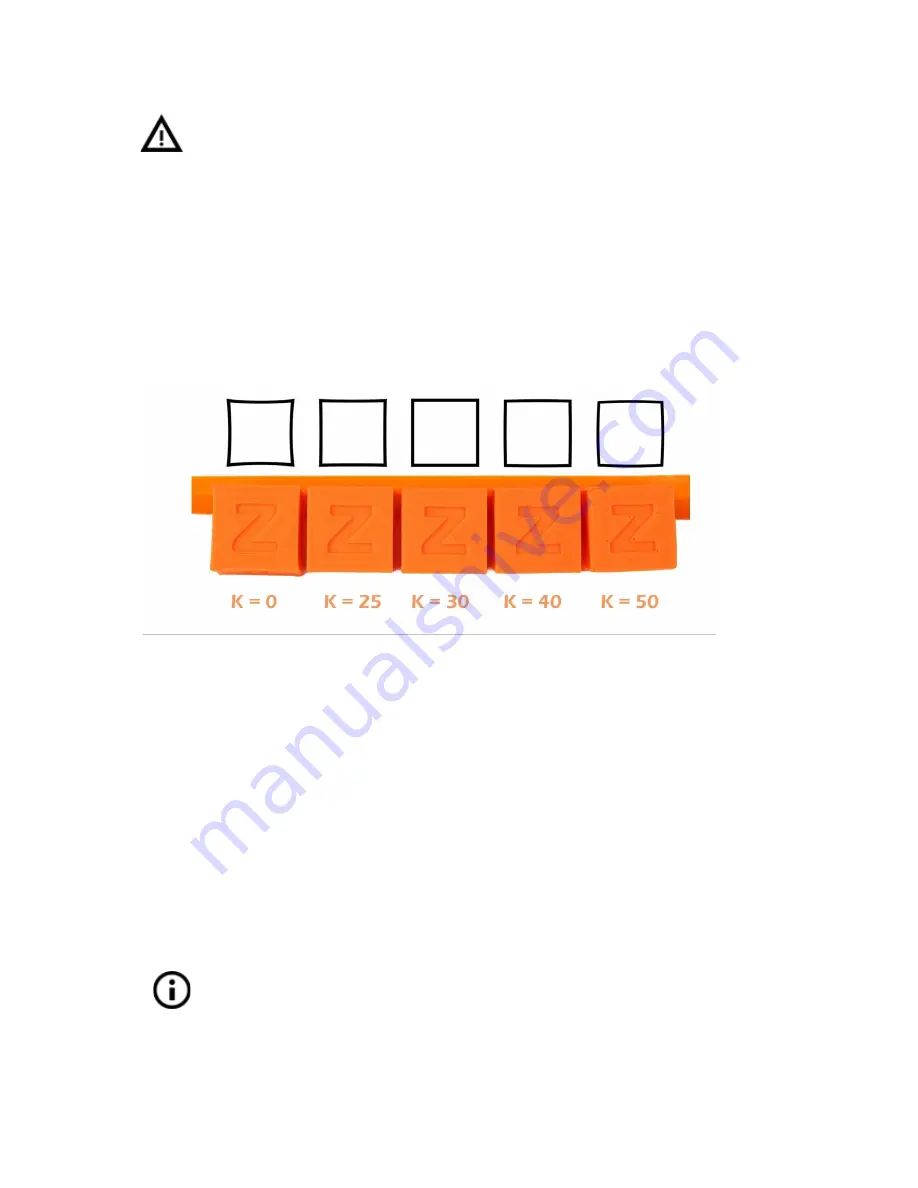
The K values (the parameter affecting how much Linear Advance affects the print) measured 
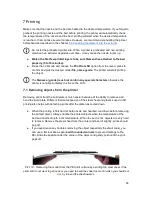
and tested are as follows: 

● PLA: 

M900 K30 

● ABS: 

M900 K30 

● PET: 

M900 K45 

● Multi material printer: 

M900 K200

 for all materials 


Pict. 24 - How K value affects the print


These values are preset in our Slic3r PE. The K value is set in custom gcode section in the 

Filament Settings tab

NOT 

under the printer specific custom gcode. 

PrusaControl 

uses 

the same K values but will not allow users to edit. 

Simplify3D, Cura

, … users just need to add “M900 K??” into the starting gcode script. Keep 

in mind you need to manually change that for different filament materials. Only Slic3r PE has 
custom gcode for each filament preset and, therefore, K value is changed automatically. 

Set the speed you want and print something (something large enough for speed to show up). 
If sharp corners have blobs, 

increase the K value

. If you see filament missing, 

decrease 

the K value

.  

Please note that different brands and colors of the same material may require a 
slightly different K value when printing at extreme speeds, however, our presets 
should be fine with all of them. 

39 

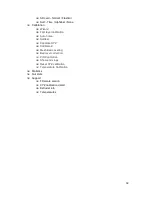
Summary of Contents for i3 MK2.5

Page 1: ......

Page 2: ...anuales QUICK GUIDE TO THE FIRST PRINT 1 Read the safety instructions carefully page 7 2 Prepare for the upgrade page 10 3 Download and install the drivers page 41 4 Calibrate the printer by following our calibration flow wizard page 11 5 Insert the SD card into the printer and print your first model page 26 Important notice tip hint or information that helps you print with ease Read carefully Thi...

Page 3: ...MK3 the third iteration of the original 3D printer It is constantly updated with the latest innovations and you ve just purchased its latest version In addition to printer hardware upgrades the main goal is to make the technology more accessible and understandable to all users Josef Prusa also organizes workshops for the public participates in professional conferences dedicated to the popularizati...

Page 4: ...solution 17 6 2 5 2 Y axis alignment 19 6 2 6 Calibrate Z 19 6 2 7 Mesh bed leveling 20 6 2 8 Loading the filament into the extruder 21 6 2 8 1 Unloading the filament 22 6 2 9 First layer calibration 23 6 2 9 1 Bed level correction 24 6 2 10 Fine tuning the first layer 24 6 2 10 1 Print Prusa logo 24 6 2 10 2 Check probe height 25 7 Printing 26 7 1 Removing objects from the printer 26 7 2 Printer ...

Page 5: ...e 58 12 1 1 Bearings 58 12 1 2 Fans 58 12 1 3 Extruder drive gear 59 12 1 4 Electronics 59 12 1 5 PEI rejuvenation 59 12 2 Print surface preparation 59 12 3 Filament sensor 59 12 3 1 Running out of filament 60 12 3 2 Filament jam 60 12 3 3 False sensor readings and debugging Dust on the sensor Extreme light conditions Exotic filaments 60 12 4 Clogged jammed extruder 61 12 5 Nozzle cleaning 62 12 6...

Page 6: ...rinting handbook PDF download In case of any printer related problem do not hesitate to contact us at info prusa3d com We are glad to receive all of your valuable comments and tips We strongly suggest you visit our official forum at forum prusa3d com where you can find solutions to common issues tips advice and hints in addition to actual information about the Original Prusa i3 printer s developme...

Page 7: ...e Also make sure that the power cord is not mechanically or otherwise damaged If so stop using damaged power cord immediately and replace it 5 When you disconnect the power cord from the socket pull the plug rather than the cord to reduce the risk of damage to the plug or to the AC outlet 6 Never disassemble the printer power supply it does not contain any parts that could be repaired by an unskil...

Page 8: ...movable sheets MK52 24V removable sheets Bondtech gears NO YES YES Noctua fan NO YES YES Trinamic Drivers NO NO YES Filament sensor NO YES YES PowerPanic NO NO YES Raspberry Pi Zero W connectivity NO NO YES P I N D A 2 with thermistor NO YES YES Hotend fan RPM NO YES YES Print fan RPM NO NO YES Crash detection NO NO YES Stealth mode NO NO YES Aluminium extrusion NO NO YES We offer the support for ...

Page 9: ...Pict 1 Original Prusa i3 MK2 5 printer upgrade Pict 2 Description of Original Prusa i3 MK2 5 9 ...

Page 10: ...arts must be printed from PETG or ABS which is bundled with the upgrade 6 2 Setup before printing After the assembly of the printer don t forget to upgrade the firmware to MK2 5 version You can always find the latest firmware at www prusa3d com drivers Keep your printer updated all the time Place the printer in a horizontally stable position the best place is a workbench where there is no risk of ...

Page 11: ...d Do not forget to read chapter 6 2 2 Flexible steel sheet surface preparation before running the Wizard It follows the calibration flow and helps you with the following steps Selftest Chapter 6 2 4 Calibrate XYZ Chapter 6 2 5 Loading the filament Chapter 6 2 8 First layer calibration Chapter 6 2 9 It is not mandatory to use it and you can cancel the Wizard at the beginning Then you should just fo...

Page 12: ...ion The MK52 heatbed has embedded high curie temperature magnets These magnets are able to firmly hold removable spring steel sheets There are two pins at the end of the heatbed that will align perfectly with cut out slots in the spring steel sheets Make sure the bed is clean and there isn t any debris on it before you put on the steel sheet Never print directly on the heatbed Pict 4 HeatBed MK52 ...

Page 13: ...st Z when switching between different types of steel sheets The surface does not have to be cleaned before every print It is just important to not touch the steel sheet with your hands or dirty tools Clean your tools with the same solution as you would the sheet and you will be able to start your next print right away Pict 5 Steel print sheets smooth PEI sheet glossy powder coated PEI and textured...

Page 14: ... functionality or adhesion 6 2 2 3 Spring steel sheet with smooth double sided PEI Uses the same PEI sheets as on the MK2 S You can leave small marks on the print surface with your nozzle or tools they will typically be shinier than the rest It does not affect the functionality or adhesion However if you want to have the same surface look on the whole printbed you can resurface it The easiest way ...

Page 15: ...o deliver any acetone based products due to shipping constraints In that case you get only the bottle and ABS from our e shop and you have to source the acetone locally 6 2 4 Selftest The purpose of the selftest routine is to check most common errors when assembling and connecting electronics and to help indicate any possible errors after the assembly You can run the Selftest from Calibration menu...

Page 16: ...tor XY Check mechanical settings that endstop can be reached when axis is in minimal position Endstop not hit Motor Z Check if the print head can be moved all the way down the Z axis to trigger the PINDA probe over the bed Endstops Wiring error XYZ Check the proper cabling of endstops Routine indicates axis on which endstop reported malfunction or is not properly responding Check the proper connec...

Page 17: ...e XYZ calibration procedure the printer homes the X and Y axis After that the Z axis will begin to move up until both sides touch the printed parts at the top Please make sure the print head went all the way up the Z axis and that you heard a rattling sound as the Z stepper motors skip steps This procedure ensures that 1 the X axis is perfectly horizontal 2 the print nozzle is in a known distance ...

Page 18: ...e slightly skewed Good job Good job the X Y axes are not precisely perpendicular but still quite all right The firmware will correct for the X Y skew during normal printing so boxes will be printed with right angles 5 XYZ calibration all right A skew will be corrected automatically You may consider to re align the X Y axes as described in the chapter 6 2 5 2 Y axis alignment Still the firmware wil...

Page 19: ...ggered too high Waiting for reset Similar to case 2 This time the PINDA sensor triggered more than 1 mm above the reference height Before doing anything else make the Z axis level by going all the way up and try again 6 2 5 2 Y axis alignment For autocalibration to work properly it is extremely important for the Y axis to be perpendicular to the X axis This can be easily checked by looking at the ...

Page 20: ... Z stepper motors skip steps This procedure ensures that 1 the X axis is perfectly horizontal 2 the print nozzle is in a known distance from the print bed In case the Z carriage did not touch the end stoppers the printer could not possibly know the height of the print nozzle above the print bed and it could therefore crash into the print bed during the Z calibration procedure The Z calibration pro...

Page 21: ...e the filament sensor and autoloading enabled simply insert the filament into the extruder Everything is automated from this point Make sure that the filament tip is nice and pointy If you have the filament sensor or autoloading disabled in the settings you can manually start the loading process from the LCD menu 1 Press the control knob on the LCD panel to enter the main menu 2 Insert the filamen...

Page 22: ...e filament The printer will pause the print head will go out of the print area unload the old filament and the LCD will guide you on what to do You can even insert filament of a different color and make your prints more colorful Check out chapter 10 6 Printing in color with ColorPrint to find out how to make more intricate color models Read chapter about our new 12 3 Filament sensor and its functi...

Page 23: ... a zig zag pattern on the print surface The nozzle will be at the height based on the PINDA probe setting it must not by any means touch the printing surface Pict 10 How to tune the nozzle height live during the test print Note 0 640 mm is only for illustration Your setting will be different Observe the line which is being extruded on the print surface A new menu will automatically show up where y...

Page 24: ...right side you can virtually raise the nozzle by 20 microns on the right side Settings are available for Left Right Front and Back The limit is 50 microns and even 20 microns can make a huge difference When you are using this function do small incremental changes A negative value will act as lowering the bed in the selected direction 6 2 10 Fine tuning the first layer 6 2 10 1 Print Prusa logo Aft...

Page 25: ...obe might be too high Lower it slightly Loosen the M3 screw on the probe holder and gently push the sensor to adjust the height and tighten the M3 screw again Then try again Calibrate XYZ Keep in mind the probe must always be higher than the nozzle tip otherwise it will catch on prints Pict 13 Probe response diagram Now you are done 25 ...

Page 26: ...the printer is not able to display the file on the LCD 7 1 Removing objects from the printer Removing prints from the build plate is much easier because of the ability to remove and bend the build plate Different thermal expansion of the steel sheet and plastics used in 3D printing also helps with detaching prints after the plate has cooled down When the printing is finished let both nozzle and he...

Page 27: ...ain screen is an information screen displaying the most important details They are the temperature of the nozzle and the heatbed 1 2 printing time 3 and the actual Z axis position 5 Pict 15 LCD layout 1 Nozzle temperature actual desired temperature 2 Heatbed temperature actual desired temperature 3 Progress of printing in shown only during the printing 4 Status bar Prusa i3 MK2 5 ready Heating fil...

Page 28: ...see a failed print which requires immediate cancellation During some LCD functions like Calibration Wizard you may encounter special symbols in the bottom right corner Double down arrow informs you that the message contains more screens which automatically switch and you should wait Tick sign informs you that you need to press the control knob to continue 7 2 3 Print statistics The printer tracks ...

Page 29: ...D Menu Tune Hi power Silent Auto 7 2 6 Factory reset The factory reset is used when troubleshooting the printer and resetting it to the factory state Entering the factory reset menu 1 Press and release the reset button marked X and positioned under the control knob on the LCD panel 2 Press and hold the control knob until you hear a beep 3 Release the control knob Options Language option resets the...

Page 30: ...n top Folders are shown on the top of the SD card menu and then other files follow The maximum number of files which can be displayed is 100 If there are more than 100 files on the SD card only the first 100 will be displayed Pict 18 SD card sorting 7 2 8 Testing if file gcode is complete The printer automatically looks for common g codes which indicate the end of the generated file If they are no...

Page 31: ...Mode Pause print during the printing process only Stop print during the printing process only Preheat PLA 215 60 PET 230 85 ABS 255 100 HIPS 220 100 PP 254 100 FLEX 230 50 Cooldown Print from SD AutoLoad filament Load filament if filament sensor is turned off Unload filament Settings Temperature Nozzle Bed Fan speed Move axis Move X Move Y Move Z Extruder Disable steppers Filament sensor On Off Fi...

Page 32: ...ayer calibration Auto home Selftest Calibrate XYZ Calibrate Z Mesh Bed Leveling Bed level correction PID Calibration Show end stops Reset XYZ calibration Temperature Calibration Statistics Fail stats Support Firmware version XYZ calibration detail Extruder info Temperatures 32 ...

Page 33: ...s print time The speed can also be changed while printing The LCD shows the FR 100 item it s actual print speed feed rate By turning the LCD knob clockwise you can increase the print speed up to 999 However we do not advise increasing the speed over 200 Watch the results of increased speed on the printed model and adjust the speed accordingly When increasing the speed always check that the model i...

Page 34: ...ux users connect the printer using the virtual serial port When the printer is connected click the Connect button The right column displays the connection information The next step is loading the model with Load model button and choosing the file_name gcode no special symbols in file name You can control the movement of all printer axes using the control area Next you can preheat the printer and p...

Page 35: ...ed temperatures 7 Thermometer 8 Confirming the set temperatures heating starts 9 2D print process preview 10 Info panel Estimated print time axis position and other info are displayed after loading the model 7 2 12 Temperatures By default the printer shows the heatbed and hotend temperatures on the LCD screen If you want also to check the temperature measured inside P I N D A probe you can do so i...

Page 36: ...ls like ABS are not able to be printed as fast as with a regular nozzle 7 3 1 2 The Olsson Ruby nozzle Similarly to hardened steel nozzle the Olsson Ruby is designed to print highly abrasive materials However since most of it is made from brass it retains the excellent heat conductivity and throughput of the stock brass nozzle Even though the ruby gemstone is highly wear resistant it s also brittl...

Page 37: ... maintain it Do not touch the nozzle during this process until the process is fully finished as it will reach high temperatures Be aware that PID tuning is not a solution to all of the temperature fluctuation issues Always make sure that your printer is located in a room with stable ambient temperatures more information can be found at Thermal Runaway and Temperature Drops at help prusa3d com 8 2 ...

Page 38: ... with the best accuracy Pict 23 Distance of the front calibration point from the axis start Pressing the button will get you to the 2nd screen This screen will identify how far you are from the perfect perpendicularity It is measuring the skew of your X Y axis Up to 0 25 Severe skew compensating for offset of 1 1 mm on 250 mm length Up to 0 12 Slight skew compensating for offset of 0 5 mm on 250 m...

Page 39: ...ue is set in custom gcode section in the Filament Settings tab NOT under the printer specific custom gcode PrusaControl uses the same K values but will not allow users to edit Simplify3D Cura users just need to add M900 K into the starting gcode script Keep in mind you need to manually change that for different filament materials Only Slic3r PE has custom gcode for each filament preset and therefo...

Page 40: ...rs It provides info of Extruder cooling fan RPM Information of filament moving in the extruder Illumination level of the filament sensor optimally below 100 This information can be used to check the function of the fans and assess how well particular filament works with the sensor 40 ...

Page 41: ...oad a large variety of ready made 3D models ranging from a simple shaver holder to a detailed aircraft engine model 3D models are generally free to download under the Creative Commons Attribution Non Commercial Models not to be used commercially you must always include the name of the author or for a small fee We have selected the most interesting sites with high quality models 1 http www thingive...

Page 42: ... or stl format into a gcode file Gcode is a file format readable by a 3D printer The file contains information for nozzle movement and the amount of filament to extrude The right tool for this task and for many more is the PrusaControl program You specify the printing material print quality and the print speed in PrusaControl You can manipulate the object there vary the placement on the printbed r...

Page 43: ...ep are 0 1 inner circle step is 45 4 Auto arrange button positions objects on the print bed 5 Material selection menu 6 Quality Speed setting of a print menu 7 Infill menu 8 Supports menu 9 Reset transformation settings button 10 Position values 11 Rotation values 12 Scale values 13 Place on bed button turns on automatic placing of objects to Z 0 14 Brim On Off button 15 Model preview 16 Generate ...

Page 44: ... Slic3r PE directly Pict 27 Slic3r interface 1 The Add button loads models into Slic3r 2 Delete and Delete All buttons remove the model s from Slic3r 3 Opens the detailed settings of print filament and printer 4 When the model is ready for print this button generates the gcode file 5 Quality Speed setting of a print 6 Material selection 7 Printer selection 8 Right click on model opens the menu wit...

Page 45: ... 3D printing benchmark 10 6 Print in color with ColorPrint There is a simple way to create layer based multicolored 3D prints with PrusaControl or with our simple online ColorPrint app by manually changing the filament Pict 29 Multicolored object printed with ColorPrint ColorPrint is now directly integrated into the PrusaControl and filament changes can be added when the gcode is already generated...

Page 46: ... menu Drag the gcode to the frame and click on Add change button Find the height of the layer where you want to make the color change This can be easily found in Slic3r under tab Layers The scale along right side displays the height of individual layers Set this number to the box The number of these changes is unlimited When you are done with your modification download the file This file is ready ...

Page 47: ... the new color is clear without any remains of the previous filament if so choose this option to continue printing with a new color 2 Filament not loaded If the new filament was not loaded properly choose this option and the printer will start the automatic filament load again When the filament is loaded properly you can choose the Yes option and the printing will continue with a new color 3 Color...

Page 48: ...al If you print an object with a gradient lower than 45 the material overhang would be preventing the object to be printed correctly Slic3r allows you to print such objects thanks to the Printing with support function Support material is an extra structure printed as scaffolding for the object you can remove the support material after the printing is finished Choose the Print Settings tab 1 and cl...

Page 49: ...nt to scale down the model evenly or you can alter the size of a model along the one of the axes Along X Y Z axis Pict 33 Size change of a printed object If you need to print an object that does not fit the printer you have to cut the object using Slic3r Right click and choose the Cut option in the menu You can cut the object horizontally if you need to perform a cut in a different axis use the Fl...

Page 50: ...est use of ABS is for architectural models concept models spare parts car interior gears phone cases etc On the other hand thermal contraction is where ABS makes it really hard to successfully print something And that s especially true when printing anything larger Even with the heatbed at 100 C your part may start lifting from the build plate and warp This and the unpleasant smell of ABS is why y...

Page 51: ...gth at temperatures over 60 C The combination of being both biodegradable and having low temperature resistance means that it s not ideal for outdoor use not to mention low UV resistance Also PLA is only soluble in chemicals like chloroform or hot benzene So when connecting multiple pieces you re better off using just glue Even though PLA is biodegradable and the material on its own is food safe w...

Page 52: ...n fight this with increasing retraction and playing with hotend temperature but if you use our filament presets in Slic3r or Prusa Control we already did that for you and the amount of stringing is minimal If you witness a tiny bit of stringing anyway you can get rid of it by quickly blasting your finished prints with a heat gun If you can handle the oozing and strong adhesion you ll be left with ...

Page 53: ...set the bed temperature between 80 to 110 C depending the size of an object larger object means higher temperature Heatbed Make sure the surface is clean as described in 6 2 2 Flexible steel sheet surface preparation chapter 11 5 PP Polypropylene is a flexible and resistant material suitable for printing precise objects requiring the flexibility firmness and persistence ADVANTAGES DISADVANTAGES To...

Page 54: ...ozzle from the previous material preheat the nozzle and load PLA to remove any other previous material When loading Flex loosen the extruder idler screws Keep in mind that when printing from Flex the automatic filament change function may not work properly Flex has a very good abrasion resistance remains flexible in cold environments and is resistant to many solvents It doesn t shrink much when co...

Page 55: ...base The first step in polishing is sanding It s a good idea to start with a coarse grit size 80 and slowly move up the grit table After sanding a big improvement in polish can be achieved with steel wool or a brass brush If you re still not happy with the finish you can try wet sanding with a very fine grit 1500 ADVANTAGES DISADVANTAGES Easy to print Needs hardened nozzle No warping Great look af...

Page 56: ...eaner instead If you do not have anything else on hand use the bundled glue as a separator after cleaning it Windex or similar window cleaner is a great option for nGen and you don t need to use the glue after the cleaning Spray a small amount on an unscented paper towel and wipe the print surface 11 11 PC ABS E3D Polycarbonate ABS PC ABS is an enhanced version of traditional ABS It offers easier ...

Page 57: ...ll of these can be changed even during a print from the Tweak menu on the LCD panel The same idea also applies even for materials which are not listed here Take the manufacturer suggested settings find the closest match in Slic3r material profiles modify and save as new Continue by printing a few simple test pieces and continuously use the Tweak menu After each improvement don t forget to modify t...

Page 58: ...uper lube or any other multi purpose grease will do 12 1 2 Fans Both fans should be checked and cleaned every couple hundred hours dust or plastic build up can decrease their efficiency or even damage them Computer cleaner spray will get the dust away and tweezers can be used for little plastic strands The extruder cooling fan measure current RPM Revolutions Per Minute Because of that the printer ...

Page 59: ...d grease is recommended to be used Oil is not recommended since it might spread to the section where the filament is fed to the hotend After extensive use it is recommended to remove clean and inspect the gears This is also a good time to also put some grease on the needle bearings in the secondary gear to keep the friction low 12 1 4 Electronics It is a good practice to check and eventually recon...

Page 60: ... in most cases it s not possible to recover the current print because it s hard to detect the exact moment of the jam happening However in a future version of the firmware we plan to offer a few more options to possibly save the print When the jam is detected the printer will try to unload the filament However this may not always be possible if too much filament was already ground off Either way t...

Page 61: ... filaments Some translucent filaments focus more light on the sensor and this can result in weird behavior Certain colors like ivory matte white or lime green can also cause false alarms If you re printing with any of these filaments and you re getting a lot of false alarms consider turning the sensor off in LCD Menu Settings Fil sensor on off 12 4 Clogged jammed extruder Material clogged in the e...

Page 62: ... out a little If the filament doesn t go through the extruder smoothly and only a small volume is coming out first check if the extruder fan is working properly and that the temperature is set correctly PLA 210 C ABS 255 C HIPS 220 C PET 240 C Also check that the filament was correctly loaded into the extruder If that is not the case Follow the instructions below 1 Heat the nozzle according to the...

Page 63: ...ove the extruder body upwards to get to the nozzle end LCD menu Settings Move axis Move Z Set the height by rotating the LCD knob and then confirm 2 Unscrew the screw on the fan mouthpiece and the two screws on the print fan and remove both parts Pict 40 part 1 3 Remove the two front screws on the nozzle fan Pict 40 part 2 4 Unscrew the two screws holding the extruder cover Pict 40 part 3 Even tho...

Page 64: ...Pict 40 Nozzle change 64 ...

Page 65: ...re properly the printer is away from drafts and object design is right the printed object should not break The easiest way to avoid breaking or overall model fragility is to choose a different material The strongest are PET HIPS and PLA while PLA has low heat resistance PET is the firmest and has the lowest thermal expansion When parts break and there is no spare time to reprint the model you can ...

Page 66: ...w these steps Align the Y axis so that each Y corner is sitting on the table none should be off the table Align the tightening of each Y axis threaded rod so that each Y corner is perpendicular facing upright to the table surface Align the tightening of each Y axis threaded rod so that each M8 threaded rod is at a right angle to the M10 threaded rods the Y axis must form a perfect rectangle when v...

Page 67: ...he assembly manual Pict 42 Proper wiring of the connectors 13 3 Printer can t read the SD card First make sure that the file name on the SD card does not contain special characters otherwise the file could not be displayed on the LCD If there is no error in the file name check the EXT2 wiring from electronics to LCD If the cable is connected properly try to swap the cables 67 ...

Page 68: ... to check is printing a round object if any of the belts are not tightened properly the result is an irregular shape instead of a perfect circle Y axis belt is located under the heatbed X axis belt moves the extruder See the pictures with properly tightened belts Pict 43 A properly tightened Y axis belt under the heatbed Pict 44 A properly tightened X axis belt 68 ...

Page 69: ...ched cables to the heatbed Do not forget to use a spiral wrap on heatbed cables and attach the cables properly so they won t restrict movement during printing Pict 45 Cables should be wrapped in a spiral wrap 69 ...

Page 70: ...Print and share Do not forget to tag your prints with prusai3mk3 while sharing so we can find pin and showcase them with our http www prusa3d com original prusa i3 prints Happy Printing 70 ...

Reviews: