7. Reset Switch (Optional)
There are many different sizes of small button switch, and rather than designing the
case for a specific one, a small drop-in “block” can be used to install a range of
switches. The block itself is very simple: 20x20x6, with a hole at a height of 10mm
from the base (for the switch).
Items Required
1 off push-to-make micro-switch – must be smaller than 16 x 16 x 4.5
Wire (e.g. 2.54mm patch wire)
Soldering Iron (most likely)
Assembling the Switch
1. Attach wires to the switch
There are many ways to achieve this – I used 18mm pins from a Pi Zero header, and
the plastic from a single strip header. You could also solder a wire directly to the
button pins.
2. Measure the wired switch dimensions:
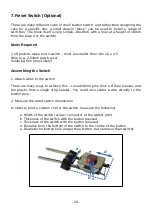
In order to print a custom clip for the switch, measure the following:
a. Width of the switch / wires / connector at the widest point
b. Thickness of the switch with the button pressed
c. Thickness of the switch with the button released
d. Distance from the bottom of the switch to the centre of the button
e. Diameter for button hole (larger than button, but narrower than switch)
- 10 -
a
b c
d
e


