


6.1 Calibrate the Z-axis
In your printer’s LCD menu, go to
Menu - Calibration - Calibrate Z
and let the printer run
the calibration procedure. The procedure consists of raising and lowering the Z-Axis and
measuring 9 points on the print bed.
Pict. 8 - Z calibration
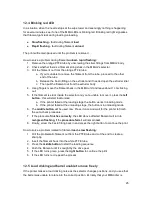
Alternatively, you can run a “manual” Z-axis calibration. After you power on the printer, press
and hold the knob for 2 seconds. A new menu will be displayed, showing the letter ‘Z’ and a
number representing the current height of the Z-axis. Rotate the knob clockwise until
both
ends of the Z-axis hit the top part of the frame
.
Once the Z-axis is calibrated, you can proceed with the First Layer Calibration.
6.2 First Layer Calibration
1. Load a
PLA filament
into at least one MMU2 slot
2. Check if your printer’s print surface is completely clean. Please refer to your model’s
handbook to learn more about surface maintenance
3. On your printer, go to
LCD Menu - Calibration - First Layer Cal.
4. The printer will warm up and ask you which filament should be used. Use the
on-screen menu to choose the desired PLA filament for the test
5. The printer will probe the bed and start printing a zig-zag pattern on the print surface.
The nozzle must not by any means touch the printing surface.
11
Summary of Contents for Original Prusa i3 MK2.5
Page 1: ......


