background image

PS Audio® Inc. 800PSAUDIO 4865 Sterling Drive Boulder, Colorado 80301

13

13

Operating Manual

Holding down the button will access the Menu display.

The Display

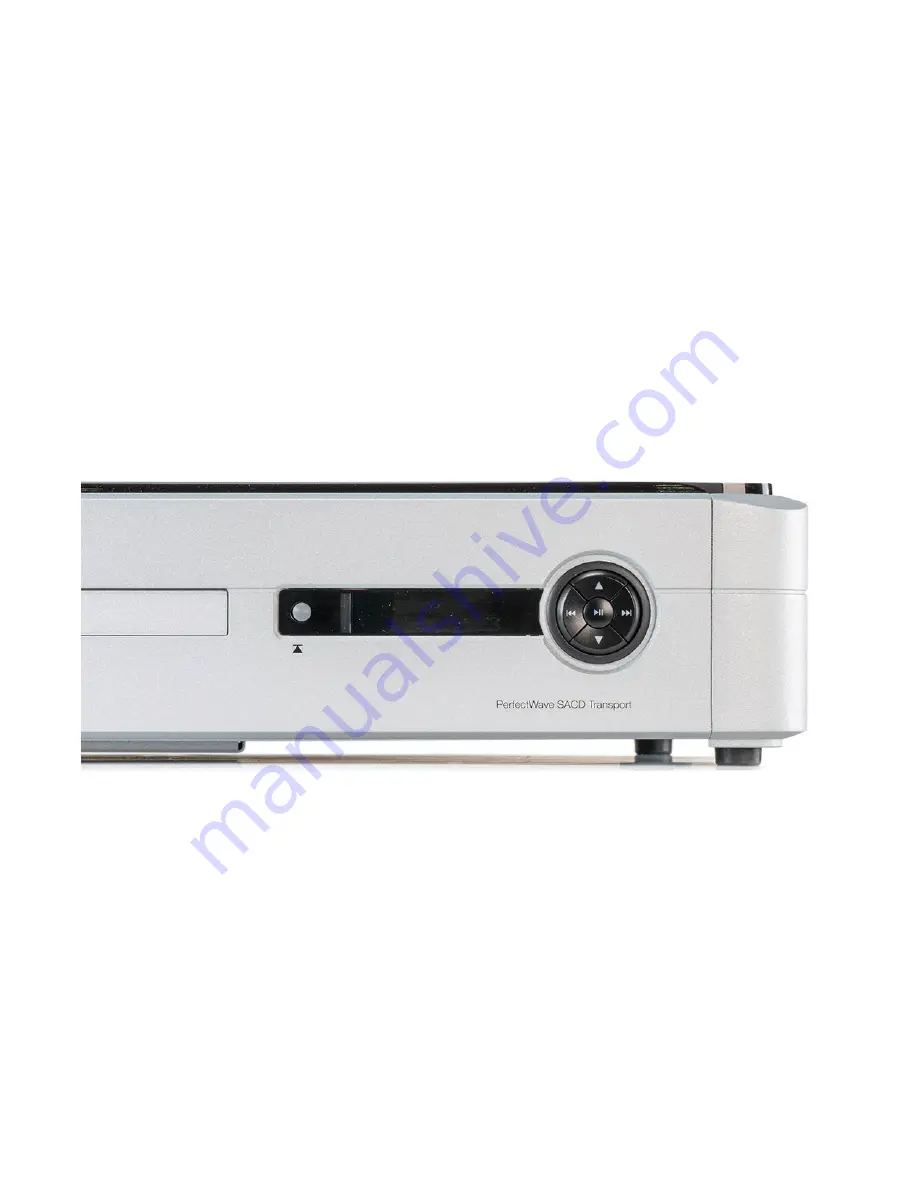
The front panel display will show various information according to the function selected, 

including track number and duration, elapsed time, disc type and other information.

By default, the display shows the track number and remaining time of the currently playing track. 

To display the elapsed time of the currently playing track, long press the up arrow navigation 

button on the control ring. To insure it is set to the correct mode (remaining or elapsed), this 

may be done while a track is playing. Once selected, the remaining/ elapsed time mode will not 

change unless the unit is powered off in the back. 

The Front Panel Control Ring

The five buttons on the control ring can have different functions depending on whether the 

button is given a short press or a long press. 

For Disc Playback

Center: A short press will begin play of the selected source.  If a disc is playing, another short 

press will pause the disc. A long press will stop disc playback. The difference between pause and 

stop is that pause will halt at the current track and time and the SACD drive will continue to spin. 

Pressing stop will return to the beginning of track 1 and the SACD drive will spin down and stop. 

Right: A short press will skip backwards to the previous track. On the first press, it will skip 

back to the beginning of the current track. If pressed within the first three seconds of a track, it 

will skip back to the previous track.

Summary of Contents for PerfectWave SACD Transport

Page 1: ...PS Audio Inc 800PSAUDIO 4865 Sterling Drive Boulder Colorado 80301 Owner s Reference PERFECTWAVE SACD TRANSPORT ...

Page 2: ...puts 7 HDMI for I 2 S 8 Unpacking the unit 8 Registering Your PerfectWave SACD Transport 8 PST Output Options 8 I 2 S Sources 9 Coax and XLR Connections 10 Powering the PST 11 Idle Mode 12 Operating the PST 12 Front panel controls 12 Open Close Menu Access Button 12 The Display 13 The Front Panel Control Ring 13 For Disc Playback 13 Playing from a USB Drive 14 Menu Features 15 Exiting the Menus 15...

Page 3: ...16 Using the Remote Control 17 Idle Mode 17 Display Dim 17 Emergency eject of a stuck disc 17 Upgrading the Firmware 18 Care of the PST 18 Product registration 20 Warranty transfer 21 Warranty service within North America 22 Obtaining An RMA 22 Packaging and Shipping 22 International warranty service 22 ...

Page 4: ...es and the point where they exit from the apparatus Unplug this apparatus during lightning storms When making connections to this or any other component make sure all components are powered off Turn off all systems power before connecting the PS Audio component to any other component Make sure all cable terminations are of the highest quality THERE ARE NO USER SERVICEABLE PARTS INSIDE THIS PS AUDI...

Page 5: ...er The PerfectWave SACD Transport PST is PS Audio s most advanced universal disc transport and is capable of playing stereo audio from most types of optical discs including SACD CD CD R CD RW and DVD R RW R RW Audio data file only It can also play MP3 WMA AAC 48kHz 320bps WAV FLAC AIFF 192kHz 24 bit DSD 5 6mHz and ALAC 96kHz 24 bit files from discs or from its USB input ...

Page 6: ...that must be experienced to be understood Proprietary Digital Lens Technology In digital audio timing is everything Jitter noise and a lack of isolation all have major impacts on sound quality especially affecting lower resolution media such as CD The PST s latest gen eration Digital Lens technology solves timing noise and isolation problems through a unique combination of buffer memory and FPGA F...

Page 7: ...n the sound quality Experiment A growing number of DACs and devices are adopting the PS Audio I 2 S over HDMI standard for digital audio transmission because of its superior audio quality Playback from a USB Drive The PST can also play files from a USB drive that is plugged into its front panel USB port Sub folders are not supported and only files in the root directory are played Simple Front Pane...

Page 8: ...nect the AC cable into the receptacle in back and plug the unit into your PS Audio Power Plant other power conditioner or into the wall Registering Your PerfectWave SACD Transport PS Audio products come from the factory with a three year warranty Please register your new PST Registration takes just a few minutes assures that you will be informed about future upgrades keeps track ofyour serial numb...

Page 9: ...the high end audio manufacturing community The PST is compatible with all properly implemented DACs that are compatible with our published protocols Although an HDMI cable is used for the I2 S connections it s important to note that I2 S data is not HDMI data and the PST s I2 S output should not be connected to the HDMI input on a DAC or receiver The HDMI connector and cabling are used only to del...

Page 10: ... data and multiple clocks Usingahigh qualityXLRdatacable connecteitherofthePST sXLRoutputstothecorresponding input of your DAC To obtain double rate DoP DSD Over PCM audio via the XLR outputs connect both the Left and Right L and R XLR outputs to the corresponding inputs on your DAC if it is so equipped RCA or BNC Coax Many DACs rely upon a coaxial digital connection to receive data Digital audio ...

Page 11: ...e network is not connected no icon will appear in the icon bar The PST can also receive factory firmware updates via its network connection should they become available In addition the PST has a built in Wi Fi antenna which can be used to receive factory supplied network firmware updates Powering the PST Once all the digital audio and network connections are made use a high quality AC cable to con...

Page 12: ...de can be activated deactivated by pressing the PS Audio logo button located on the upper left hand corner of the PerfectWave SACD Transport front panel When the logo button is not lit the PST is in Idle mode Idle mode can also be activated deactivated by pressing the On Off button in the top left hand corner of the remote CAUTION Activate Idle mode before powering down your unit using the rear pa...

Page 13: ...apsed time mode will not change unless the unit is powered off in the back The Front Panel Control Ring The five buttons on the control ring can have different functions depending on whether the button is given a short press or a long press For Disc Playback Center A short press will begin play of the selected source If a disc is playing another short press will pause the disc A long press will st...

Page 14: ...ewind mode scanning backward through the track at approximately ten times the normal playing speed Pressing the Down key or the center Play key will bring the PST out of fast rewind mode and the disc will go back to playing normally A long press more than two seconds on the Down button will toggle the time display to be either remaining time counting down or elapsed time counting up The default is...

Page 15: ...use the control ring up and down buttons Exiting the Menus Executing a long press of the menu button holding for more than two seconds or the center Play Pause button will exit the menus and return the unit to the Home screen The menus will also timeout after seven seconds Note that some settings such as repeat take effect immediately while other settings will not take effect until a final selecti...

Page 16: ...s menu to activate the WPS feature then press the corresponding WPS button on your router Your PST will then be connected to your Wi Fi network automatically Wifi Setup sub menu This menu is used to manually setup a Wi Fi network connection Network Select Select your Wifi router from the drop down menu using the Up or Down arrow keys to select the correct AP access point Press the menu select butt...

Page 17: ...access and so on The remote comes supplied with two AAA batteries Please remove the back cover and insert the batteries in the correct orientation Idle Mode Use the Off button to put the unit in Idle mode Use the On button to return it to the operating mode Display Dim Pressing the Dim button will turn off the display and all the indicators on your PerfectWave SACD Transport Any time you press any...

Page 18: ...n download the firmware update at no charge After downloading the files unzip them and transfer them to a blank USB stick Then place the stick in the rear panel USB slot of the PST labeled FW Turn off the rear panel power switch wait for 10 seconds and then turn the power switch to the On position which will reboot the PST The front panel logo Ready light will begin blinking indicating that the ne...

Page 19: ...PS Audio Inc 800PSAUDIO 4865 Sterling Drive Boulder Colorado 80301 19 19 Operating Manual ...

Page 20: ...pment of the warrantied product to PS Audio or its authorized repair center Under this limited warranty PS Audio or its authorized repair center will pay the cost of returning the repaired or replacement product to you What this warranty does not cover This warranty does not cover damage due to Accidents carelessness improper transportation misuse neglect or abuse Failure to follow the operating i...

Page 21: ...epaired PS Audio will either replace or refund the cost of the unit We reserve the right to replace any out of stock discontinued or limited edition products with a comparable product Discontinued products may not be available for warranty Warranty transfer This warranty is for the benefit of the original purchaser of the product The warranty may be transferred to a subsequent purchaser during the...

Page 22: ...f shipping the product to a PS Audio authorized repair center You should insure the product for its full retail cost in the event it gets lost or damaged in transit PS Audio is not responsible for damage incurred during the transit of products sent to us Shipping your product in non PS Audio packaging may void this warranty PS Audio reserves the right to charge you for new factory packaging to ret...

Page 23: ...PS Audio Inc 800PSAUDIO 4865 Sterling Drive Boulder Colorado 80301 23 23 Your Product Your Serial Number Your Purchase Information Date of Purchase ...

Page 24: ...may not all share the same genes here we are all related by a passion nay obsession with listening to the music we love at the highest most breathtaking quality possible And in our minds that makes us kin In fact we believe that every nutty hertz counting audiophile out there is part of our tribe That s how we ve built our company over the last 40 years with the kind of care and respect that you g...

Reviews: