background image

6

English

7

English

Pressing the INFO key displays the Gateway IP Address and the Subnet Mask 

used with the IP Address assigned by the DHCP Server. 

Note: 

If the DHCP Server 

does not provide the Gateway IP Address, a 0.0.0.0 IP Address is displayed.

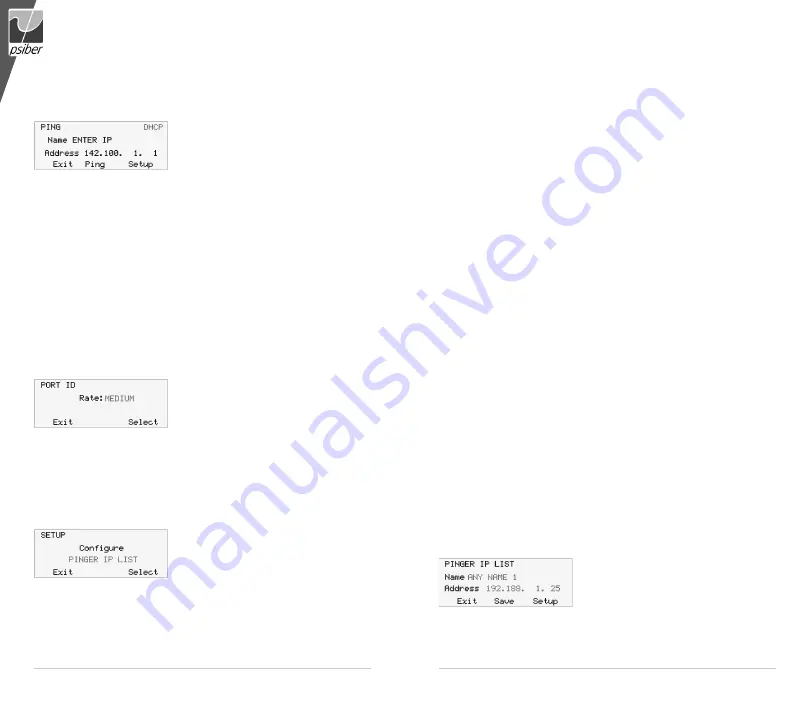
Pressing the PING key while in the DHCP Client mode presents the PING 

screen with a “DHCP” message displayed and 

the IP Address of the Gateway. If Gateway 

information is not available, the DHCP Server 

IP Address is shown.

Pressing the PING key from the IP Ping Screen transmits a PING that uses 

the IP Address, Gateway Address and Subnet Mask provided by the DHCP 

Server instead of the IP Address, Gateway Address and Subnet Mask that 

were previously entered and stored in the Pinger. The Gateway IP Address is 

automatically entered as the address to be PINGed (or the DHCP Server address 

when Gateway information is not available). Alternatively, a new IP Address can 

be entered or  the Up/Down cursor key can be used to select a previously stored 

address. Pressing the EXIT key returns the Pinger back to the LINK Screen and 

clears the DHCP Server assigned addresses and mask. Pressing the Setup key 

also clears the DHCP Server assigned information and transmits a DHCP release 

packet to the DHCP server so that the IP address is available for reassignment.

PORT ID ScREEN

Pressing the PortID function key in the Link Screen presents the Port ID Screen. 

As soon as this screen appears, the Pinger begins transmitting a pattern of Link sig-

nals that will cause the hub,switch or NIC Link 

LED to blink or stay on continuously. Identifying 

the specific port a wall outlet/PC is connected to 

can aid in diagnosing the cause of failed PING 

tests. Hubs and switches from various manufacturers have different specifications 

for the time it takes for Link signals to turn the Link LED on and off. The Pinger Plus 

has four different blink rates and a continuous mode that can be selected by press-

ing the Up/Down cursor key.  An initial test directly at the hub or switch will determine 

the best blink rate setting before conducting a Port ID test at a wall outlet.

SETUP

Pressing the SETUP key in any screen 

presents the Setup Screen.The Up/Down 

cursor key is used to display: 

1)  Pinger IP Address Setup

2)  Pinger Subnet Mask Setup 

3)  Pinger Gateway Setup

4)  Pinger IP List Setup

5)  Pinger MAC Screen 

6)  Profile Setup 

7)  Default Profile 

8)  Ping Count 

9)  Packet Size 

 10)  Time Out 

 11)  Link Search

 12)  Power Down Time Setup 

 13)  Password Setup or

 14)  Pinger Update . 

Press the SELECT function key to enter the displayed setup screen. 

The Pinger MAC is shown for information only and can not be changed.

IP lIST SETUP ScREEN

The IP List Setup screen is used to enter from one to eight names and IP 

addresses. The Pinger can then PING the entries individually or PING all entries 

sequentially.

DaTa ENTRY – 

Use the Up/Down cursor key to select one of the eight 

storage locations and press the right arrow key to display the cursor and begin 

entering a new name or editing an existing one. Use the data entry keypad to 

input the number or letter (each time the key is pressed the next letter or number 

on the key is displayed). Pressing the right cursor key advances to the next 

character. Pressing the left cursor key selects the previous character. Names can 

be a maximum of ten characters long. Pressing the right cursor key an eleventh 

time advances the cursor to the IP Address which is divided into four fields of 

three characters. Only numbers can be input in the fields and  the maximum 

valid number for any field is 255. Single digits can be entered in any of the three 

character locations and will be right hand justified when the cursor is moved to the 

next field. Two digit numbers can be entered in the left two or right two character 

locations. If an invalid number is entered, the cursor will not advance to the next 

field. After entering or editing the name and IP address, press the SAVE function 

key to store the information in non-volatile memory. The information is retained 

even if the unit is turned off or the batteries are  removed. To remove an entry 

from the list, press the right cursor key to select the entry and then press the star 

key. A “Delete Entry” message is displayed and pressing the SAVE function key 

clears the selected name and IP Address.

PINGER IP SETUP ScREEN

The IP address for the Pinger Plus is input 

from this screen. The unit comes programmed 

with a default address of 192.168.1.42.

Summary of Contents for PINGER PLUS+

Page 1: ...ROFESSIONAL NETWORK TESTING PROTOCOL ANALYSIS PINGER PLUS TM NETWORK IP TESTER USER S GUIDE Handbuch Manuel d utilisateur 99 Washington Street Melrose MA 02176 Phone 781 665 1400 Toll Free 1 800 517 8431 ...

Page 2: ...nter the Pinger IP address shown in the Pinger IP Address setup screen in the browser URL window All setup features can be configured from the browser The User Guide can also be displayed OPERATION To test a hub switch router or NIC connect a patch cable from the RJ 45 port on the equipment to the RJ 45 jack on the Pinger Plus LINK SCREEN Turn on the Pinger Plus by pressing the PWR button The unit...

Page 3: ... SCREEN When IP List is selected and the PING function key is pressed each IP address stored in the IP List see IP List Setup is PINGed in turn The same Wait and No Response messages are displayed as described above After completing the PING of the last stored IP address the IP List Reponse screen is shown LIST RESPONSE SCREEN The List Response screen shows the results of the PING to each of the s...

Page 4: ...SETUP key in any screen presents the Setup Screen The Up Down cursor key is used to display 1 Pinger IPAddress Setup 2 Pinger Subnet Mask Setup 3 Pinger Gateway Setup 4 Pinger IP List Setup 5 Pinger MAC Screen 6 Profile Setup 7 Default Profile 8 Ping Count 9 Packet Size 10 Time Out 11 Link Search 12 Power Down Time Setup 13 Password Setup or 14 Pinger Update Press the SELECT function key to enter ...

Page 5: ...n IP address from 1 to 99 times or continu ously Pressing the Up Down cursor key scrolls the number of times to PING from 1 to 99 The Continuous PING setting is shown by scrolling down from 1 or up from 99 Multiple PINGs are not available for Lists Profiles or Ranges PING PACKET SIZE AND TIMEOUT SETUP SCREENS The PING packet size has six settings from 50 to 1400 bytes The time the Pinger Plus wait...

Page 6: ...messen Datenintegrität zu überprüfen MACAdressen herauszufinden Gespeicherte Listen oder einen Bereich von IPAdressen im Netzwerk zu suchen Der Pinger Plus bietet einen DHCP Client Modus um die DHCP Server Funk tionalität zu testen Zusätzlich verfügt er über eine Port Identifikationsfunktion mit einstellbarer Blinkrate um herauszufinden welcher Port eines HUBs oder Switches mit der entsprechenden ...

Page 7: ...nterschiedlich ist kann immer noch ein Ping Test durchgeführt werden PING Menü Mit der Funktionstaste PING diese ist je nach geladenem Menü F1 Taste oder F2 Taste gelangen Sie in das Ping Menü Mit den Auf Ab Pfeiltasten können Sie wählen zwischen 1 Ping Eingabe und anpingen einer neuen IPAdresse 2 List Anpingen einer von 8 vorprogrammierten IPAdressen siehe auch IP List Setup 3 ListNameIPList Anpi...

Page 8: ...ner Sekunde werden in Millisekunden ms angegeben Range Menü IP Bereich Wenn Range also dasAnsprechen eines Bereichs fortlaufender IPAdressen ausgewählt wurde wird die Start und Stop IP Adresse angezeigt Die ersten drei Felder der Start und Stop IPAdresse müssen identisch sein Somit kann maximal ein Bereich von 255 IPAdressen angepingt werden Durch Drücken der Funktionstaste PING werden alle IPAdre...

Page 9: ...Setup Hier kann eine Liste von häufig verwendeten IPAdressen angelegt werden 5 Pinger MACAddress Screen Pinger MACAdresse 6 Profile Setup Hier definieren Sie bis zu 8 Profile mit Pinger Plus IPAdresse Gateway IP und Subnet Mask zu pingende IPAdresse 7 Default Profile Definiert das Standard Profil Wird Pinger ausgewählt verwendet das Gerät dieAbsenderAdresse von Punkt 1 3 Ansonsten die im Profil vo...

Page 10: ...sse eingeben und wieder mit NEXT bestätigen Danach eine bis acht Ziel IP Adressen eingeben und dann mit SAVE speichern Fertig Default Profil Menü Ein Default Profil kann ausgewählt werden damit die Konfiguration eines Profils beim Einschalten des Gerätes sofort zur Verfügung steht Ab Werk ist das Profil Pinger eingestellt Hierbei werden die Pinger IPAdresse GatewayAdresse und Subnet Mask aus den i...

Page 11: ... trägt nur die Versandkosten vom Ort des Käufers an die Psiber Data GmbH Das ist der EINZIGE UND AUSSCHLIESSLICHE ERSATZANSPRUCH gemäß diesem Vertrag Geräte die durch Fahrlässigkeit Unfall oder unsachgemäßen Gebrauch Schaden genommen haben oder Geräte die durch andere als einer autorisierten Reparaturwerkstatt verändert oder repariert wurden sind von der Garantie ausgeschlossen Zur Rücksendung ein...

Page 12: ...fiché par UN sur l écran Link et la connexion sera toujours établie en half duplex Même si les modes duplex du partenaire de liaison testé et du Pinger Plus sont différents duplex mismatch il est possible de faire un test PING Le menu PING Une pression sur la touche PING selon le menu affiché c est la touche F1 ou F2 présente le menu PING Les touches fléchées haut bas sont utilisées pour sélection...

Page 13: ...ésultats Chaque adresse IP qui a répondu s affiche en indiquant le temps de réponse Round Trip Time l état de données Data Good ou Bad voir ci dessus et l adresse MAC Des adresses IP qui n ont pas répondu dans le délai configuré en menu Timeout s afficheront par No Response Des délais de moins d une seconde sont indiqués en millième de seconde ms Le menu Range Gamme IP Si Range une gamme d adresse...

Page 14: ...gnotement et un mode continu Servez vous des touches fléchées haut bas pour faire votre choix Il est recommandé de faire ce test à l avance directement sur le port d un concentrateur ou commutateur pour pouvoir sélectionner le meilleur taux de clignotement avant de faire le test Port ID sur une prise murale Setup Configuration En appuyant sur la touche Setup dans un menu quelconque l écran Setup s...

Page 15: ...ut bas Unzéroaupremierchampestuneentréenonvalideet seramodifiéeparlePingeren255pardéfaut aussitôtlemasqueestenregistré Remarque Lemasquedesous réseauetl adressedelapasserellepardéfautpeu ventsimplementêtreidentifiésàl aided unordinateurraccordéaumêmesous réseau quelePingerPlus CesinformationssontaccessiblesdanslemenuNetworkSettings configurationsderéseau danslespropriétésdeprotocoleTCP IP Le menu ...

Page 16: ...eut rendre le testeur inutilisable et nécessite une réparation à l usine Insérez de nouvelles piles dans le testeur ou branchez le à l adaptateur CAavant de commencer à l actualiser Alimentation Autonomie typique environ 5 6 heures à 4 piles alcalineAA Extinction automatique auto power down Le Pinger s éteint automatique ment après l écoulement du temps configuré dans le menu Power Down ou si ON é...

Reviews: