background image

Chapter 3:  Hardware

Power Management

Psion Teklogix Omnii HDK User Manual

21

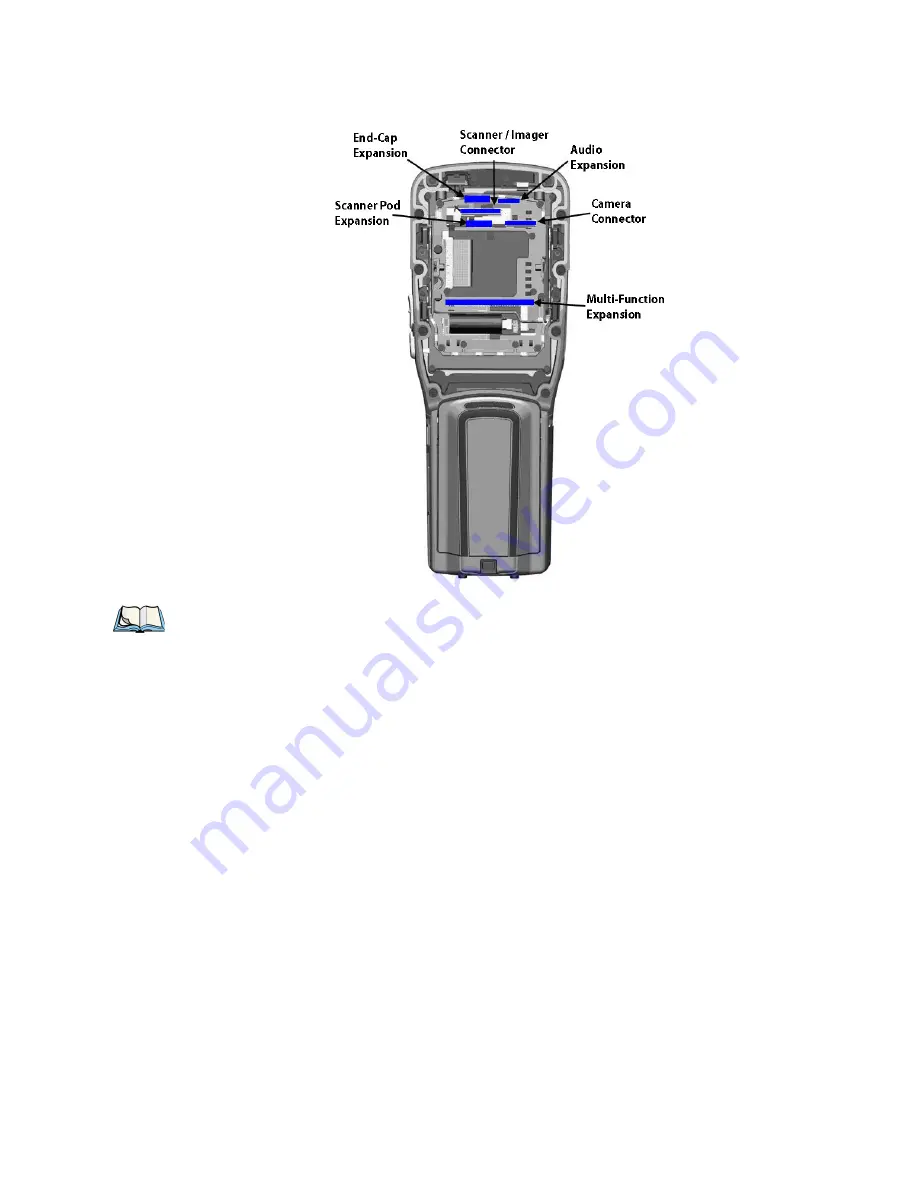
Figure 3.1  Connector Locations of the Omnii XT10 Main Logic Board

3.7

Power Management

Omnii is powered by a lithium-ion rechargeable battery pack and can also be powered from 
external power. When Omnii is powered from external power, the battery pack also charges.
Use only power sources recommended or sold by Psion Teklogix for Omnii.

3.7.1

Batteries

The battery is a custom 5000 mAh lithium-ion cylindrical multi-cell pack that fully implements 
a Smart Battery Specification and is CTIA approved (Model No. ST3000). The battery is fully 
sealed and designed to survive in rugged environments. For more details, refer to the Omnii 
Hand-Held Computer User Manual (P/N 8000190).

Note: The camera and scanner/imager connectors are not intended for third-party expansion on 

Omnii XT10, and are shown here for reference only.

Summary of Contents for OMNii HDK XT10

Page 1: ...Omnii HDK User Manual Omnii XT10 December 8 2010 P N 8100210 A ISO 9001 Certified Quality Management System...

Page 2: ...on changes are periodically added to the information herein these changes will be incorporated into new editions of the publication Psion Teklogix Inc reserves the right to make improvements and or ch...

Page 3: ...service organization See Psion Teklogix terms and conditions of sale for full details Service and Information Psion Teklogix provides a complete range of product support services and information to it...

Page 4: ......

Page 5: ...egistry Keys 13 Chapter 3 Hardware 3 1 Overview 17 3 2 Hardware Variants 17 3 2 1 Display Variants 17 3 2 2 Keyboard Variants 17 3 2 3 Back Cover Variants 18 3 2 4 Scanner Imager Variants 18 3 3 Proce...

Page 6: ...inFunction 47 4 7 4 14 Hdk7545_ExpansionSetPinState 48 4 7 4 15 Hdk7545_ExpansionGetPinState 49 4 7 4 16 Hdk7545_ExpansionSetPullUpDown 50 4 7 4 17 Hdk7545_ExpansionGetIrq 51 4 7 4 18 Hdk7545_ReadEepr...

Page 7: ...lti Function Connector 98 6 4 5 Expansion Port Standard Interfaces 100 6 4 5 1 Serial UART Interface 100 6 4 5 2 USB Interface 101 6 4 5 3 GPIO General Purpose Input Output Interface 101 6 4 5 4 SPI S...

Page 8: ...10 5 2 Attach the Omnii Back Cover 148 10 5 3 Connect the Test Module to an Expansion Port 148 10 6 Using the HDK Demo Application 149 10 6 1 Getting Started 149 10 6 2 Main Tabs 151 10 6 2 1 USB 151...

Page 9: ...DEVELOPER KIT LICENSE AGREEMENT C 3 C 2 GRANT OF LICENSE C 3 C 3 REQUIREMENTS RESTRICTIONS RIGHTS AND LIMITATIONS C 3 C 4 HIGH RISK ACTIVITIES C 4 C 5 DISCLAIMER OF WARRANTY C 4 C 6 LIMITATION OF LIAB...

Page 10: ......

Page 11: ...nual 1 INTRODUCTION 1 1 1 About This Manual 3 1 2 Text Conventions 4 1 3 About the HDK 4 1 4 Development Platform 4 1 5 Contents of the HDK 4 1 5 1 Files in the HDK 5 1 6 Obtaining the HDK 7 1 7 About...

Page 12: ......

Page 13: ...rivers Chapter 5 Mechanical Considerations describes the physical aspects of designing and mounting expansion modules Chapter 6 Omnii Expansion Ports and Connectors describes the connectors on Omnii i...

Page 14: ...ides the software tools necessary to access and control the expansion ports and the devices attached to them 1 4 Development Platform The Omnii API library is designed for application development usin...

Page 15: ...ck_Cover_Auto_Std_2D pdf 2D line drawing of the auto range standard back cover with loca tions of mounting points for the back cover and pistol grip Back_Cover_Auto_Std_3D igs 3D CAD model of the auto...

Page 16: ...f Artwork for the 36 key alpha modified numeric calculator 12 Fn keyboard overlay KB_Overlay_36NumTel12 pdf Artwork for the 36 key numeric telephony 12 Fn keyboard overlay KB_Overlay_59ABCTel6 pdf Art...

Page 17: ...stalling the HDK files required for developing applications to work with your expansion devices see Section 4 7 Omnii HDK Application Development Software 1 7 About the Omnii Hand Held Computer Omnii...

Page 18: ......

Page 19: ...x Omnii HDK User Manual 9 GETTING STARTED 2 2 1 Overview 11 2 2 What Can I Do With the Omnii HDK 11 2 3 Expansion Areas 12 2 4 Expansion Device Requirements 13 2 4 1 Device EEPROM 13 2 4 2 Device Regi...

Page 20: ......

Page 21: ...ecisely with your Omnii hand held computer Section 5 4 Expansion Module and Device Design and Installation install non Psion Teklogix serial USB or GPIO devices in existing Psion Teklogix end cap pod...

Page 22: ...ed Expansion Areas 12 Psion Teklogix Omnii HDK User Manual 2 3 Expansion Areas The following illustrations show the areas where custom expansion modules can be mounted on your Omnii hand held computer...

Page 23: ...y that specify the device driver s and port configuration to use for that device Details on this EEPROM can be found in Chapter 8 EEPROM Specifications and instructions on reading and writing the EEPR...

Page 24: ......

Page 25: ...Variants 17 3 2 1 Display Variants 17 3 2 2 Keyboard Variants 17 3 2 3 Back Cover Variants 18 3 2 4 Scanner Imager Variants 18 3 3 Processor 19 3 4 Identifying Hardware 20 3 5 The LEDs 20 3 6 Connect...

Page 26: ......

Page 27: ...anumeric variant 36 Key Numeric Telephony 12Fn Keyboard This numeric keyboard has the number keys arranged telephone style with the numbers 1 2 3 along the top row The alphabetic characters are also a...

Page 28: ...Variants Omnii comes standard with no scanner or imager installed A scanner or imager engine can be in stalled in a pod expansion module and mounted to the expansion back cover Alternatively a scanner...

Page 29: ...k Cover SE1223LR long range bar code scanner SE1524ER auto range bar code scanner Large Standard Back Cover SE1224HP high performance bar code scanner EV15 1D imager 5080 2D imager 3 3 Processor Omnii...

Page 30: ...ng purposes is Application 3 6 Connectors In addition to the external docking connector on the base of the Omnii hand held computer the following connectors exist on the main logic board Audio Expansi...

Page 31: ...e only power sources recommended or sold by Psion Teklogix for Omnii 3 7 1 Batteries The battery is a custom 5000 mAh lithium ion cylindrical multi cell pack that fully implements a Smart Battery Spec...

Page 32: ......

Page 33: ...egKey 36 4 7 4 2 Hdk7545_Open 36 4 7 4 3 Hdk7545_Close 37 4 7 4 4 Hdk7545_SetPower 38 4 7 4 5 Hdk7545_GetPower 38 4 7 4 6 Hdk7545_SetPowerMode 39 4 7 4 7 Hdk7545_GetPowerMode 40 4 7 4 8 Hdk7545_Expans...

Page 34: ...24 Psion Teklogix Omnii HDK User Manual 4 7 6 4 Hdk7545_PinFunction 59 4 7 6 5 Hdk7545_PinState 59 4 7 6 6 Hdk7545_PullUpDown 59 4 7 6 7 Hdk7545_PinMode 59 4 7 7 Omnii HDK API Constants 59...

Page 35: ...26 4 2 2 Non Psion Teklogix Drivers The Psion Teklogix platform loads some standard device drivers If the expansion module uses standard drivers such as serial or USB there is no need to load custom d...

Page 36: ...the device manufacturer and model names separated by a space For example for a device made by Psion Teklogix with the model name Exp1_UART the subkey should be 4 Program the expansion device EEPROM M...

Page 37: ...st 0x02 load default USB host driver Flags_UsbClient 0x04 load default USB client driver Flags_Spi 0x08 load default SPI driver Flags_UsbOtg 0x10 load default USB OTG driver Flags_None 0x00 load vendo...

Page 38: ...cturer and Model fields in the EEPROM see Section 8 3 1 Common EEPROM Fields for more details For example if an end cap expansion device manufactured by Psion Teklogix with the model field defined as...

Page 39: ...about expansion devices This value is a bit field as defined in the following table Table 4 2 PinFunctions Registry Value Definitions Bit Pin Name Description 0 LSB EXP1_TXD_GPIO0 0 GPIO pin 0 1 Seria...

Page 40: ...expansion devices For all expansion devices that require an additional driver to be loaded follow these steps Within the device registry key add a driver subkey For example Under the driver subkey add...

Page 41: ...e Microsoft documentation at http code msdn microsoft com BusEnum2 can be used Alternatively the driver specified in the driver key can load the other drivers Sample Driver Registry Entries This is a...

Page 42: ...fter the peripherals driver finishes initializing it performs the following steps to detect connected hardware and load the appropriate drivers 1 The EEPROM or other identifier is read to determine th...

Page 43: ...eplicator RS 232 port on portable docking module RS 232 port on desktop docking station RS 232 port on vehicle cradle Internal USB to serial converter in the desktop dock XMOD option snap module and v...

Page 44: ...klogix Mobile Devices SDK The Mobile Devices SDK contains many APIs designed specifically for interacting with Psion Teklogix mobile devices and peripherals Very simple and generic applications may no...

Page 45: ...ext The Installation Folder dialog box appears 3 To change the default installation folder type the path into the field or click the Browse button and navigate to the destination folder Click Install...

Page 46: ...ns Returns ERROR_SUCCESS if successful The expansionSlot parameter contains a valid ID ERROR_INVALID_PARAMETER one of the pointers was null or incorrect ERROR_INVALID_DATA an exception was generated E...

Page 47: ...e HANDLE hdk Parameters hdk in pointer to a valid open HDK handle Description This function is used to close an open HDK handle and release all the resources it owns The handle cannot be used after it...

Page 48: ...SS if successful ERROR_INVALID_HANDLE the specified handle is invalid ERROR_INVALID_DATA an exception was generated Other errors are possible Sample Code 4 7 4 5 Hdk7545_GetPower Syntax DWORD Hdk7545_...

Page 49: ...ed device driver application must enable and disable the power If the power mode of the device is Auto the Peripherals driver will enable disable power to the connectors automatically Power to the con...

Page 50: ...here are currently two modes available Auto and Manual The default power mode is Manual This function can only be called by a driver not by an application The driver that calls this function must be l...

Page 51: ...sing the Hdk7545_ExpansionSetPinFunction function see page 46 The pin direction does not need to be set if the alternate non GPIO function for the pin is enabled Drivers and or applications must set t...

Page 52: ...nction serial or SPI using the Hdk7545_ExpansionSetPinFunction function see page 46 The pin direction does not need to be set if the alternate non GPIO function for the pin is enabled Drivers and or a...

Page 53: ...of the specified pin on the expansion connector The mode can be set to either Hdk7545_PinMode_NoInterrupt or to a combination of one or more of the following values Hdk7545_PinMode_InterruptLowHigh ed...

Page 54: ...f successful ERROR_INVALID_HANDLE the specified handle is invalid ERROR_INVALID_PARAMETER the specified pin is not valid ERROR_INVALID_DATA an exception was generated Other errors are possible Sample...

Page 55: ..._Connector_Expansion1 HANDLE hdkHandle INVALID_HANDLE_VALUE DWORD result Hdk7545_Open hdkHandle expansionSlot if result ERROR_SUCCESS return ERROR_NOT_SUPPORTED DWORD mode 2 0 0 DWORD pins 2 HDK7545_G...

Page 56: ...ation Registry Keys Returns ERROR_SUCCESS if successful ERROR_INVALID_HANDLE the specified handle is invalid ERROR_INVALID_PARAMETER the specified pin is not valid ERROR_INVALID_DATA an exception was...

Page 57: ...n was generated Other errors are possible Sample Code Hdk7545_ExpansionSetPinFunction hdkHandle HDK7545_GPIO_PIN_EXPANSION_GPIO7_CSN Hdk7545_PinFunction_Alternate Hdk7545_Close hdkHandle Hdk7545_Close...

Page 58: ...valid ERROR_INVALID_PARAMETER the specified pin is not valid ERROR_INVALID_DATA an exception was generated Other errors are possible Sample Code RETAILMSG 1 L PIN Functions r nPin 0 u Pin 1 u Pin 2 u...

Page 59: ...ot valid or the state pointer is null ERROR_INVALID_DATA an exception was generated Other errors are possible Sample Code query the state of a pin and change it if the state is not clear DWORD GetStat...

Page 60: ...n on the same pin simultaneously If a pull up is enabled an existing pull down is disabled and vice versa This function is not supported on Omnii XT10 Returns ERROR_SUCCESS if successful ERROR_INVALID...

Page 61: ...ter is null ERROR_INVALID_DATA an exception was generated Other errors are possible Sample Code interrupt handling for an expansion GPIO DWORD GetIRQ Hdk7545_Connector expansionSlot Hdk7545_Connector_...

Page 62: ...cifications It is the responsibility of anyone developing expansion hardware to correctly program the EEPROMs If an EEPROM is not programmed properly the values reported by the Hdk7545_ReadEepromHeade...

Page 63: ...so set a valid EEPROM size m_EepromSize 128 256 etc The EEPROM size must be the actual total size of the EEPROM on the connector in bytes and a multiple of 128 If a size that is larger than the actual...

Page 64: ...ture size format version supplied by the caller does not match what was expected by the HDK and or the hand held device Other errors are possible Sample Code DWORD WriteEeprom Hdk7545_Connector expans...

Page 65: ...on size reported in the Hdk7545_Eeprom structure m_ExtendedSize to determine how much space is available for extended data See Hdk7545_ReadEepromHeader for details on reading the EEPROM header The for...

Page 66: ...ecifications for more information The size of the EEPROM may vary Drivers should use the extended data region size reported in the Hdk7545_Eeprom structure m_ExtendedSize to determine how much space i...

Page 67: ...hdkHandle return result const BYTE data 24 0 1 2 3 4 5 6 7 8 9 10 11 12 13 14 15 16 17 18 19 20 21 22 23 DWORD dataSize sizeof data DWORD offset 0 if eeprom m_ExtendedSize dataSize Hdk7545_Close hdkHa...

Page 68: ...is 32640 255 128 bytes or the actual size of the EEPROM whichever is less m_ExtendedSize this field stores the amount of extended data available to developers This is a read only field derived from th...

Page 69: ...unction typedef enum Hdk7545_PinState_Clr 0 Hdk7545_PinState_Set 1 Hdk7545_PinState_Unknown 0xffffffff Hdk7545_PinState typedef enum Hdk7545_PullUpDown_Pullup 1 Hdk7545_PullUpDown_Pulldown Hdk7545_Pul...

Page 70: ...OM structure version information define HDK7545_EEPROM_VERSION_MAJOR 0x0001 define HDK7545_EEPROM_VERSION_MINOR 0x0002 define HDK7545_EEPROM_VERSION HDK7545_EEPROM_VERSION_MAJOR 16 HDK7545_EEPROM_VERS...

Page 71: ...65 5 4 1 Physical Space Considerations 65 5 4 2 End Cap Modules and Devices 66 5 4 3 Pod Expansion Modules and Devices 68 5 4 4 Back Cover Modules and Devices 71 5 4 5 Pistol Grip Modules 74 5 4 6 Ke...

Page 72: ......

Page 73: ...Filename 3D CAD models of the auto range standard back cover Back_Cover_Auto_Std_3D igs Back_Cover_Auto_Std_3D stp 3D CAD models of the expansion back cover showing end cap and pod expansion openings...

Page 74: ...s of the standard end cap Endcap_Standard_2D dwg Endcap_Standard_2D pdf Artwork for the 36 key alpha modified numeric calculator 12 Fn keyboard hard caps KB_HardCaps_36ModNumCal12 pdf Artwork for the...

Page 75: ...t you can design your device and flex cables to align properly These locations are also shown in the following two dimensional dwg files The information in the above files in conjunction with the file...

Page 76: ...obtain the required width depth and shape of this ridge Table 5 5 Associated Files for End Cap Description Filename 2D line drawings of the auto range standard back cover with loca tions of mounting...

Page 77: ...ched with four screws Removing and installing these screws requires a T10 Torx screwdriver To remove the end cap 1 Remove the four T10 screws securing the end cap to the main housing 2 Remove the end...

Page 78: ...flex cable to the scanner through the pod opening then secure the pod in place using four M3x5 T10 Torx screws Torque the screws to 5 0 in lb 0 56 N m 2 Fit the end cap to the top of the unit 3 Insert...

Page 79: ...ening is used to create a seal with the attached pod The pod expansion module must be designed with a corresponding hard ridge that presses into the overmould to form this seal The 3D CAD model includ...

Page 80: ...ssary to separate the whole back cover from the unit in order to properly access the connector and install the cable To remove the back cover 1 Remove the eight T10 Torx screws holding the back cover...

Page 81: ...Back_Cover_Auto_Std_2D dwg Back_Cover_Auto_Std_2D pdf 3D CAD models of the auto range standard back cover Back_Cover_Auto_Std_3D igs Back_Cover_Auto_Std_3D stp 2D line drawings of the expansion back...

Page 82: ...e attached to the Omnii main housing with eight T10 Torx screws that enter from the back plus two T6 Torx screws that enter through the front of the unit above the display and fit into inserts mounted...

Page 83: ...he back cover from the main housing to allow access to the cables that are still attached 5 Disconnect any cables attaching the back cover to the main unit trigger switch scanner speaker camera GPS an...

Page 84: ...d_3D igs Back_Cover_Auto_Std_3D stp 2D line drawings of the expansion back cover with locations of mounting points for the back cover pistol grip end cap and pod expansion Back_Cover_Expan_2D dwg Back...

Page 85: ...esive before installing the new overlay If you wish to install the overlay on a new keyboard bezel or if you need to replace a damaged bezel blank ones can be ordered using the following part numbers...

Page 86: ...uring the scanner pod to the main housing 2 Lift the pod from the unit 3 Disconnect the scanner flex cable from the scanner module To attach the new pod module 1 Attach any cables to the appropriate s...

Page 87: ...secure using four M2 5x5 T6 Torx screws Torque the screws to 2 5 in lb 0 28 N m To attach the back cover to the main housing 1 Attach any cables to the appropriate sockets on the main logic board 2 Se...

Page 88: ...antenna you must first remove the back cover of your Omnii a Remove the eight T10 Torx screws holding the back cover to the main housing b Remove the two T6 Torx screws at the top of the display on th...

Page 89: ...he cable in the seal 3 Install four M3x5 T10 Torx screws to secure the end cap to the main housing Torque the screws to 5 0 in lb 0 56 N m 4 Replace the back cover a Attach any back cover cables to th...

Page 90: ......

Page 91: ...eaker 90 6 4 Expansion Ports 90 6 4 1 Expansion Port Power 91 6 4 2 Expansion Port 1 End Cap Connector 94 6 4 3 Expansion Port 2 Pod Expansion Connector 96 6 4 4 Expansion Port 3 100 pin Multi Functio...

Page 92: ......

Page 93: ...or includes Expansion Port 3 J2 Camera connector J9 not for use with Omnii XT10 HDK Scanner imager connector J13 not for use with Omnii XT10 HDK Figure 6 1 Connector Locations on the Omnii Main Logic...

Page 94: ...t HP_AMP_EN enable line for headphone amplifier circuit HP_DETECT_N headset detection MIC and MIC differential audio inputs from expansion board into main logic board MIC_AMP_EN enable line for microp...

Page 95: ...3 V Biased at 0 V 11 MIC Input Analog Differential microphone signals coming from expansion board These inputs are fed into the codec on the main logic board Maximum input level of each of these signa...

Page 96: ...e single ended headset audio expansion board can be used with most commercially available 2 5 mm audio headsets The MAX9720 headphone amplifier in the reference design will detect whether a mono or st...

Page 97: ...a single output channel Microphone Biasing The headset microphone is biased at 3 0 V when in use It is biased from a low noise low drop out linear regulator LDO When the microphone is not in use the L...

Page 98: ...cient power to drive the loudspeaker Similar to the single ended headset audio expansion board filtering capacitors are placed at various locations throughout the audio paths to prevent GSM interferen...

Page 99: ...n the reference design this is accomplished with a comparator When the switch is not pressed the microphone is not connected and the DC voltage applied at the microphone matches the 3 0 V biasing volt...

Page 100: ...two allowing up to three expansion modules to be connected at the same time The three expansion ports are located as follows Expansion Port 1 End Cap Connector see Section 6 4 2 Expansion Port 1 End C...

Page 101: ...n pin 3 limited to 1000 mA and there are also three unswitched pins on the same connector pins 2 4 and 6 which provide VSYS power up to a maximum current of 2000 mA If a GPS module is installed in the...

Page 102: ...t DUSB Transferring Receiving at 12 Mbps 21 Expansion n USB EXNUSB Transferring Receiving at 12 Mbps 113 Speaker SPK Maximum volume 84 Receiver RXV Maximum volume 53 Recording Mic REC 14 Beeper BEEP R...

Page 103: ...owered by the battery higher current draw results in shorter battery life The standard battery has a 5000 mAh capacity so a constant load of 2000 mA will drain the battery in approximately 2 5 hours E...

Page 104: ...mounted bottom contact connector Table 6 5 Expansion Port 1 2 Power Pins Pin Name n Expansion Port Description Expansion Port 1 2 Pin EXPn_1Wire Connection for 1 Wire EEPROM 19 EXPn_3V3 3 3 V power 1...

Page 105: ...t of 22 pin End Cap Connector Pin Signal Function I O Type Voltage V 1 EXP1_3V3 Power 100 mA current limited Power 3 3 2 6 9 18 20 21 22 GND Ground Ground 3 4 5 EXP1_VSYS Power Raw unregulated battery...

Page 106: ...connector Pinout The 22 pin pod expansion connector provides access to expansion port 2 with the following pinout Table 6 8 Pinout of 22 pin Pod Expansion Connector Pin Signal Function I O Type Volta...

Page 107: ...en impact such as may occur if the terminal is dropped Open the latch and if the stiffener plastic is present remove it from the socket If the terminal is reassembled without a cable in this socket in...

Page 108: ...nufacturer Part Number CLM 150 020 F D K Mating Connector MW 50 03 G D 150 065 Number of Pins 100 Current Rating 1 5A per pin Figure 6 13 Expansion Port 3 Pins on 100 Pin Connector Top View If a GPS m...

Page 109: ...r Raw unregulated battery voltage 1000 mA current limited switched Power 3 0 4 2 5 GND Ground Ground 7 EXP3_USB USB Host D I O 9 EXP3_USB USB Host D I O 11 GND Ground Ground 13 EXP3_RTS_GPIO3 Serial R...

Page 110: ...hat they are configured for GPIO operation see Section 6 4 5 3 on page 101 and set the following registry keys for the serial driver Serial communication is supported up to 115200 kbps Table 6 10 Expa...

Page 111: ...ght data pins on each expansion interface can be used as GPIO General Purpose Input Output communication lines These same pins are also used for serial and SPI communications the function of the pins...

Page 112: ...on the Omnii XT10 main logic board exposes an interface for GPS modules Future Omnii models will include interfaces for WWAN radios and other expansion devices on this connector as well In addition st...

Page 113: ...tive signal used to shed all loads when running from backup power Output 3 3 15 EXP3_CTS_GPIO2 Serial CTS GPIO pin 2 I O 3 3 16 5V0 5 V power supply 100 mA maximum Power 5 0 17 EXP3_RXD_GPIO1 Serial R...

Page 114: ...x Omnii HDK User Manual 31 33 35 37 48 50 51 52 55 56 58 60 62 64 66 77 79 93 95 98 RESERVED Reserved for future use 32 GPS_CTS GPS serial port CTS GPIO I O 1 8 34 GPS_RTS GPS serial port RTS GPIO I O...

Page 115: ...ATIONS 7 7 1 Overview 107 7 2 Desktop Docking Stations 107 7 2 1 Docking Station USB Connectors 107 7 2 2 Docking Station RS 232 Connector 109 7 2 3 Docking Station Ethernet RJ45 Connector 109 7 2 4 D...

Page 116: ......

Page 117: ...ties as ST4002 and also comes with a built in expansion PCB assembly mounted in the X Mod connector to provide standard RS 232 serial and Ethernet ports This serial Ethernet module is available as a k...

Page 118: ...s no Omnii docked in the docking station no power is provided to the VBUS power line even if a power adaptor is connected Figure 7 3 USB Host Type A Connector Table 7 1 Pinout Of The USB MicroB Connec...

Page 119: ...n provides a female RJ45 port for connecting the docked device to an Ethernet network This port supports speeds up to 10 Mbps Figure 7 5 RJ45 Connector Table 7 3 Pinout Of The RS 232 DE9M Connector Pi...

Page 120: ...er created device to the hand held computer X Mod Connector Details For details on the X Mod connector socket and the specifications for designing a matching header see the files 114 24004 2011 2x10 c...

Page 121: ...the bottom of the unit Also included in the HDK is the 3D CAD model of the RS 232 Ethernet module from the ST4003 docking station showing the size shape and screw locations of an X Mod PCB assembly Ta...

Page 122: ...rd Outline pdf Zip file containing 3D models of the docking station bottom housing X Mod covers and the ST4003 RS 232 Ethernet expansion module ProE model of parts zip 2D drawings of the bottom housin...

Page 123: ...X Mod socket is a simple procedure 1 Remove all power from the docking station 2 Use a Phillips screwdriver to remove the four M3 screws holding the cover to the bottom of the docking station 3 If an...

Page 124: ......

Page 125: ...sion Teklogix Omnii HDK User Manual 115 EEPROM SPECIFICATIONS 8 8 1 Overview 117 8 2 EEPROM Hardware 117 8 3 EEPROM Data Specification 117 8 3 1 Common EEPROM Fields 117 8 4 EEPROM Reading Writing 119...

Page 126: ......

Page 127: ...ce operation will consume the SysCon processing time and may slow the system down 8 3 EEPROM Data Specification The module EEPROM is used to identify the hardware and load appropriate software drivers...

Page 128: ...gether uniquely define the module hardware These fields will be displayed to the user in the System Properties panel of the System applet in the Control Panel They will also define the registry key of...

Page 129: ...ecific Parameters Starting at this address parameters specific to the module type can be appended 8 4 EEPROM Reading Writing EEPROMs on devices attached to Omnii are read using the Hdk7545_ReadEepromH...

Page 130: ......

Page 131: ...guration 129 9 6 GPIO Devices 132 9 6 1 GPIO Power 132 9 6 2 GPIO Data Pins 132 9 6 3 GPIO Inputs and Outputs 133 9 7 RS 232 UART Devices 134 9 7 1 RS 232 UART Power 135 9 7 2 RS 232 UART Data Pins 13...

Page 132: ......

Page 133: ...In addition to ease of access the board provides standard connectors that will stand up to the repeated insertion and removal of cables required during the development process preventing wear and tea...

Page 134: ...klogix Omnii HDK User Manual 9 3 Board Components The components of the breakout board are indicated on the following illustration Figure 9 3 Breakout Board Components 1 2 3 4 5 6 7 8 9 10 11 12 13 14...

Page 135: ...15 J36 Header for accessing VSYS 5 V power HDK_5V0 16 J37 Jumper header to enable 3 3 V VSYS power HDK_3V3 17 J34 Header for accessing VSYS 3 3 V power HDK_3V3 18 Scratch pad for HDK_5V0 and HDK_3V3 p...

Page 136: ...tead incorporated into the 100 pin multi function connector therefore the flex cable cannot be used to connect directly to this port A cable with a 100 pin connector can be constructed using the pinou...

Page 137: ...xpansion pod module 3 Remove the eight T10 Torx screws holding the back cover to the main housing 4 Remove the two T6 Torx screws at the top of the display on the front of the unit Table 9 1 Omnii Hea...

Page 138: ...e attach the back cover to your Omnii 1 Connect all cables from the back cover to the main logic board trigger speaker camera etc 2 Fit the back cover in place on the main housing making sure no cable...

Page 139: ...mnii to 3 3 V and 5 V power lines These lines in turn provide power to circuits for testing GPIO UART and USB devices to power headers J34 HDK_3V3 and J36 HDK_5V0 and to the power scratch pad grid 3 3...

Page 140: ...d J36 headers have similar pin configurations To access power from these headers construct wire harnesses with the following pinouts Figure 9 6 Power Headers J34 and J36 Pin Order VSYS 3 3 V and 5 0 V...

Page 141: ...the EXP_3V3 power header J35 and the 1 wire EEPROM header J39 Power header J35 can be used to access the 3 3 V power from EXP_3V3 directly To access power from this header construct a wire harness wit...

Page 142: ...data pins for connecting to GPIO RS 232 UART and SPI devices In addition to configuring the pins on Omnii for the specific type of device being attached to the expansion port see PinFunctions registr...

Page 143: ...n Order 9 6 3 GPIO Inputs and Outputs GPIO lines 0 through 3 are connected to red LEDs DS3 DS4 DS5 and DS6 respectively Activity on these LEDs indicates activity on their respective data lines VSYS 5...

Page 144: ...abled to power these switches DIP switches 3 and 4 on bank SW5 are not connected Figure 9 12 GPIO DIP Switch Bank SW5 The tactile switches SW3 and SW4 are connected to GPIO lines 6 and 7 respectively...

Page 145: ...wer lines are enabled select the UART voltage by installing a jumper on jumper header J15 as indicated in the following table Figure 9 14 UART Power Jumper J15 Pin Order 9 7 2 RS 232 UART Data Pins Th...

Page 146: ...T GPIO_0 J17 1 2 UART_RXD RS 232_RXD GPIO_1 J18 1 2 UART_CTS RS 232_CTS GPIO_2 J19 1 2 UART_RTS RS 232_RTS GPIO_3 J20 2 3 UART_TXD RS 232_TXD J21 2 3 UART_CTS RS 232_CTS J22 2 3 UART_RXD RS 232_RXD J2...

Page 147: ...mitted Data 4 DTR Data Terminal Ready 5 GND Ground 6 DSR Data Set Ready 7 RTS Request to Send 8 CTS Clear to Send 9 RI Ring Indicator Table 9 10 UART Data Pin Jumper Settings Jumper Pins Function J16...

Page 148: ...mpers across the pins of jumper headers J38 and J3 to enable this power line see Section 9 5 on page 129 for more details 9 8 2 USB Data Pins The breakout board supplies two headers for connecting to...

Page 149: ...vice To take power from the EXP_3V3 power line install a jumper across pins 1 and 2 of the EEPROM header J39 As long as the breakout board is connected to Omnii power will be available across these pi...

Page 150: ...ng the EEPROM see Chapter 8 EEPROM Specifications A simple interface for programming the breakout board EEPROM from the Omnii hand held computer is provided in the HDK Demo application included with t...

Page 151: ...pins of J38 and J3 No power from HDK_3V3 side of scratch pad grid Are LEDs DS11 and DS12 lit Install jumpers across pins of J38 and J37 No power from HDK_5V0 side of scratch pad grid Are LEDs DS2 and...

Page 152: ...power enabled see Power Troubleshooting section Device not working J30 connector Is EXP_3V3 power being sup plied is breakout board connected to Omnii Check and reseat connection at both ends Device...

Page 153: ...and Compiling the HDK Demo Application 145 10 4 Creating Registry Keys 146 10 5 Connecting the Hardware 147 10 5 1 Remove the Omnii Back Cover 147 10 5 3 Connect the Test Module to an Expansion Port...

Page 154: ......

Page 155: ...PC and Omnii 2 Browse to the folder where you installed the HDK API files default folder C Program Files Windows CE Tools wce600 PsionTeklogixCE600 3 Browse to the HDKDemoApp subfolder 4 Copy the file...

Page 156: ...pe 3 Under the device subkey create the registry values for the type of device being tested as indicated in the following subsections USB Device Registry Keys UART Device Registry Keys HKLM Drivers Bu...

Page 157: ...x screws at the top of the display on the front of the unit 5 Gently lift the back cover from the main housing to allow access to the cables that are still attached 6 Disconnect any cables attaching t...

Page 158: ...Install the screws in the sequence shown here to ensure a consistent seal around the perimeter 4 Install the two T6 Torx screws in the front cover above the display and torque to 2 5 in lb 0 28 N m 5...

Page 159: ...he expansion device you must configure the registry entries as described in Section 10 4 Creating Registry Keys and programmed the 1 wire EEPROM fields as described in Section 10 6 2 4 EEPROM Browse t...

Page 160: ...he radio button next to the expansion port to which your device is connected then tap the Connect button A warning message appears reminding you to ensure that the flex cable is connected to the expan...

Page 161: ...es an interface to communicate with all USB storage devices connected to Omnii including those connected via expansion ports File Browsing Window The file systems of all USB drives enumerated by Omnii...

Page 162: ...nput Window This window provides an interface to send commands or other input to the serial device Tap in this window to make it active then type the input string Output Window This window displays co...

Page 163: ...he following warning message appears Since UART and GPIO devices share the same data communication pins the breakout board must also be configured so that the pins are routed to the proper circuits on...

Page 164: ...input SW5 DIP switch 1 line 4 SW5 DIP switch 2 line 5 SW3 line 6 introduces activity on the line and illuminates the onscreen indicator GPIO Interrupt 7 This indicator illuminates to indicate activit...

Page 165: ...board and is described in Chapter 9 Breakout Board Ensure that the jumper settings are correct and tap OK to proceed 10 6 2 4 EEPROM The EEPROM tab provides an interface to read and write device info...

Page 166: ...ata fields on the screen Write Tapping this button overwrites the data in the 1 wire EEPROM of the connected device with the information currently displayed in the data fields on the screen Data Field...

Page 167: ...r Windows Embedded CE 6 0 User Manual Part number 8100190 Psion Teklogix 2009 Mobile Devices SDK Developers Guide Part number 8100016 A 2 Psion Teklogix Downloadable Software The following software is...

Page 168: ......

Page 169: ...eless Radios B 6 B 4 Internal Scanners and Imagers B 7 B 4 1 SE1223LR Long Range Decoded Scanner B 7 B 4 2 SE1224HP High Performance Scanner B 8 B 4 2 1 SE1224HP Decode Zones B 8 B 4 3 SE1524ER Extend...

Page 170: ......

Page 171: ...boards Backlit high durability hard capped keys Large selection of both alpha and numeric formats For a list of currently available keyboard configurations consult your order sheet Indicators And Cont...

Page 172: ...ge the main battery and temperatures above 70 C 158 F may damage the unit Rain And Dust Resistance IEC 60529 classification IP65 Humidity 5 95 RH non condensing Drop Durability 1 7 m 5 6 ft 26 drops t...

Page 173: ...see Lithium ion Battery Safety Precautions in the Omnii Hand Held Computer Regulatory Warranty Guide PN 8000191 Parameter Specification Model Number ST3000 Chemistry lithium ion Li Ion Capacity 5000...

Page 174: ...1 Mbps EVM 802 11b 28 dB typ 16 802 11g 29 dB typ 13 Bluetooth Coexistence Collaborative with Bluetooth radio Parameter Specification Form Factor Embedded 920 kbps serial interface Bluetooth Version V...

Page 175: ...ns Linear Minimum Print Contrast Minimum 40 absolute dark light reflectance measured at 650 nm Symbologies Supported UPC EAN Code 128 Code 39 Code 93 I 2 of 5 Discrete 2 of 5 Codabar MSI UCC EAN 128 T...

Page 176: ...ngle Field of View 42 typical 30 narrow Scan Patterns Linear Minimum Print Contrast Minimum 25 absolute dark light reflectance measured at 650 nm Symbologies UPC EAN Code 128 UCC EAN 128 RSS Code 39 C...

Page 177: ...ans sec bi directional Scan Angle Field of View 13 5 0 7 Scan Patterns Linear Minimum Print Contrast Minimum 25 absolute dark light reflectance measured at 650 nm Symbologies UPC EAN Code 128 UCC EAN1...

Page 178: ...m 25 Minimum X Dimension 0 1 mm 4 mils Reading Distance Up to 90 cm 35 in Symbologies UPC E A EAN RSS Code 39 Code 128 UCC EAN 128 ISBN ISBT Interleaved Matrix Industrial and Standard 2 of 5 Codabar C...

Page 179: ...Ds 626 nm 30 nm Aiming LEDs 526 nm 30 nm Laser 650 nm 10 nm Input Voltage Imager Input Voltage 5080 3 3 VDC 5 23 C 3 0 VDC to 5 5 VDC 23 C Current Draw Imager Current Draw 5080 Max Operating Current 1...

Page 180: ...nd ST4003 Fast charging of both internal battery and spare battery pack Host USB port Client USB port ST4003 A DE9M serial port unpowered and an RJ45 10Base T Ethernet interface Both compati ble with...

Page 181: ...1 1 2 0 Host and USB 2 0 Client connectors and provides a DC IN port Model No ST4500 USB DE9M variant through a powered DE9M serial connector it powers and charges the hand held and provides communica...

Page 182: ......

Page 183: ...GREEMENT C 3 C 2 GRANT OF LICENSE C 3 C 3 REQUIREMENTS RESTRICTIONS RIGHTS AND LIMITATIONS C 3 C 4 HIGH RISK ACTIVITIES C 4 C 5 DISCLAIMER OF WARRANTY C 4 C 6 LIMITATION OF LIABILITY C 4 C 7 COPYRIGHT...

Page 184: ......

Page 185: ...itted to sell lease or rent distribute or sublicense the HDK or to use the HDK in a time sharing arrangement or in any other unauthorized manner ii no license is granted to you in the human readable c...

Page 186: ...ITIONS OF MER CHANTABLE QUALITY OR FITNESS FOR A PARTICULAR PURPOSE WE DO NOT WARRANT OR MAKE ANY REPRESENTATIONS REGARDING THE USE OR THE RESULTS OF THE USE OF THE HDK IN TERMS OF ITS CORRECTNESS ACC...

Page 187: ...greement that by their nature continue after it ends will remain in effect until they are completed C 10 GENERAL The laws of the Province of Ontario and the federal laws applicable therein excluding t...

Page 188: ......

Page 189: ...24 connecting 126 GPIO devices 132 header pinout 133 inputs and outputs 133 jumper settings 132 kit contents 123 power configuration 129 RS 232 UART devices 134 power 135 RS 232 header pinout 136 RS 2...

Page 190: ...ports 90 102 expansion port 1 20 90 94 expansion port 2 20 90 96 expansion port 3 20 83 90 98 GPIO interface 101 physical locations 65 power 91 RS 232 UART serial interface 100 SPI interface 102 USB i...

Page 191: ...r 85 breakout board GPIO header 133 end cap connector 95 Ethernet RJ45 connector ST4003 docking station 109 expansion port 1 95 expansion port 2 96 expansion port 3 99 GPIO 101 pod expansion connector...

Page 192: ...er large device installation 77 standard scanner pod see scanner pod standard T text conventions 4 U UART interface see RS 232 UART serial interface USB interface expansion ports 101 microB client int...

Reviews: