background image


10 


11 

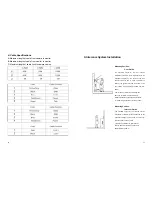
4.:Cable Specifications 

6.


Intercom System Installation


A: Maximum length of cable from camera to monitor


B: Maximum length of cable from monitor to monitor


C: Maximum length of cable Lock to camera cables 


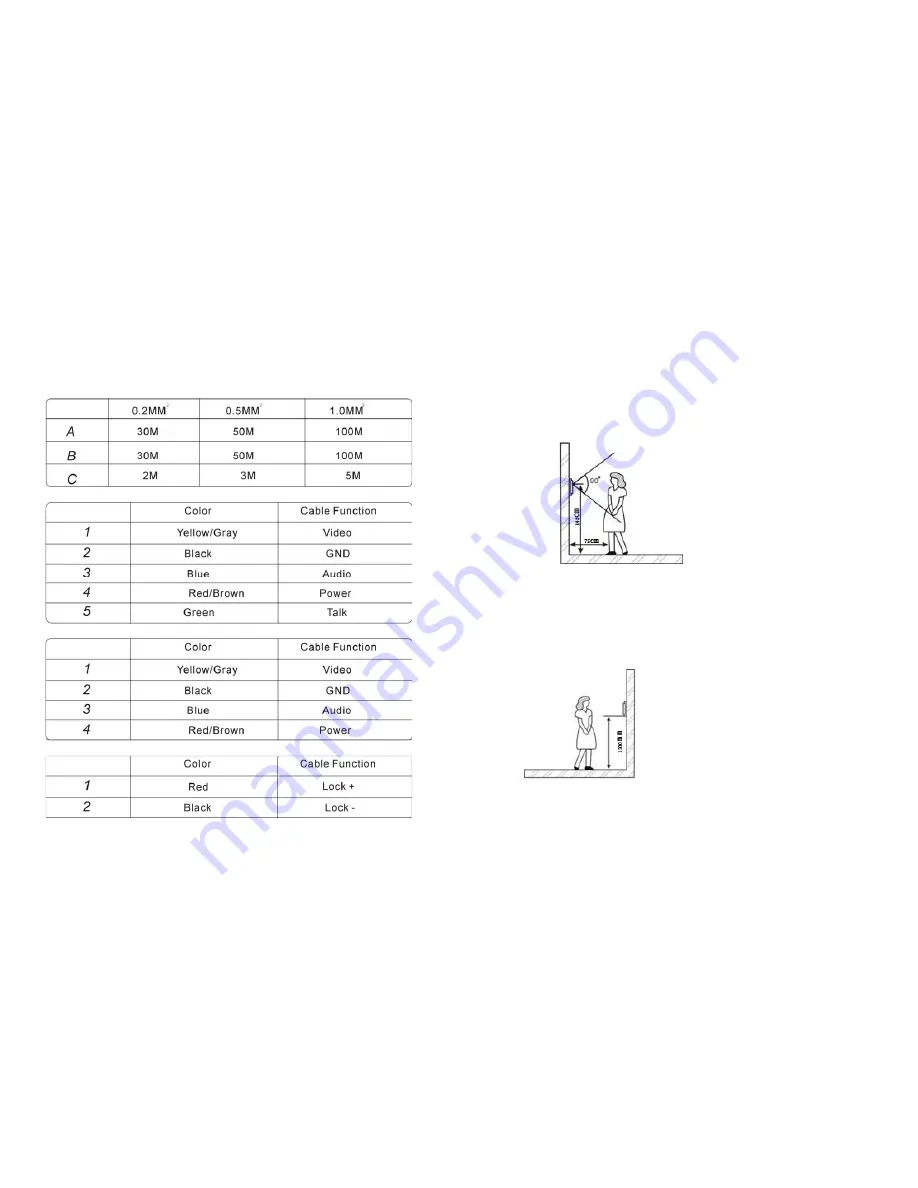
Mounting Position, 


                        Door Station 

The standard height for the door station 

installation is 1450mm. (note: this depends on the 

individual’s height), so the centre of the lens 

coincides with the line of vision. The distance 

between the ground level and the bottom of the 

door station is approximately 1300mm.The total 

field of


view of the door station lens is 90 degrees 


about the horizontal axis.The maximum 

distance between the caller and door station 

for a clear image should be less than 750mm. 


Mounting Position, 

Intercom Station 

The standard height for the intercom station 

installation is 1300mm (note: this depends on the 

individual’s height), so the centre of the monitor 

coincides with the line of vision. 

The distance between the ground level 

and the bottom of the intercom station is 

approximately 1300mm. 


Summary of Contents for PST-VD972C

Page 1: ......

Page 2: ...ion 11 7 Camera Rear Installation 12 8 Monitor Setup 14 9 Specifications 15 10 Operating conditions 16 11 Maintenance 16 12 Warnings 16 13 Parts 18 14 Technical support 18 15 Notes 19 Note Due to ongoing product development and quality improvements it is possible that the illustrations shown in this manual differ slightly from the actual product ...

Page 3: ...era in the door units and when used with the optional electronic lock enable the resident to electronically open the door for the caller The monitor has a modern appearance user friendly design changeable ABS plastic screen or glass screen and simple to use individual control buttons Image is very clear and with its simple installation it is an ideal home security product which will make for a saf...

Page 4: ...ion 1 Microphone sends caller s voice to indoor unit 2 Infrared light enables the camera to function at night 3 Please ensure you carefully record and keep the Serial Number label on the machine It is the only means of identifying your product 3 Camera lens sends caller s image to indoor unit 4 Call button Used to call the home owner and turn on the camera 4 Warranty For one year from purchasing t...

Page 5: ...t vibration or impact Places where noise generating devices such as close to TV or radio equipment 11 Monitor is designed for indoor use only Do not install outdoors 12 Keep the equipment dry If water should get in wipe off immediately Water contains minerals that can erode electronic circuits 13 Intercom system is not operational during a power failure 14 Intercom system may be affected by radio ...

Page 6: ...leaned using a neutral detergent with a soft towel before drying with a soft dry cloth Do not use benzene thinner or other organic solvents such as gasoline to clean These solvents may damage the machine casing or the surface and may discolor the buttons 12 Warnings 1 The machine should be installed in a solid well ventilated dry environment away from direct sunlight strong magnetic field and dust...

Page 7: ...e and indoor phone power on Press key 3 system will go into the monitor function Display screen is lighting Now can see the outdoor condition If press key 1 the Activity indicatior LED in indoor phone is shine and can talk with outdoor about 15s If press key 4 can open the door with e lock Quit monitor In the condition of monitor and not talking press key 3 to quit the monitor In the conditoin of ...

Page 8: ...lect the volum of voice funciton if press key 2 for about 5 s when the indoor phone is not working At the same time this indoor phone is ringing Now press key 3 to select the volum of voice the vocie including 4 degrade to recycle the volume will turn from the lowest to the max if press key 3 Quit from Select function if press key 2 after the volume is ok and the systerm come back to waiting 8 Mon...

Page 9: ...on the back of camera 1 1 2 2 3 3 4 4 2 wire cable for lock is optional to connect 2 One camera to two monitor 2 Select a location for the outdoor camera And fix 4 screws into 4 holes in the wall with plastic bracket and inner case 3 two camera to two monitor 3 Secure to the camera s rear cover using the screws through these two holes And finished the camera installion ...

Page 10: ...sion The distance between the ground level and the bottom of the door station is approximately 1300mm The total field of view of the door station lens is 90 degrees about the horizontal axis The maximum distance between the caller and door station for a clear image should be less than 750mm Mounting Position Intercom Station The standard height for the intercom station installation is 1300mm note ...

Page 11: ...olumen tiene 4 configuraciones cuando haya seleccionado el que más le acomode presione nuevamente el botón 2 para confirmar 2 COMO CAMBIAR LA MELODIA DEL MONITOR Para poder cambiar la melodía tiene que presionar el botón 3 durante 10 segundos una vez que entra en estado de configuración presione el botón 2 para cambiar de melodía cuando haya seleccionado el indicado presione nuevamente el botón 3 ...

Page 12: ...iene que tener la precaución de que los cables tengan un buena aislación y verificar que no estén en contacto uno con el otro si se llegara a producir dicho corto circuito entre los pines de conexión esta podría averiar el circuito electrónico del monitor y por consecuencia inhabilitando algunas de sus funcionalidades como por ejemplo el encendido automático de la pantalla sin ningún control sobre...

Reviews: