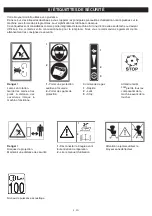
I / SAFETY INSTRUCTIONS
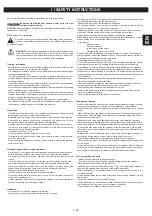
Pay special attention to information preceded by the following symbols :
Indicates a high likelihood of serious or fatal injury if the ins-
tructions are not followed.
CAUTION:
Indicates likelihood of bodily injury or damage to the equipment if the ins-
tructions are not followed.
NB:
Provides useful information.
This symbol reminds you to take care when performing certain operations.
If you have any problems or questions about the shredder, please contact
an approved dealer.
WARNING:
The shredder is designed to provide safe and reliable service
under the usage conditions described in the instructions. Before using
your shredder, please read and assimilate the content of this manual. Fai-
lure to do so can result in injury or damage to the equipment.
Training / Information
- Familiarise yourself with correct use of the shredder and its controls before using it.
Make sure you know how to stop the motor quickly.
- The shredder must always be used in accordance with the recommendations given
in the operating instructions.
- The user is responsible for accidents or hazards occurring to other people or their
property. He/she is responsible for assessing any potential risks concerning any
shredding operation.
- Never allow children or people unfamiliar with these instructions to use the shredder.
Local regulations may restrict the age of the operator.
- Do not use the shredder after taking medication or substances known to adversely
affect the ability to react or concentrate.
- When using the shredder, wear appropriate protective equipment, in particular safety
footwear, long trousers, safety glasses, gloves and ear protectors. Do not wear loose
clothing or clothing that has hanging cords or ties.
- Be aware that there is a slight risk of electric discharge from the spark plug.
- The shredder should be used exclusively for shredding plant matter. Using it for any
other purpose could be dangerous or damage the machine.
Preparation
- Carefully inspect the plant matter to be shredded and remove any objects that could
be dangerous (stones, wire, glass, metal objects, etc.).
- Before starting the machine, check that all screws, nuts, bolts and other retaining
mechanisms are properly secured and that guards and screens are in place.
Replace damaged or unreadable warning and operating labels.
- Keep the motor cut-out electric cables in good condition to ensure that cut-out of
the motor is guaranteed (at the contact switches located near the obstruction
clearance hatch and the feeding chute).
- Check for leaks (petrol, oil, etc.).
- Do not operate the machine within 5 m of bystanders.
- Only operate the machine in open space (e.g. not close to a wall or other objects)
on a firm, level surface.
- Do not operate the shredder on a paved or gravel surface where ejected material
could cause injury.
Warning! Danger! Petrol is highly flammable
- Store fuel only in containers specifically designed and approved for that purpose.
Fill with petrol in an outdoor area only and do not smoke during this operation.
- Never remove the petrol tank cap or add petrol when the motor is running or while
it is hot.
- If you spill petrol on the ground do not start the motor. Move away from the area
and avoid creating sources of ignition until the petrol vapours have dissipated.
- Store the shredder in a dry place. Never store the shredder in a place where petrol
vapours could be ignited by a flame, spark or other strong source of heat.
- Always screw the petrol tank cap on correctly.
- Limit the amount of petrol in the tank to minimise splashes.
- Do not operate the motor in a closed room or area in order to prevent the build-up
of carbon monoxide vapours.
- Carbon monoxide can be fatal. Only operate the shredder in a well-ventilated area.
- The fuel tank should only be drained outdoors.
Operation
- Do not work on a slope (the shredder may tip over).
- Never pick up or carry the shredder while the motor is running.
- Start the motor carefully in compliance with the manufacturer's instructions and keep
your face and body away from the feeding chute.
- Switch off the motor when the shredder is unattended.
- Do not place hands or any other part of the body or clothing inside the feeding
chamber, discharge chute, or near any moving part.
- Keep proper balance and footing at all times. Do not overreach. Never stand at a
higher level than the base of the machine when feeding material into it.
- Always stand clear of the discharge area when operating the shredder.
When feeding material into the shredder be extremely careful that pieces of metal,
stones, bottles, tins or other foreign objects are not included.
- In the event of:
- Abnormal noise,
- Abnormal vibration,
- Impact with a foreign object,
- Damage to the motor cut-out cable,
Switch off the motor immediately and let the shredder cool down. Disconnect the
spark plug cable, inspect the machine and have any necessary repairs carried out
by an approved service agent before using again.
- If the cutting parts get jammed (see § VI-e)
- Do not allow processed material to build up in the discharge zone; this may prevent
proper discharge and result in kickback of material through the feed opening.
- If the shredder is jammed, switch off the power supply and disconnect the spark
plug cable before removing the debris. Keep the power supply free of debris and
other material to prevent damage to it or potential fire. Remember that operating the
starting mechanism on machines with internal combustion engines will also activate
the cutting parts.
- Keep all guards and deflectors securely in place and operating correctly.
- Work only in daylight or good artificial light.
- Use of non-approved accessories may make the shredder dangerous and cause
damage to your machine that will not be covered by your warranty.
- Do not transport the shredder when the power source is on.
- Switch off the power source and disconnect the spark plug cable whenever you
leave the shredder unattended.
- Do not tilt the shredder when the motor is switched on..
Maintenance / storage
- Switch off the motor and disconnect the spark plug cable before cleaning, checking,
changing tool(s), adjusting or carrying out any maintenance of the shredder.
- Switch off the motor, disconnect the spark plug cable and use thick gloves to change
tool(s).
- When servicing the cutting blades, remember that even if the power supply will not
start because of the protective locking mechanism, the cutting blades can still be
activated by the starter motor.
- Keep all nuts and screws fully tightened to guarantee safe operating conditions.
- Store the shredder in a place where fuel vapours cannot come into contact with a
naked flame or sparks. For prolonged storage periods, empty the fuel from the tank
(in an outside area, when using the shredder for the last time before winter, leave
the motor on until it cuts out through lack of fuel). Always let the shredder cool down
before storing.
- To reduce the risk of fire, keep the motor, silencer and petrol storage area free of
plant matter, excess grease and any other material likely to catch fire.
- Faulty exhaust silencers must be replaced by an approved service agent.
- Do not repair worn parts. They must be replaced with original parts by an approved
service agent.
- For your safety, do not modify the specifications of your shredder. Do not modify the
motor speed control settings and do not use the motor when running at excessive
rpm. Regular maintenance is essential for safe and efficient performance.
Moving, handling, transport
- This device cannot be used to transport people.
- The motor must be switched off when carrying out any work on the shredder.
- Never transport the shredder with the motor on.
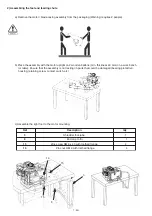
- Handling: do not lift the shredder alone (see § V-2-g). The weight of the shredder is
shown on the manufacturer's plate and at the end of this manual.
- Before transporting the shredder, wait until the cutting assembly has come to a
complete standstill.
- An appropriate loading ramp must be used to load and unload the shredder into and
from a trailer.
- Secure the shredder correctly for safe transport.
- The shredder must be transported in a trailer with the motor off and the spark plug
cable disconnected. Do not use any other means of transport.
- This shredder is not suitable for towing without a trailer.
2 - EN
EN
Summary of Contents for IROKO 55P
Page 16: ...Z s Z s d W W Z D Z Z Z D Z Z Z s Z s y E ddKz h W h E h...
Page 31: ...E Z s d h W W h D d Z D d d Z Z s y E E h D t t W...
Page 33: ...I 2 RU 5 VI e V 2 g RU...
Page 34: ...II 3 RU 1 2 1 2 3 1 2 2 1 1 2 3 2 1...
Page 40: ...f 6a 2 0 6b 0 2 9 2 0 10 12 4 2 11 starlock 12 2 2 9 RU 6 10 11 9 10 10 9 6 10 11 g h 1 2 3...
Page 41: ...10 RU i i 4 8 3 4 SUBARU EP 17 3 4 SUBARU EP 17 0 6 LONCIN LC 170 0 6 LONCIN LC 170 2 10W30 RU...
Page 42: ...VI a 4 b c 11 RU SUBARU EP 17 LONCIN LC 170 1 2 3 4 5 45 2 1 2 3 4 5 6...
Page 43: ...12 RU d SUBARU EP 17 1 2 LONCIN LC 170 e 4 8 2 VII 1 3 2 RU...
Page 45: ...14 RU X a b IX 1 C 36 IX 1 XI a 50 b 20 24 c 50 3 24 XII RU...
Page 46: ...d cf VII 4 2 5 M10 2 5 4 M10 4 cf V 2 i XII...
Page 47: ......

