
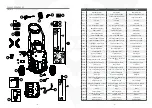

- 6 -
- 7 -
PUESTA EN MARCHA
5. Antes de usar por primera vez, cargue
completamente la batería.
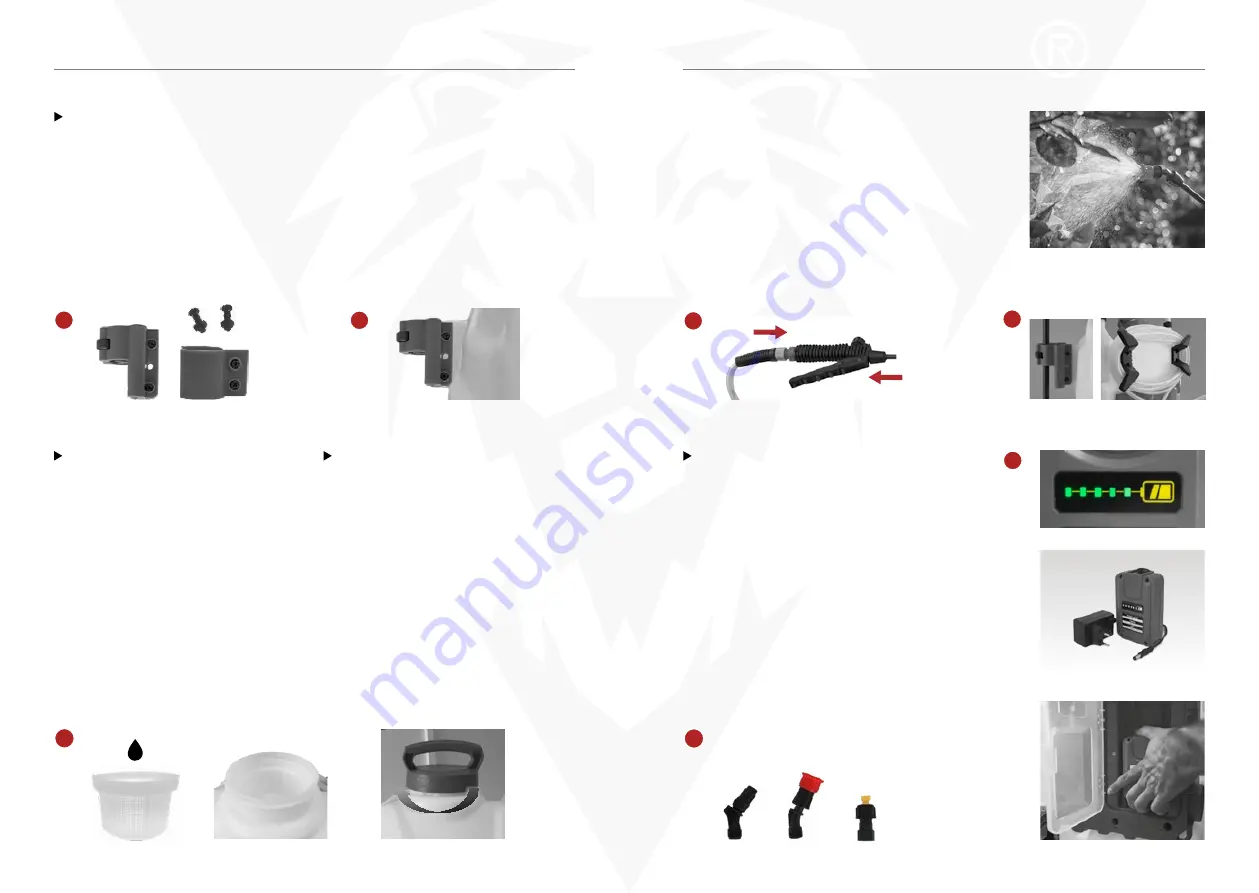
NOTA: La luz verde parpadeante indica que la
batería se está cargando cuando deje de parpadear,
la batería está completamente cargada.
6. Retire la tapa y, utilizando el filtro de carga,
vierta el líquido en el depósito. Ponga la tapa y
apriétela firmemente. Para algunos productos,
es recomendable preparar antes la mezcla en un
contenedor adecuado.
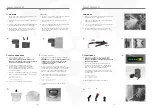
7. Seleccione la boquilla adecuada. Conéctela a la lanza
tirando hacia abajo de la boquilla de conexión rápida.
a) Boquilla regulable.
b) Boquilla 4 salidas (roja).
c) Boquilla herbicida (GA).
8. Comience a pulverizar apretando el gatillo.
5. Avant la première utilisation, chargez complètement
la batterie.
REMARQUE: Le voyant vert clignotant indique que
la batterie est en cours de chargement lorsque
le voyant cesse de clignoter, la batterie est
complètement chargée.
6. Retirez le couvercle et en utilisant le filtre du
chargement, versez le liquide dans le dépôt. Mettez
le couvercle et serrez-le fermement. Pour certains
produits, il est recommandable de préparer par
avance le mélange dans un container adéquat.
7. Sélectionnez la buse appropriée. Connectez-le à la
lance en tirant sur la buse à connexion rapide.
a) Buse réglable.
b) Buse à 4 sorties (rouge).
c) Buse herbicide (GA).
8. Commencez à pulvériser en appuyant sur la
gâchette.
MISE EN MARCHE
STARTING-UP
5. Fully charge the battery prior to first operation.
NOTE: The flashing green light indicates that
battery is charging when the light stop flashing, the
battery is fully charged.
6. Remove the cap and, using the load filter, pour
the liquid in the tank. Replace the cap and tighten
securely. For some products, you should prepare
before the mixture in a suitable container.
7. Determine which nozzle is right for the job & connect
to spray wand by pulling down on quick-connect and
inserting nozzle.
a) Adjustable nozzle.
b) 4-outlet nozzle (red).
c) Herbicidal nozzle (GA).
8. Begin spraying by squeezing spray trigger.
5
ES
MANUAL DE USO
FR
MANUEL D’UTILISATION
EN
USER’S MANUAL
6
7
a)
b)
c)
PULMIC PEGASUS 35
PULMIC PEGASUS 35
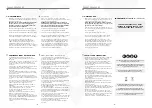
MONTAGE
1. Retirez les écrous, les vis, le porte-lance et les buses
de filtre ou le goulot de remplissage.
2. Fixer le couvercle et porte lance au réservoir et
serrez les vis.
3. Connectez la lance de pulvérisation au tuyau et à la
poignée en appuyant et en vissant.
4. Enclenchez la lance dans l’étui et enroulez le tuyau
autour de son support jusqu’à ce que vous soyez
prêt à pulvériser.
SETTING-UP
1. Remove the nuts and bolts, holster, and nozzles from
liquid intake filter or storage handle.
2. Attach holster and hose holder to tank and tighten
with the nuts and bolts.
3. Connect the spray lance to the hose and the handle
by pressing down and screwing.
4. Snap the wand into the holster and coil the hose
around the hose holder until you’re ready to spray.
MONTAJE
1. Retire las tuercas, tornillos, el porta lanzas y boqui-
llas del filtro o boca de llenado.
2. Fije la funda y el portalanzas al tanque y apriete los
tornillos.
3. Conecte la lanza de pulverización a la manguera y a la
empuñadura apretando hacia abajo y enroscando.
4. Encaje la lanza en el porta lanzas y enrolle la
manguera alrededor del soporte de la manguera
hasta que esté listo para pulverizar.
1
2
3
4


