background image

7

8

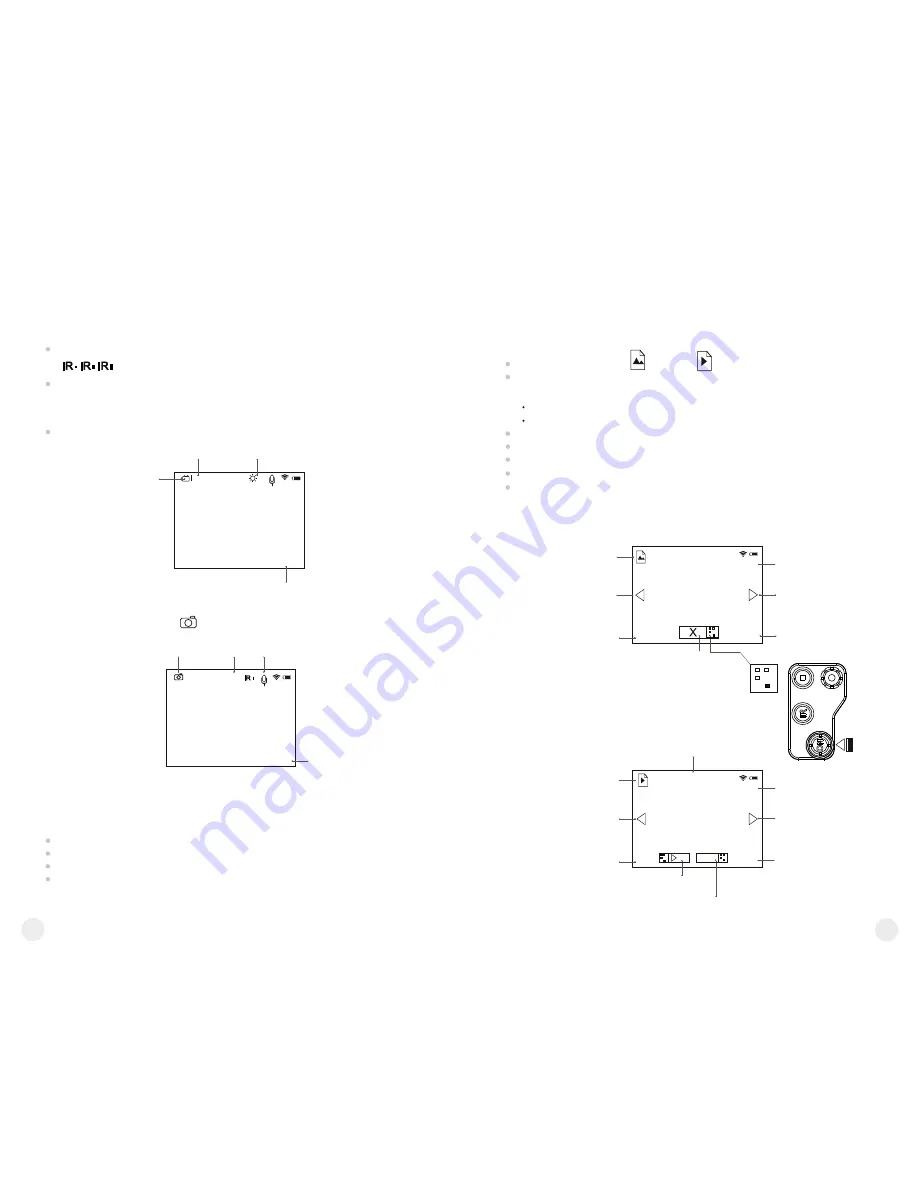
IR Illuminator and brightness.

 In 

VIDEO

 mode the display shows the 

following information:

IR Illuminator power level

 – shown by the corresponding icon -  


.


If the IR Illuminator is off, the icon is not displayed.  

Brightness level

.


Brightness level (from 0 to 20) is displayed only during brightness 
adjustment. 

Wi-Fi

13x

04:23pm

Brightness 
adjustment

Current time

15

PHOTO MODE  
Photo Mode 

is shown by


icon on the display

.

Photos are saved


into the internal Flash memory.

The following functions are displayed in 

PHOTO

 Mode:

IR Illuminator
Brightness
Full magnification
Wi-Fi

13x

04:23pm

Note: 

sound is not recorded in 

Photo Mode.

VIDEO mode

SOUND

ZOOM

Current time

VIDEO mode

01:42

Available recording

time

The counter of available photos is displayed when the number of photos is 999 or less.


999

Note:


maximum duration of a recorded file is seven minutes. After this 

time expires a video is recorded into a new file. The number of recorded 
files is limited by the capacity of unit’s internal memory. 

REVIEW MODE 

is designed to review photo and video files (saved in the 

internal Flash memory) on the display.  

File display order. 

Upon activation of Review Mode, the display always 

shows the last recorded file. 

Mode indication on the display.

 Along with the image itself the display 

shows the following information:  

File type icon: photo        or video        .
Video  clip  length  –  shown  as  mm:ss.  File  counter  –  shown  as  x/y 

(common for photo and video files) – 


x – number of running file. 


y –  total number of files.

Page


navigation

 (

left

-

right

).

Resolution of current (displayed) file. 

“PLAY” 

and 

“PAUSE”

 indicators for video clip

File deletion indicator
Date and time of file recording

REVIEW Mode – Photo

REVIEW Mode – Video

2/123

96

0p

Delete current file

Time and date
of photo file

File counter

2/123

480p

Play current
      file

File navigation 
arrow (right)

Delete current
        file

File navigation 
arrow (left)

00

:05

Video duration

Video review mode

Photo resolution

Time and date
of video file

File counter

Photo resolution

File navigation
arrow (left)

Mode
REVIEW-PHOTO

File navigation
arrow (right)

22:18

2016.08.05

Prompt for button press 

Х

22:18

2016.08.05

Summary of Contents for DIGIFORCE 860RT

Page 1: ......

Page 2: ......

Page 3: ...applications including Outdoor observation Search and rescue Hunting camping Sports and night navigation observation Equipment maintenance BATTERY INSTALLATION Turn the battery compartment lever throu...

Page 4: ...f Long press Turns the display on off hold longer than 1 sec Turns the unit off hold longer than 3 sec Digital zoom activation Switch between files leftwards navigation Return to the beginning of file...

Page 5: ...IR 5 illuminator allows you to increase the observation distance and recognise the object Press the button successively to change power level from 1 to 3 IR The corresponding icon will appear in the u...

Page 6: ...by the capacity of unit s internal memory REVIEW MODE is designed to review photo and video files saved in the internal Flash memory on the display File display order Upon activation of Review Mode t...

Page 7: ...NO 22 18 2016 08 05 Enter menu ZOOM control IR Illuminator control Unavailable functions During file review some control functions are not available If the IR Illuminator was on it turns off when ent...

Page 8: ...d time setup This menu option allows you to set the current date and time and time format Date setup Enter the submenu with a brief press of the ZOOM 7 button Date format is displayed as yyyy mm dd 20...

Page 9: ...n of REVIEW mode the IR Illuminator switches off the power level is saved and the icon is not shown on the display Upon exiting REVIEW mode the IR Illuminator reverts to the power level selected befor...

Page 10: ...CESSORIES 15 The unit is equipped with a special mount 3 designed to attach various accessories such as an auxiliary IR Illuminator Pulsar 805 Pulsar 940 Pulsar X 850 LED Illuminators or Pulsar L 915...

Page 11: ...ange There are obstacles between the unit and the signal receiver concrete walls for example Place the unit in line of sight of the Wi Fi signal Check Corrective action Problem Poor image quality Chec...

Page 12: ...aturel La recherche et le sauvetage La chasse et le tourisme Les jeux sportifs et l orientation dans les conditions de nuit La surveillance de fonctionnement de l quipement technologique MISE EN PLACE...

Page 13: ...aintenir le bouton appuy pendant plus d une seconde Arr t du dispositif maintenir le bouton appuy pendant plus de 3 secondes Activation de zoom num rique Echange de fichiers navigation vers la gauche...

Page 14: ...ur Afin de d clencher l illuminateur IR appuyez sur le bouton IR et le maintenez appuy pendant deux secondes L ic ne IR dispara t Pour plus de d tails sur le fonctionnement de l illuminatueur IR voir...

Page 15: ...repr sent es sur l afficheur ne sont pas enregistr es L entr e dans le menu et les manipulations dans le menu sont possibles au cours de l enregistrement vid o Attention Vous ne pourrez arr ter l enre...

Page 16: ...strement Indication de visionnage vid o 28 27 2 123 960p Supprimer le fichier actuel Compteur de fichiers R solution de la photo La fl che de saut vers la gauche Mode REVIEW PHOTO La fl che de saut ve...

Page 17: ...ur de dispositif Digiforce 860RT moyennant Wi Fi vers le smartphone soit vers la tablette Pour plus de d tails en ce qui concerne la technologie Stream Vision veuillez consulter une brochure explicati...

Page 18: ...s affiche sur l afficheur en mode de fonctionnement Video et Photo La valeur d finie est sauvegard e dans la memoire de dispositif Lors du d marrage de dispositif ult rieur de dispositif la derni re...

Page 19: ...iption DISPLAYOFF Afin d enclencher l afficheur appuyez et maintenez appuy le bouton ON pendant plus d une seconde Si la fonction DISPLAYOFF est activ e Tous les organes de commande sauf le bouton ON...

Page 20: ...eu de livarison comprend l adaptateur de pied 12 qui permet d assurer tant le raccordement d un illuminateur IR suppl mentaire que le montage de dispositif sur un pied PARTICULARITES D EXPLOITATION 16...

Page 21: ...ignal Wi Fi avec certitude Pr sence d obstacles entre le dispositif et le r cepteur de signal murs en b ton par exemple D placez le dispositif dans la zone de visibilit directe de fonctionnement de si...

Page 22: ...sbereiche ideal geeignet Beobachtung unter nat rlichen Bedingungen Rettungsma nahmen Jagd und Tourismus Sportspiele und Nachtorientierung Betriebs berwachung EINLEGEN DER BATTERIEN Den Griff des Decke...

Page 23: ...g Einschaltung des Displays l nger als 1 Sekunde gedr ckt halten Ausschaltung des Ger tes l nger als 3 Sekunden gedr ckt halten Digitales Zoom aktivieren Umschaltung zwischen den Dateien Navigation na...

Page 24: ...istungsst rke des IR Strahlers einzustellen dr cken Sie die Taste IR Die Leistungsst rke von 1 bis 3 wird unten auf dem Bildschirm angezeigt Um den IR Strahler zu deaktivieren halten Sie die Taste IR...

Page 25: ...s ist 999 oder weniger 999 REVIEW MODUS Wiedergabe der aufgenommenen auf dem internen Speicher des Ger tes gespeicherten Foto und Videodateien auf dem Display Anzeigereihenfolge der Dateien Beim Einsc...

Page 26: ...ug ngliche Funktionen W hrend der Wiedergabe der Dateien sind einige Bedienfunktionen des Ger tes unzug nglich Ist der IR Strahler aktiv wird er bei der Umschaltung in den REVIEW Modus ausgeschaltet D...

Page 27: ...griffsebene Guest Gast Benutzer der Anwendung Stream Vision hat einen Zugang nur zu Video Stream aus dem Ger t Foto Modus Verf gbareAufl sungsvarianten f r die Fotoaufnahme in Pixel 320x240 640x480 12...

Page 28: ...en Sie kurz dieTaste IR 12 nderung der Leistungsst rke des IR Strahlers Die Leistungsst rke des IR Strahlers wird durch aufeinanderfolgende Bet tigungen der Taste IR geregelt die nderungen erfolgen zy...

Page 29: ...Bei der Abschaltung bleibt das Ger t um ausgeschalteten Zustand F r den weiteren Betrieb ist das Ger t einzuschalten Beim Anschluss von Power Sobald vom PC getrennt wird schaltet das Ger t ab Sobald d...

Page 30: ...en Sie das Batteriefach reinigen Sie die Kontakte Das Ger t funktioniert mit der externen Stromspeisung nicht Pr fen Sie die Spannung am Ausgang der externen Stromspeisung Laden Sie die externe Stroms...

Page 31: ...uaci n natural B squeda y salvamento Caza y turismo Juegos deportivos y orientaci n nocturna Observaci n del funcionamiento de los equipos tecnol gicos INSTALACI N DE LAS BATER AS Haga girar la manill...

Page 32: ...de m s de 1 segundo Desconexi n del dispositivo retenci n de m s de 3 segundos Activaci n del zoom digital Cambio entre los archivos navegaci n a la izquierda Devoluci n al comienzo del archivo examin...

Page 33: ...iluminador de IR presione sucesivamente el bot n IR El nivel de potencia desde 1 hasta 3 se representa en la parte superior de la pantalla Para apagar el iluminador de IR presione y mantenga presionad...

Page 34: ...C En lugar del tiempo real se representa el temporizador de la grabaci n de video MODO PHOTO modo de toma de fotos La indicaci n del modo en la pantalla se muestra con ayuda del pictograma Foto Las fo...

Page 35: ...l video Aparece el indicador PLAY en lugar del indicador PAUSE Continuaci n de la vista despu s de la pausa La presi n breve de turno del bot n REC permite reanudar la vista del archivo desde el lugar...

Page 36: ...OM 7 Para conservar la contrase a y la salida desde el submen presione y mantenga presionado el bot n ZOOM 7 por m s de un segundo 68 67 i El funcionamiento de Wi Fi se designa con un pictograma en la...

Page 37: ...e la grabaci n de video Entre al submen por medio de una presi n breve del bot n ZOOM 7 En adelante con los botones de navegaci n elija una de las opciones Yes conectar la grabaci n del sonido en el d...

Page 38: ...excepci n del bot n ON no est n activos La grabaci n de video continua si la grabaci n se llevaba a cabo antes de la conexi n de la funci n DISPLAYOFF La funci n Wi Fi continua funcionando 72 71 La de...

Page 39: ...dar de de pulgada est destinado a la instalaci n del dispositivo en el tr pode 74 73 El dispositivo se suministra con el adaptador de tr pode 12 que permite simult neamente conectar un iluminador supl...

Page 40: ...od n Aseg rese de que su fuente de alimentaci n suministra la tensi n de salida Aseg rese de que el contacto central de la fuente de alimentaci n externa est intacto Verifique la integridad del cable...

Page 41: ...ambiente naturale Ricerca e salvataggio Caccia e turismo Giochi sportivi ed orientamento notturno Sorveglianza sul funzionamento dell attrezzatura tecnologica INSTALLAZIONE DELLE BATTERIE Girate la m...

Page 42: ...del display tenere premuto pi di 1 sec Disattivazione dell apparecchio tenere premuto pi di 3 sec Attivazione dello zoom digitale Interscambio tra i file navigazione a sinistra Per tornare all inizio...

Page 43: ...muto il pulsante IR per due secondi Il pittogramma scompare Per l informazione pi dettagliata sul funzionamento dell illuminatore IR si prega di consultare il paragrafo 12 ILLUMINATORE IR INCORPORATO...

Page 44: ...dicazione del regime sul dispaly si visualizza con l aiuto del pittogramma Le foto saranno salvate nella memoria interna dell apparecchio L indicazione delle funzioni sul dispaly nel regime PHOTO Illu...

Page 45: ...ne del pulsante REC 6 L indicazione della pausa del review del video Il timer conto alla rovescia della durata del video si ferma Appare l indicatore PLAY al posto dell indicatore PAUSE La continuazio...

Page 46: ...lo di accesso Proprietario Utente di Stream Vision ha l accesso completo a tutte le funzioni del dispositivo Livello di accesso Ospite Utente di Stream Vision ha l accesso solo al flusso video dal dis...

Page 47: ...azione dell audio attiva sul display appare il pittogramma Quando la funzione disattivata il pittogramma si visualizza Il pittogramma Registrazione di audio si visualizza sul display nel regione di fu...

Page 48: ...tivarsi e l apparecchio entra nel egime di funzionamento 92 91 CONNESSIONE USB 14 E prevista la possibilit di collegare l apparecchio con il computer via USB 11 L apparecchio viene riconosciuto dal co...

Page 49: ...recchio L unit non impermeabile La struttura dell illuminatore IR incorporato non prevede la possibilit della sua focalizzazione GUASTI POSSIBILI 18 17 MANUTENZIONE E CONSERVAZIONE Il corpo pu essere...

Page 50: ...OM 2 Tenere premuto il pulsante ON tenendo premuto REC e ZOOM 3 Il LED verde lampeggia due volte poi inizier a lampeggiare costantemente il software originale viene installato 4 Rilasciare i pulsanti...

Page 51: ...5 640x480 5 5x10 4 6 5 4xAA 98 6 5x 13x Stream Vision Wi Fi Stream Vision 810 LED 3 DISPLAY OFF USB LCD F d 1 0 Digiforce 90 OPEN 90 CLOSE 15 C 50 C DIGIFORCE 860RT 78093 5 97 t 22 C Wi Fi 6 SKU 0 4 a...

Page 52: ...100 Power Bank 5V 5 6 7 8 9 10 11 1 2 3 4 ON IR REC ZOOM LED USB ON ZOOM REC Video Photo Video Photo 1 Wi Fi 2 Wi Fi Wi Fi 1 3 Photo Review Review Review Video Photo Review Review Video IR Video Phot...

Page 53: ...AYOFF ON ON Switch off 3 1 2 20 30 1 8 0 20 1 8 9 IR 5 IR 5 1 3 IR 5 IR 12 ZOOM 7 9 Video Photo Review Video REC 6 Video Photo Review Video VIDEO Video Video 6 5x 13x REC 6 Flash VIDEO Rec 04 23pm VID...

Page 54: ...103 104 VIDEO 0 20 Wi Fi 13x 00 02 VIDEO ZOOM REC 13x 04 23pm VIDEO 15 PHOTO Photo PHOTO Wi Fi REVIEW Review x y PLAY PAUSE 04 23pm PHOTO ZOOM PHOTO 01 42 00 42 13x 999 999...

Page 55: ...AY 2 123 960p 2 123 480p 22 18 2016 08 05 00 05 REVIEW VIDEO 106 105 REC 6 PLAY PAUSE REC 6 ZOOM IR ON Yes ZOOM No ON Zoom 5 123 480p 00 05 REVIEW VIDEO 5 123 480p 00 05 YES NO 22 18 2016 08 05 22 18...

Page 56: ...108 107 i Wi Fi Wi Fi Wi Fi Wi Fi Stream Vision Stream Vision Wi Fi Wi Fi Digiforce 860RT Stream Vision www pulsar nv com 320x240 640x480 320x240 640x480 1280x960 ZOOM 7 IR 5 REC 6 ZOOM 240p 320x240 4...

Page 57: ...6 24 AM PM ZOOM REC IR ZOOM REC IR ZOOM 109 ZOOM 7 Yes No ZOOM Video Photo VIDEO PHOTO ZOOM 7 ZOOM 6 5x 13x 6 5x 6 5x 12 810 Video Photo IR 5 Zoom ZOOM 11 Name Digiforce 860RT SKU 78093 Serial 7011930...

Page 58: ...PHOTO ON 4 DISPLAYOFF ON DISPLAYOFF ON DISPLAYOFF Wi Fi DISPLAYOFF ON USB power bank USB 14 USB 11 Power USB Power USB Zoom USB Video Photo Review 960p 04 23pm USB 111 112 USB Mass storage device USB...

Page 59: ...Power power bank ON 15 3 LED Pulsar 805 Pulsar 940 Pulsar X850 Pulsar L 915 Pulsar L 808S 12 114 113 16 2 3 18 USB Wi Fi Wi Fi c Wi Fi 17 1 REC ZOOM 2 ON REC ZOOM 3 4 REC ZOOM 5 1 6...

Page 60: ......

Reviews: