background image


6


Operating parameters (tab.6). 

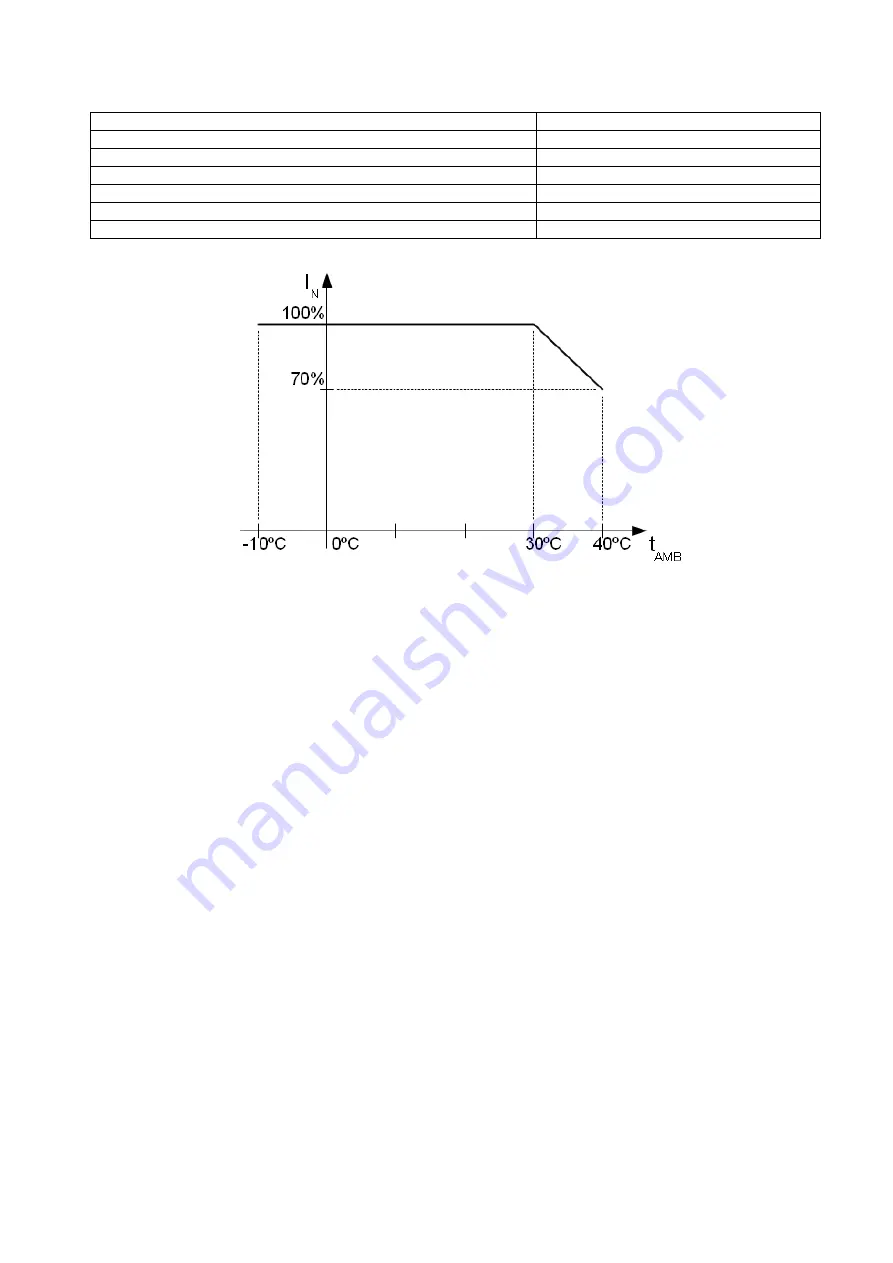
Operating temperature 

-10ºC...+40ºC (see: chart 1) 

Storage temperature 

-20ºC...+60ºC 

Relative humidity 

20%...90%, without condensation 

Vibrations during operation 

unacceptable 

Impulse waves during operation 

unacceptable 

Direct insulation 

unacceptable 

Vibrations and impulse waves during transport 

According to PN-83/T-42106 


Chart 1. Acceptable output current from the PSU depending on ambient temperature. 


2. Installation. 


2.1 Requirements. 


The buffer PSU shall be mounted by a qualified installer with appropriate permissions and qualifications for 

230V/AC installations and low-voltage installations (required and necessary for a given country). The device shall 
be  mounted  in  confined  spaces,  according  to  the  environment  class  II,  with  normal  air  humidity  (RH=90%  max. 
without  condensation)  and  the  temperature  from  -10°C  to  +40°C.  The  PSU  shall  work  in  a  vertical  positi on  that 
guarantees sufficient convectional air-flow through ventilating holes of the enclosure. 


Before installation, prepare a PSU load balance. 


1. Output current 5A + 0,5A battery charge 
2. Output current 3,5A + 2A battery charge 


Total device c battery: 5,5A max. 

 
As the PSU is designed for a continuous operation and is not equipped with a power-switch, therefore an 

appropriate  overload  protection  shall  be  guaranteed  in  the  power  supply  circuit.  Moreover,  the  user  shall  be 
informed  about  the  method  of  unplugging  (usually  through  assigning  an  appropriate  fuse  in  the  fuse-box).  The 
electrical system shall follow valid standards and regulations. 
 

2.2 Installation procedure. 
 

1. Before installation, cut off the voltage in the 230V power-supply circuit. 
2. Mount the PSU in a selected location and connect the wires. 
3. Connect the power cables (~230Vac) to L-N clips of the PSU. Connect the ground wire to the clip marked by the 
earth symbol PE (PSU module connector). Use a three-core cable (with a yellow and green PE protection wire) to 
make  the  connection.  Lead  the  cables  to  the  appropriate  clips  through  the  insulating  bushing  of  the  connection 
board. 
 

Summary of Contents for HPSB 5524C

Page 1: ...HPSB 5524C v 1 0 HPSB 27 6V 5A 2x17Ah Buffer switch mode power supply unit EN Edition 2 from 18 09 2012 Supersedes edition 1 from 21 11 2011 ...

Page 2: ...bilised voltage of 24 V DC 15 The PSU provides voltage of U 27 6 V DC Current efficiency 1 Output current 5A 0 5A battery charge 2 Output current 3 5A 2A battery charge Total device current battery 5 5A max In case of power decay a battery back up is activated immediately The PSU is constructed based on the switch mode PSU with high energy efficiency The PSU is housed in a metal enclosure colour R...

Page 3: ...nts and connectors tab 1 tab 2 fig 2 Element no Fig 2 Description 1 PSU module 2 connectors see tab 2 3 green LED indicates AC power 4 potentiometer output voltage adjustment 5 BAT GND battery outputs BAT red GND black 6 TAMPER contact of sabotage protection NC 7 Additional connector for LED indication 8 Selection jumper for charging current Ibat 0 5A Ibat 2A Legend jumper installed jumper removed...

Page 4: ...4 Fig 2 The view of the PSU ...

Page 5: ...cation AC diode indicating AC power status AUX diode indicating DC power status at the PSU output red normal status on failure off green normal status on failure off Technical outputs TAMPER indicates enclosure opening microswitch NC contacts enclosure closed 0 5A 50V DC max Mechanical parameters tab 4 Enclosure dimensions 405 x 355 x 90 8 400 x 350 x 90 WxHxD Fixation see figure 2 Fitting battery...

Page 6: ... convectional air flow through ventilating holes of the enclosure Before installation prepare a PSU load balance 1 Output current 5A 0 5A battery charge 2 Output current 3 5A 2A battery charge Total device current battery 5 5A max As the PSU is designed for a continuous operation and is not equipped with a power switch therefore an appropriate overload protection shall be guaranteed in the power s...

Page 7: ...DC 9 After installing and checking proper working the enclosure can be closed 3 Operating status indication 3 1 LED indication of operating status The PSU is equipped with two diodes on the front panel 4 Operation and use 4 1 Overload or short circuit of the PSU output SCP on In case of overload the output voltage is automatically shut off and so is the LED indicator The restoration of the voltage...

Page 8: ...ty repairs at the earliest convenienve however not later that within 14 days from the delivery to the service centre of the manufacturer 7 The repair period mentioned in item 6 may be prolonged if there are no technical possibilities to carry out the repairs or if the equipment has been conditionally accepted due to the breaking warranty terms by the claimant 8 All the services rendered by force o...

Reviews: