background image

3

Installation Instructions:

CAUTION: Do not drill through a countertop that is more than 1” thick.
CAUTION: Do not attempt to drill through a tiled, marble, granite or 
similar countertop. Consult a plumber or the countertop manufacturer 
for advice or assistance
CAUTION: When drilling through a countertop make sure the area  
below the drilling area is free of wiring and piping. Make certain that 
you have ample room to make the proper connection to the bottom of 
the Faucet.
CAUTION: Do not attempt to drill through an all-porcelain or  
porcelain-coated sink. For applications on these types of sinks we 
recommend using the sprayer hole or mounting the Faucet through the 
countertop. Otherwise consult a plumber or manufacturer for advice or 
assistance.

1. 

Line the bottom of the sink with newspaper to prevent shavings, parts, or 
tools from falling down the drain.

2.

  Place masking tape over the area to be drilled to help prevent scratches if 

drill bit slips.

3.

   Mark point with a center punch. Use a 5/8” drill bit to drill a pilot hole.

4.

   Smooth rough edges with a file.

1.

  Turn off the cold water supply by turning off the shut-off valve under the 

sink. If the cold water line does not have a shut-off valve under the sink, 
turn off the main water line in the house. Place a tray or towel under the cold 
water line to catch any excess water.

2.

   Turn on the cold water faucet and allow all the water to drain from the line.  

On a single handle faucet, the hot water may have to be turned off to prevent 
any hot water cross over.

3. 

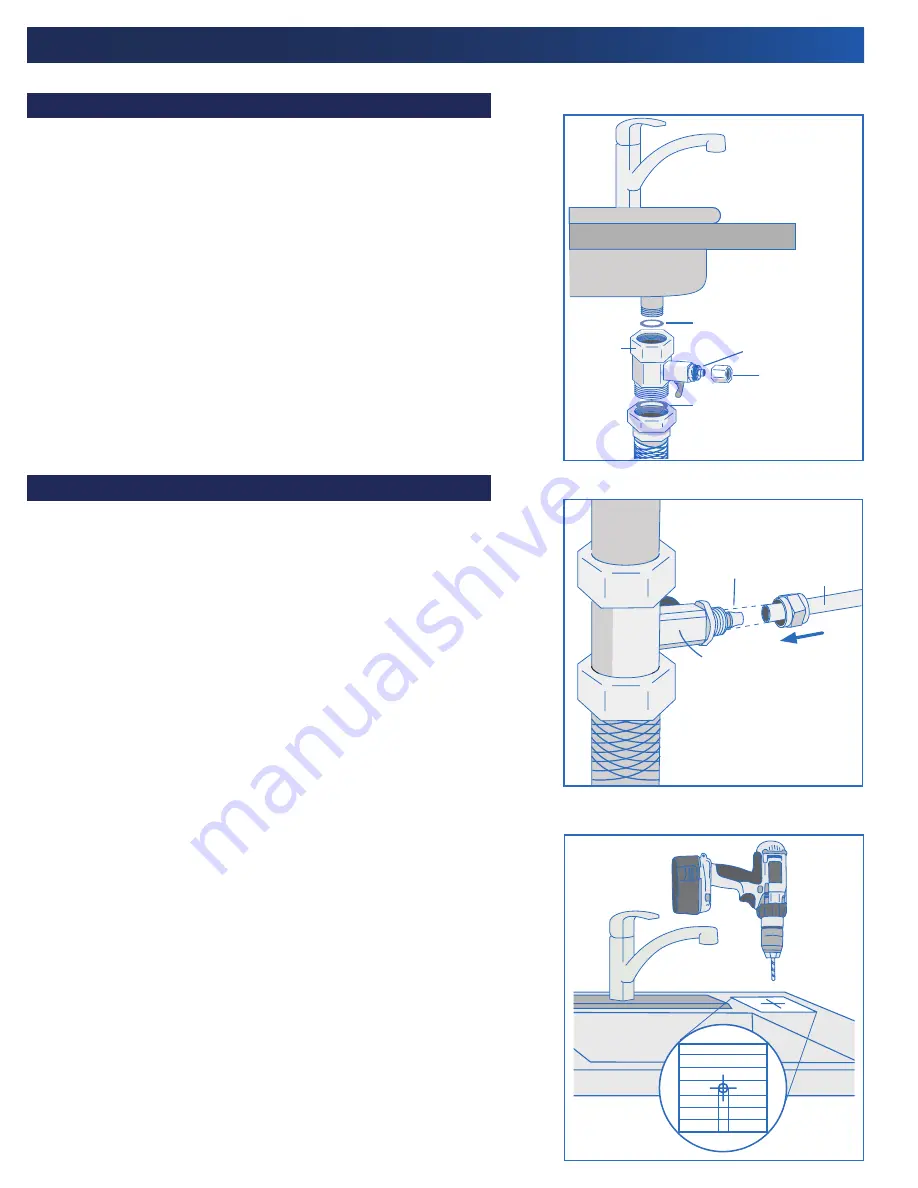
  Loosen nut and separate cold water braided flex line from the kitchen cold 

water faucet shank. Attach Inlet Valve to the faucet shank using the Rubber 
Washer. Reinstall the flex line onto the Inlet Valve and tighten with an  
adjustable wrench.

4. 

  Insert 1/4” Tubing over the Guide Tube of the Inlet Valve. Tighten the  

Compression Nut with an adjustable wrench.

CAUTION: The water supply to your unit MUST be from the 
COLD WATER LINE. Hot water will damage your filtration system.

The Drinking Water Faucet should be positioned with function, convenience and 
appearance in mind. An adequate flat area is required to allow the Faucet to rest 
securely. Check the underside of the location for interference. Most sinks have  
a pre-drilled 1-1/4" diameter hole designed for spray hoses. The Drinking Water 
Faucet may be installed using this hole. If the pre-drilled hole cannot be used, or 
is in an inconvenient location, it will be necessary to drill a 5/8” hole in the sink 
or through the countertop next to the sink for the Faucet.

Connecting to Cold Water Line (See Figure 1 and 2):

Drilling the Faucet Hole (See Figure 3):

Figure 1

Figure 3

Inlet 

Valve

Rubber 

Washer

Rubber 

Washer

Compression 

Nut

Guide Tube

Figure 2

1/4” 

Tubing

Inlet 

Valve

Guide Tube

5/8”

Summary of Contents for PUN2FS

Page 1: ... 2020 All rights reserved PUR is a registered trademark used under license from Helen of Troy Limited 200512 Owner s Manual PUN2FS Dual Stage Under Sink Universal Filtration System ...

Page 2: ... the quality and the list of contaminants of the water in your area While using the system for the first time or prolonged non use such as during a vacation over one week the system should be flushed thoroughly This system contains replaceable filter cartridge s with a limited service life Flow Rate 0 5 GPM 1 9 LPM Min Max Operating Pressure 30 100 psi 207 698 kPa Min Max Operating Temperature 40 ...

Page 3: ...aucet Compression Nut 1 J Ferrule 1 Item Description QTY K Insert 1 L Inlet Compression Nut 1 M Chrome Plate 1 N Rubber Gasket 1 O Plastic Lock Washer 1 P Star Washer 1 Q Stem Nut 1 R Faucet 1 S Installation Use Care Guide 1 T Sump Wrench 1 Tools Required for Installation A C E D F G H M L S T N O P Q R I J K B Adjustable Wrench Pliers Phillips Screwdriver Utility Knife Measuring Tape Drill and 5 ...

Page 4: ...el under the cold water line to catch any excess water 2 Turn on the cold water faucet and allow all the water to drain from the line On a single handle faucet the hot water may have to be turned off to prevent any hot water cross over 3 Loosen nut and separate cold water braided flex line from the kitchen cold water faucet shank Attach Inlet Valve to the faucet shank using the Rubber Washer Reins...

Page 5: ...llation Instructions continued 1 Remove Stem Nut on the Faucet 2 Slide the Chrome Plate and Black Rubber Washer onto the Faucet Stem 3 The Chrome Plate Rubber Washer and Faucet Body are installed above the sink or countertop 4 Place the Faucet through the drilled faucet hole then add Securing Plate Star Lock Washer and Stem Nut 5 Tighten Stem Nut firmly while aligning the Faucet in the desired loc...

Page 6: ... through the eyes of the bracket on the screws Tighten the screws to secure the system 4 Push the ends of the tubing into the inlet outlet of the Head Assembly A by referring to Connecting the Tubes Using Quick Connect Fittings below CAUTION Do not kink tubing as this will impede water flow Water Outlet Water Inlet A B B 1 4 White Tubing 1 4 White Tubing Faucet Faucet Shank Minimum 2 Clearance 1 R...

Page 7: ...ilter The replacement filter can be obtained online at www ghpgroupinc com or at the retail store the system was purchased 1 Turn off Inlet Valve G and open Faucet R to relieve pressure of the system Place a tray or towel under Filter Sumps B to catch excess water 2 Unscrew the sump by turning Wrench T in a counter clockwise direction and remove old cartridge 3 Wash the sump throughout with mild s...

Page 8: ...ad this performance data and compare the capability of this system with your actual water treatment needs It is recommended that before installing the system you have your water supply tested to determine your actual water treatment needs This system conforms to NSF ANSI 42 53 and CSA B483 1 for the specific performance claims as verified and substantiated by test data While testing was performed ...

Page 9: ...Item Description Part 1 Sediment Filter PUNSED 2 Carbon Block Filter PUNCRBL 3 Inlet Valve VWC10001 4 Faucet VWC10002 5 Small O ring Filter Sump VWC10012 6 Large O ring Filter Sump VWC10013 7 Sump Wrench VWC10007 1 2 4 5 6 7 3 ...

Page 10: ...e caused in transit Freight charges on warranty parts or products to and from the factory shall be the responsibility of the owner THIS LIMITED WARRANTY IS GIVEN TO THE PURCHASER IN LIEU OF ALL OTHER WARRANTIES EXPRESSED OR IMPLIED INCLUDING BUT NOT LIMITED TO THE WARRANTIES OF MERCHANTABILITY OF FITNESS FOR A PARTICULAR PURPOSE THE REMEDY PROVIDED IN THIS WARRANTY IS EXCLUSIVE AND IS GRANTED IN L...

Page 11: ...s PUR est une marque déposée dont l utilisation est autorisée en vertu d une licence accordée par Helen of Troy Limited Manuel du propriétaire PUN2FS Système universel de filtration à double étape pour installation sous l évier ...

Page 12: ...tre municipalité ou votre agence de santé au sujet de la qualité et de la liste des contaminants dans votre approvisionnement en eau local Lors de l utilisation du système pour la première fois ou après une longue période de non utilisation comme des vacances de plus d une semaine le système doit être rincé soigneusement Ce système contient des cartouches de filtre remplaçables avec une durée de v...

Page 13: ...net 1 J Virole 1 ART Description QTÉ K Insérer 1 L Écrou à compression entrée 1 M Plaque en chrome 1 N Joint en caoutchouc 1 O Rondelle de blocage en plastique 1 P Rondelle en étoile 1 Q Écrou de tige 1 R Robinet 1 S Guide d installation d utilisation et d entretien 1 T Clé de puisard 1 Outils requis pour l installation A C E D F G H M L S T N O P Q R I J K B Lunettes de protection Clé réglable Pi...

Page 14: ... surplus d eau 2 Ouvrez le robinet d eau froide et laissez toute l eau s écouler du tuyau Sur un robinet à poignée unique il peut être nécessaire de couper l eau chaude pour éviter que l eau chaude ne se mélange à l eau froide 3 Desserrez l écrou et séparez le tuyau flexible tressé d eau froide de la tige du robinet d eau froide de la cuisine Attachez la vanne d entrée à la tige du robinet à l aid...

Page 15: ...installation suite 1 Retirez l écrou de tige du robinet 2 Faites glisser la plaque en chrome et la rondelle en caoutchouc noire sur la tige du robinet 3 La plaque en chrome la rondelle en caoutchouc et le corps du robinet s installent au dessus de l évier ou sur le comptoir 4 Placez le robinet dans le trou percé puis ajoutez une plaque de fixation une rondelle en étoile et un écrou de tige 5 Resse...

Page 16: ...es trous du support sur les vis Serrez les vis pour fixer le système en place 4 Insérez les bouts du tuyau à l entrée et à la sortie de la tête A en vous référant à Branchement des tuyaux à l aide d accessoires à connexion rapide ci dessous Sortie d eau Entrée d eau A B B Tuyau de 1 4 po Tuyau de 1 4 po Faucet Tige du robinet Dégagement de 2 po F ATTENTION Ne pas plier les tuyaux car cela entraver...

Page 17: ...ur www ghpgroupinc com ou au point de vente où vous avez acheté le système 1 Fermez la vanne d entrée G et ouvrez le robinet R pour soulager la pression dans le système Placez un plateau ou une serviette sous les puisards de filtre B pour attraper les gouttes d eau qui pourraient tomber 2 Dévissez le puisard en tournant la clé T dans le sens anti horaire et retirez la vieille cartouche 3 Lavez bie...

Page 18: ...pinc com Fiche de données de performance Remarque Lisez les données de performance et comparez la capacité du système avec vos besoins réels en matière de traitement de l eau Avant d installer le système il est recommandé de faire tester votre approvisionnement en eau pour déterminer vos besoins réels en matière de traitement de l eau Ce système est conforme aux normes NSF ANSI 42 53 et CSA B483 1...

Page 19: ...e pièce 1 Filtre à sédiments PUNSED 2 Filtre à bloc de carbone PUNCRBL 3 Vanne d entrée VWC10001 4 Robinet VWC10002 5 Petit joint torique Puisard de filtre VWC10012 6 Grand joint torique Puisard de filtre VWC10013 7 Clé de puisard VWC10007 1 2 4 5 6 7 3 ...

Page 20: ...on OEM 5 Des dommages causés en transit Les frais d expédition pour envoyer des pièces ou des produits à ou de l usine sont la responsabilité du propriétaire CETTE GARANTIE LIMITÉE EST ACCORDÉE À L ACHETEUR ET REMPLACE TOUTES AUTRES GARANTIES EXPRIMÉES OU IMPLICITES Y COMPRIS MAIS SANS S Y LIMITER LES GARANTIES DE MARCHANDABILITÉ À UNE FIN PARTICULIÈRE LA RÉPARATION PRÉVUE DANS CETTE GARANTIE EST ...

Page 21: ...los derechos reservados PUR es una marca registrada utilizada bajo licencia de Helen of Troy Limited Manual del propietario PUN2FS Sistema de filtrado universal de doble etapa para instalación debajo del fregadero ...

Page 22: ... sanitario acerca de la calidad y la lista de contaminantes del agua en su área Cuando utilice el sistema por primera vez o después de no haberlo utilizado prolongadamente como unas vacaciones de más de una semana el sistema debe ser purgado a fondo Este sistema contiene cartuchos de filtros reemplazables con una vida útil limitada Caudal 0 5 GPM 1 9 LPM Presión operacional mín máx 30 100 psi 207 ...

Page 23: ...grifo 1 J Casquillo 1 Art Descripción Cant K Inserto 1 L Tuerca de compresión de la válvula de entrada 1 M Placa de cromo 1 N Junta de goma 1 O Arandela de seguridad plástica 1 P Arandela de estrella 1 Q Tuerca del vástago 1 R Grifo 1 S Guía de instalación uso y cuidado 1 T Llave del sumidero 1 Herramientas requeridas para la instalación A C E D F G H M L S T N O P Q R I J K B Gafas de seguridad L...

Page 24: ...a línea de agua fría para recoger el exceso de agua Abra el grifo de agua fría y dejé drenar el agua de la línea En un grifo de una sola manija el agua caliente debe estar cerrada para evitar cualquier paso cruzado de agua caliente 3 Afloje la tuerca y separe el tubo flexible tejido de agua fría del grifo de agua fría de la cocina Fije la válvula de entrada al mango del grifo utilizando la tuerca ...

Page 25: ...inuado 1 Quite la tuerca del vástago del grifo 2 Deslice la placa de cromo y la arandela de goma negra en el vástago del grifo 3 La placa de cromo la arandela de goma y el cuerpo del grifo van instalados encima del fregadero o de la bancada 4 Coloque el grifo a través del orificio perforado para el grifo y luego coloque la placa de seguridad la arandela de estrella de seguridad y la tuerca del vás...

Page 26: ... Apriete los tornillos para asegurar el sistema 4 Empuje los extremos de los tubos en la entrada y en la salida del cabezal A consultando Conexión de los tubos utilizando los conectores de conexión rápida a continuación Salida de agua Entrada de agua A B B Tubo blanco de 1 4 Tubo blanco de 1 4 Grifo Mango del grifo Espacio libre mínimo de 2 F PRECAUCIÓN No pliegue el tubo ya que esto impedirá el f...

Page 27: ...l filtro se puede obtener en línea en www ghpgroupinc com o en la tienda donde se compró el sistema 1 Cierre la válvula de entrada G y abra el grifo R para liberar presión del sistema Coloque una bandeja o una toalla debajo del sumidero del filtro B para recoger cualquier exceso de agua 2 Desenrosque el sumidero girando la llave T en sentido contrario a las agujas del reloj y quite el cartucho vie...

Page 28: ...stomerservice ghpgroupinc com Datos de funcionamiento Nota Lea estos datos de rendimiento y compare la capacidad de este sistema con sus necesidades reales de tratamiento de agua Se recomienda antes de instalar el sistema que haga examinar su suministro de agua para determinar sus necesidades reales de tratamiento de agua Este sistema es conforme a las normas NSF ANSI 42 53 y CSA B483 1 para las a...

Page 29: ...iltro de sedimentos PUNSED 2 Filtro de bloque de carbono PUNCRBL 3 Válvula de entrada VWC10001 4 Grifo VWC10002 5 Junta tórica pequeña sumidero del filtro VWC10012 6 Junta tórica grande sumidero del filtro VWC10013 7 Llave del sumidero VWC10007 1 2 4 5 6 7 3 ...

Page 30: ... sean originales 5 Daño ocasionado durante el transporte Costos de envío de piezas o productos en garantía hacia y desde la fábrica serán responsabilidad del propietario ESTA GARANTÍA LIMITADA SE OTORGA AL COMPRADOR EN LUGAR DE TODAS LAS DEMÁS GARANTÍAS EXPRESA O IMPLÍCITA INCLUIDAS PERO NO LIMITADAS A LAS GARANTÍAS DE COMERCIABILIDAD DE APTITUD PARA UN PROPÓSITO PARTICULAR EL RECURSO PROPORCIONAD...

Reviews: