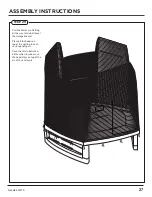
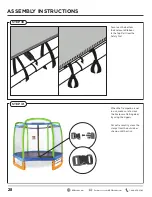
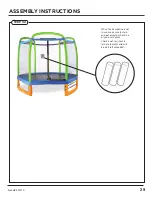
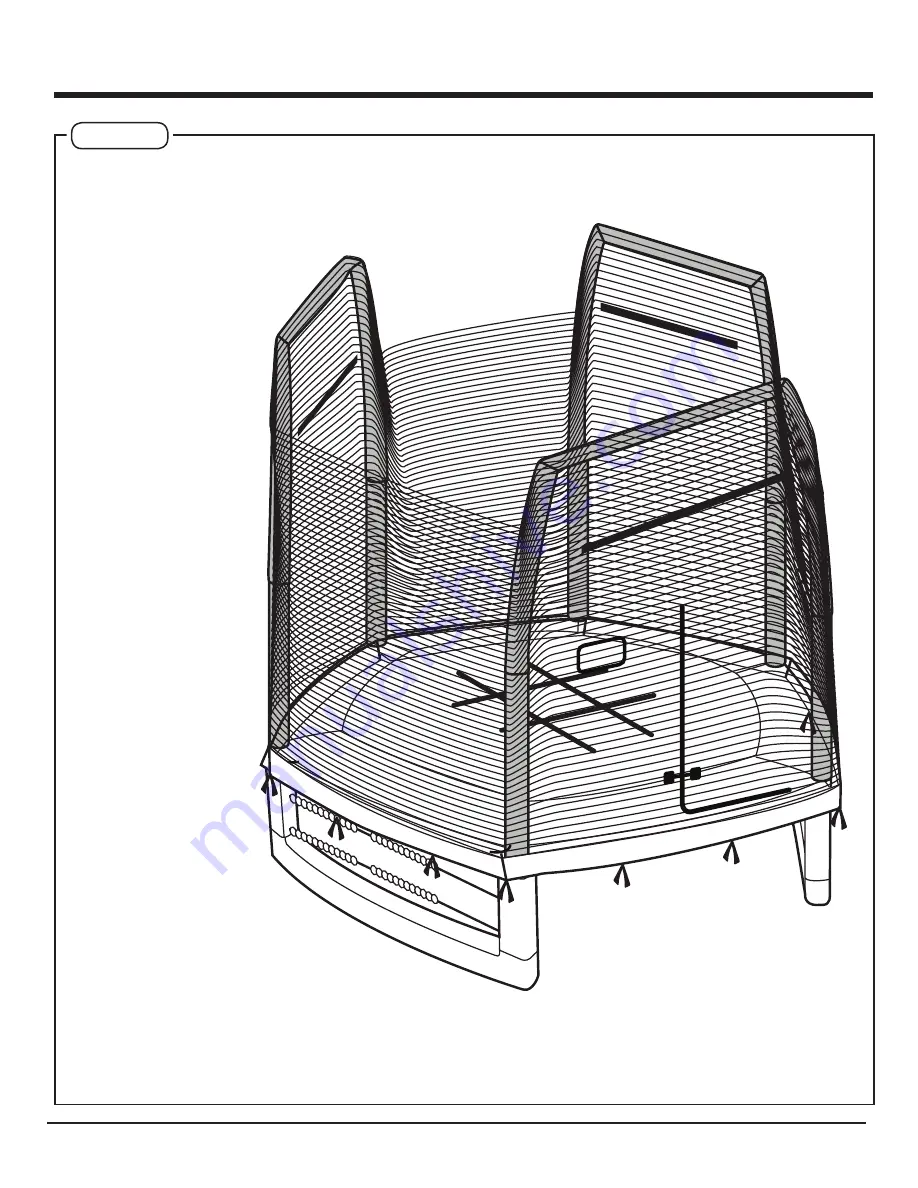
background image

ASSEMBLY INSTRUCTIONS

STEP 29

Pull the Enclosure Netting 

all the way to the bottom of 

the trampoline mat.

Place all the hoods on 

top of the netting to each 

corresponding arc.

Push the Velcro between 

both section to make sure 

the hood stays on top of the 

arc of the enclosure.

27

Model# 9

307TS

Summary of Contents for 9307TS

Page 1: ...1 01 GQBrands com CustomerService GQBrands com 1 866 498 5269 4401 Samuell Blvd Ste 150 Mesquite TX 75149 P A T E N T P E N D I N G FOR AGES WEIGHT LIMIT TO BUILD Tools Provided TOOLS NEEDED 3 9 120Lbs 54 Kgs X 2 Manual en español ubicado en GQBrands com SpanishManuallocated atGQBrands com ...

Page 2: ...URATION TO THE TERMS SET FORTH HEREIN SOME STATES DO NOT ALLOW LIMITATION ON HOW LONG AN IMPLIED WARRANTY LASTS ACCORDINGLY THE ABOVE LIMITATION MAY NO APPLY TO YOU THIS WARRANTY GIVES YOU SPECIFIC LEGAL RIGHTS YOU MAY ALSO HAVE OTHER RIGHTS WHICH VARY FROM STATE TO STATE WHILE EVERY ATTEMPT IS MADE TO ENSURE THE HIGHEST DEGREE OF PROTECTION IN ALL EQUIPMENT WE CANNOT GUARANTEE FREEDOM OF INJURY T...

Page 3: ... Small Parts NOT for children under 3 years of age WARNING While every attempt is made to ensure the highest degree of protection in all equipment we cannot guarantee freedom from injury The user assumes all risks of injury due to use and installation All merchandise is sold on this condition which no representative of the company can waive or change THIS PRODUCT CAN POSSIBLY EXPOSE YOU TO CHEMICA...

Page 4: ...la seguridad del trampolín Úselo solo cuando el trampolín esté limpio y seco Inspeccione antes de usar Mantenga el acolchado del marco en su lugar WARNING WARNING Do not attemp or allow somersaults Landing on the head or neck can cause serious injury paralysis or death even when landing in the middle of the bed 120 LBS MAX WEIGHT MODEL 9307TS Global Quality Brands PureFun net 4401 Samuell Blvd Ste...

Page 5: ... below the location where you are installing your trampoline set Failure to do so can result in serious injury death and property damage Children MUST NEVER use the trampoline unless supervised by a responsible adult with knowledge of trampoline use DO NOT leave children unattended at any time The trampoline frame pad is not designed or intended to support the weight of the user Do not step or jum...

Page 6: ... reduce their risk of falling Do not flip somersault or perform maneuvers which may cause you to land on the head or neck Paralysis or death can result even if you land in the middle of the trampoline mat IMPORTANT You must not use the trampoline if you have a medical history of neck or back injuries or certain mental or physical conditions an existing condition dramatically increases the risk of s...

Page 7: ...nd and Knee Drop Start bouncing from a standing position keeping your eyes on the frame pad Land on the bed on your hands and knees Push with your hands and come back up to an erect position 1 2 3 Back Drop Start from a low bounce and land on your back Keep your chin forward on your chest as you land Kick forward and up with your legs to return to an erect position 1 2 3 Seat Drop Land in a sittin...

Page 8: ...ur body is turning Keep your back parallel to the bed and your head up After completing a half turn land in the front drop position 1 2 3 4 Swivel Hips Start with a seat drop Turn your head to the left or right and swing your arms up in the same direction Turn your hips in the same direction as your head and arms completing a twist Land in the seat drop position 1 2 3 4 8 CustomerService GQBrands ...

Page 9: ...evel away from wires trees and othe possible hazards Ensure a clear space of 8 2ft 2 5m around sides away from walls fences structures roads and other hard surfaces and play areas WHAT YOU WILL NEED Phillips head screwdriver Gloves Safety glasses 1 This is a 2 person build 2 Time for build is approximately 2 hours 3 Choose a good location 9 Model 9307TS ...

Page 10: ...Rail with Socket Straight Pole Foam Plastic Horizontal Leg Base 1 8 5A 5B Jump Mat and Frame Pad Straight Enclosure Pole Plastic Vertical Leg Extension Plastic Vertical Leg Extension Abacus x1 x6 x6 x6 x6 x6 x6 x4 x2 x3 x6 x36 10 10A Arc Top Enclosure Rail Arc Foam x3 x3 10 CustomerService GQBrands com GQBrands com 1 866 498 5269 ...

Page 11: ...2 14 15 11 Allen Wrench M8 Nut Flat Washer Metal Rod Red Abacus Ball Green Abacus Ball Blue Abacus Ball Yellow Abacus Ball Plastic Flat Plate Wrench Spring Washer Enclosure Netting 18 17 Screw Arc Washer x6 x1 x1 x1 x6 x1 x10 x12 x14 x4 x12 x12 x12 x12 x2 x1 11 Model 9307TS ...

Page 12: ...rt the Metal Rod 22 from the larger TOP opening of he Plastic Vertical Leg Extension 5B for the Abacus Slide 12x Red Abacus Balls 23 through the Metal Rod and then slide 12x Blue Abacus Balls 24 NOTE You may choose which colors go first between all 4 colors provided x2 x1 21 Flat Washer 20 M8 Nut 21 20 20 12 CustomerService GQBrands com GQBrands com 1 866 498 5269 ...

Page 13: ... Vertical Leg Extension towards the Abacus balls to be able to secure the Metal Rod using the hardware provided Using 2 Abacus Flat Caps 12 place 1 on each side of the Leg Extension to avoid the metal rod from escaping x2 x1 21 Flat Washer 20 M8 Nut 20 21 20 13 Model 9307TS ...

Page 14: ...e Metal Rod 22 from the larger BOTTOM opening of he Plastic Vertical Leg Extension 5B for the Abacus Slide 12x Green Abacus Balls 25 through the Metal Rod and then slide 12x Yellow Abacus Balls 26 NOTE You may choose which colors go first between all 4 colors provided x2 x1 21 Flat Washer 20 M8 Nut 20 21 20 14 CustomerService GQBrands com GQBrands com 1 866 498 5269 ...

Page 15: ...ards the Abacus balls to be able to secure the Metal Rod using the hardware provided Using 2 Abacus Flat Caps 12 place 1 on each side of the Leg Extension to avoid the metal rod from escaping x2 12 Plastic Flat Plate x2 x1 21 Flat Washer 20 M8 Nut 20 21 20 15 Model 9307TS ...

Page 16: ...ure and properly tightened use the Allen wrench provided Insert the 2x Vertical Leg Extensions at both openings of the Plastic Horizontal Leg Base 6 The flat area of the Horizontal Base must face the floor Both indents in the Base must be facing upwards STEP 9 STEP 10 4 12 4 4 16 CustomerService GQBrands com GQBrands com 1 866 498 5269 ...

Page 17: ...ent at he bottom of the legs will align to the openings of the Horizontal Leg Base Slide 2x Corner Top Rail with Socket Part 3 and align to the upper opening of the Vertical Leg Extensions NOTE Make sure that you locate the upper openings of the corner arms and they are facing upwards STEP 11 STEP 12 3 3 Spring holes must be facing upward 17 Model 9307TS ...

Page 18: ... of the corners NOTE Just like the Corners the openings of the Top Rails must be facing upwards for the springs to be installed Align all the openings and with the Screw 18 facing the outside tighten all hardware shown using the Phillips Screwdriver from the Allen Wrench 19 The Straight Enclosure Poles should have Foam 8A already pre installed 15 STEP 14 18 18 CustomerService GQBrands com GQBrands...

Page 19: ...ASSEMBLY INSTRUCTIONS STEP 15 STEP 16 6 6 4 5A 5A 5A 5A 4 4 4 Complete two more assembled legs 19 Model 9307TS ...

Page 20: ... Spring Washer x1 x1 18 Screw 19 Allen Wrench 19 20 17 17 Align all the openings and with the Screw 18 facing the outside tighten all hardware shown using the Phillips Screwdriver from the Allen Wrench 19 15 STEP 18 18 20 CustomerService GQBrands com GQBrands com 1 866 498 5269 ...

Page 21: ...Once you have 3 completed sections slide the remainder of the Top Rails facing upwards to the legs of the trampoline 2 2 2 STEP 19 STEP 20 ASSEMBLY INSTRUCTIONS 3 Completed Legs 21 Model 9307TS ...

Page 22: ...ing ends facing down C Hook 16 C Hook Locate the R Hook side of the Galvanized Spring Part 7 At the bottom of the trampoline there will be V rings assigned to an opening of the Top Rail based on the proximity of each one Attach the Spring to the V Ring using the R Hook Make sure the ends of the Springs are facing downwards to avoid punctures to the mat or injury while jumping on the trampoline Usi...

Page 23: ...fic order Follow the Spring order shown for the best way to properly install and secure the Jump Mat and Frame Pad to the Top Rails Once the first 16 Springs have been installed on the Top Rail install the remaining 20 Springs NOTE Failure to install the springs to the correct V Ring and Top Rail openings and or not follow the Spring Order Installation as shown may result in tearing or injury whil...

Page 24: ... ribbons must be attached and secured to the Top Rail to make sure no skipping tearing or loose jumping occurs 9 9 10 Assemble 3 Upper Arcs ASSEMBLY INSTRUCTIONS 24 CustomerService GQBrands com GQBrands com 1 866 498 5269 ...

Page 25: ... 27 Slide all 3 completed upper arcs to the top section of the Curved enclosure poles NOTE Make sure arcs are placed away from horizontal bases as shown 3 Completed Upper Arcs ASSEMBLY INSTRUCTIONS 25 Model 9307TS ...

Page 26: ...P 28 Place the Enclosure Netting 11 on top of the trampoline making sure all arcs are inside The zipper and safety buckle must be facing the outside of the trampoline 26 CustomerService GQBrands com GQBrands com 1 866 498 5269 ...

Page 27: ...osure Netting all the way to the bottom of the trampoline mat Place all the hoods on top of the netting to each corresponding arc Push the Velcro between both section to make sure the hood stays on top of the arc of the enclosure 27 Model 9307TS ...

Page 28: ...ons to the Top Rail from the Safety Net When the Trampoline is not in use make sure to close the Enclosure Netting door by using the zippers For extra security close the clasps from the outside as shown until the click 28 CustomerService GQBrands com GQBrands com 1 866 498 5269 ...

Page 29: ...INSTRUCTIONS STEP 32 When the trampoline is not in use make sure to store and put away the chalk in a dry and safe place Chalk is not resistant to rain or elements and will break if left untended 29 Model 9307TS ...

Page 30: ...frame or suspension system Bent or broken enclosure poles Missing or torn foam on the poles Torn or ripped enclosure netting Broken or fraying zipper in the enclosure opening Cease using trampoline immediately and secure it against unauthorized use if any of these conditions are present Cleaning your Trampoline High touch surfaces made of plastic or metal such as frame pads Abacus Beads and jump m...

Reviews: