background image

11

MODEL# 9314E

ASSEMBLY INSTRUCTIONS

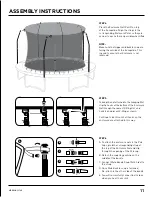
STEP 4

Place the Enclosure Net (Part 9) on top 

of the trampoline. Align the straps to the 

corresponding Enclosure Poles so they are 

as near to each other as possible when lifted

NOTE:


Make sure that zipper and buckle snap are 

facing the outside of the trampoline. This 

is good to ensure that Enclosure is not 

reversed.

STEP 5

To keep the net attached to the Jumping Mat, 

slip the hooks at the bottom of the Enclosure 

Net through the nearest V-Ring slot, and 

hook to an adjacent V-Ring as shown. 


Continue to do this until all hooks on the 

enclosure are attached in this way.

STEP 6

A. To attach the enclosure netv to the Pole 

Caps, grab the corresponding strap at 

the top of the Enclosure Net and slip 

through the opening of the Pole cap.

B. Detach the snaps by pushing on the 

middle of the buckle.

C. Connect Male Buckle Snap (Fork Side) to 

the strap.

D. Once Male Buckle snap is fastened, 

Re-attach to the other side of the buckle.

E. You will successfully connect both sides 

when you hear them click.

B

A

C

D

E

Summary of Contents for 9314TS

Page 1: ...poline at any time Do not allow small children to use unless supervised by an adult ADULT ASSEMBLY REQUIRED The contents of this package are not suitable for children under 3 years of age Contains sma...

Page 2: ...all of the parts are included If you find that any parts are missing or damaged we will happily provide replacement parts at no charge within 30 days of purchase Please keep in mind that for select da...

Page 3: ...ater or ice weather damage damage caused by unauthorized repair work or damage caused by improper use of the products are not covered by the product warranty No other warranty beyond that specifically...

Page 4: ...ZARD Small Parts NOT for children under 3 years of age WARNING While every attempt is made to ensure the highest degree of protection in all equipment we cannot guarantee freedom from injury The user...

Page 5: ...ST NEVER be left unattended at any time Ensure the trampoline set is on level ground with a minimum of 8 feet 2 5M clear space around the sides 26 feet 8M clear height space above and that no obstruct...

Page 6: ...d Do not use this trampoline indoors Do not use this trampoline on any slippery smooth floor surface uneven or sloping ground surface Do not place the trampoline on hard surfaces such as asphalt stone...

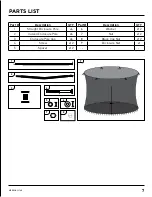
Page 7: ...art Description QTY Part Description QTY 1 Straight Enclosure Pole x6 6 Washer x12 2 Curved Enclosure Pole x6 7 Nut x12 3 Enclosure Pole Cap x6 8 Black Cap Nut x12 4 Screw x12 9 Enclosure Net x1 5 Spa...

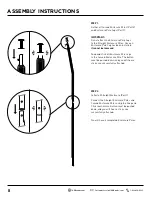
Page 8: ...Cap has been installed it cannot be removed Snap and click all Enclosure Pole caps to the Curved Enclosure Pole The button must be pushed down and you will hear a click once successfully attached STE...

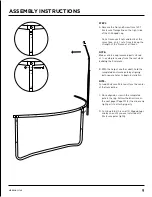
Page 9: ...a safe place away from the mat while building the Enclosure B With the help of another adult hold the completed enclosure pole by aligning both square holes to begin installation NOTE Curved Enclosur...

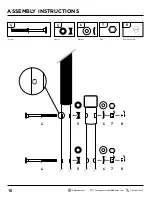
Page 10: ...10 CustomerService GQBrands com GQBrands com 1 866 498 5269 5 5 4 4 6 6 7 7 8 8 ASSEMBLY INSTRUCTIONS 6 4 7 5 8 Screw Spacer Washer Nut Black Nut Cap...

Page 11: ...ks at the bottom of the Enclosure Net through the nearest V Ring slot and hook to an adjacent V Ring as shown Continue to do this until all hooks on the enclosure are attached in this way STEP 6 A To...

Page 12: ...an purchase springs frame pads jump mats and many more parts directly from PureFun You can contact customer service info below or visit our website PureFun Net Question Something was missing from the...

Reviews: