background image

5

MODEL# 9315TS - ENCLOSURE

ASSEMBLY INSTRUCTIONS

STEP 1

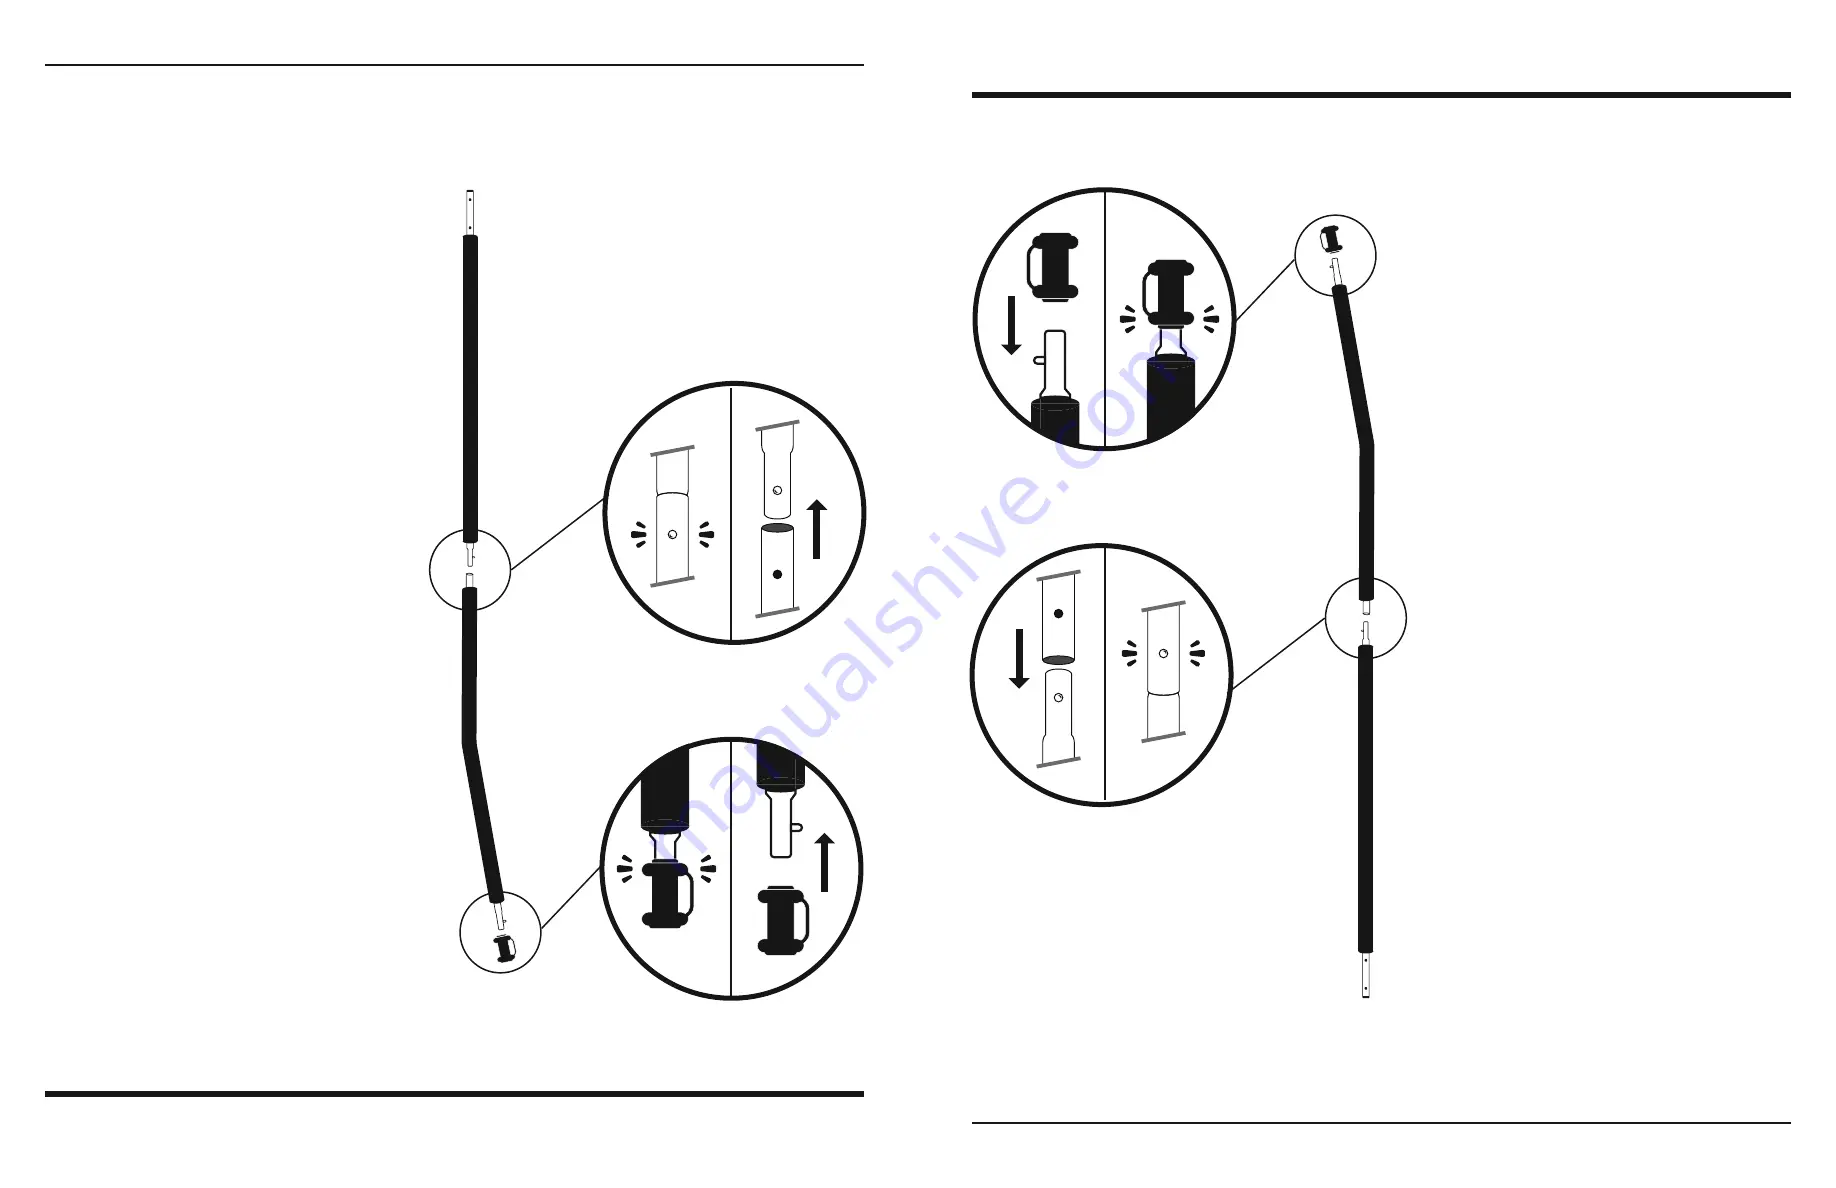
Gather all Curved Enclosure Poles (Part 2) 
and Enclosure Pole Caps (Part 3). 

IMPORTANT:


Do not attach the Enclosure Pole Caps 
to the Straight Enclosure Poles. Once an 
Enclosure Pole Cap has been installed


it cannot be removed

.  

 
Snap and click all Enclosure Pole caps 
to the Curved Enclosure Pole. The button 
must be pushed down, and you will hear a 
click once successfully attached.

STEP 2

Collect all Straight Enclosure  (Part 1) 
 
Connect the Straight Enclosure Poles and 
Curved Enclosure Poles using the Snap and 
Click mechanism. Button must be pushed 
down, and you will hear a click once 
successfully attached.

You will have 6 completed Enclosure Poles.

5

MODEL# 9315TS - RECINTA

PASO 1:


Reúna todos l

os Po

stes Curv

ados Del 

Recinto (P

arte 2) y T

apa De Po

stes (P

arte 

3).

IMPORTANTE:


No fije la Tapa De P

os

te en el P

os

te Rect

Del Recintos. Una v

ez que se ha instalado 

un Tapa De P

os

te no se puede quit

ar .

Haga clic y haga clic en todos l

os Tapa De 

Po

stes en el P

os

te Curv

ado Del Recinto. El 

botón debe ser empujado hacia abajo, y se 

escuchará un clic una v

ez unido con é

xito.

PASO 2:

Recoja t

odos los r

ecintos r

ectos (P

arte 1)

Conecte el P

ost

e Recto Del Recint

os y el 

Pos

te Curv

ado Del Recintos usnado el bot

on 

click. Botón debe ser empujado hacia abajo,


y se escuchará un clic una v

ez con é

xito


adjunto.

T endr

ás 6 polos de r

ecinto c

omplet

os.

INSTRUCCIONES DE

 MONTAJE

Summary of Contents for 9315TS

Page 1: ...ice GQBrands com 1 866 498 5269 GQBrands com 4401 Samuell Blvd Ste 150 Mesquite TX 75149 RECINTA DE 15 PIES DURA BOUNCE MODELO 9315TS ENCLOSURE MANUAL DEL PRODUCTO VERSI N 06 17 02 6 2X N A POR EDADES...

Page 2: ...NO PODEMOS GARANTIZAR LA LIBERTAD DE LESI N EL USUARIO ASUME TODO EL RIESGO DE LESI N POR USO TODA LA MERCANC A EST VENDIDA EN ESTA CONDICI N QUE NING N REPRESENTANTE DE LAS MARCAS DE GLOBAL QUALITY B...

Page 3: ...a os de edad Lea estas advertencias y la informaci n de este manual en su totalidad El incumplimiento de las siguientes instrucciones puede aumentar el riesgo de lesiones graves y o muerte Es esencia...

Page 4: ...a De Pl stico Curvado Grueso Arandela Tuerca Tapa de Tuerca Negra x6 x6 x6 x12 x1 x12 x12 x12 x12 LISTA DE PARTES 4 CustomerService GQBrands com GQBrands com 1 866 498 5269 PARTS LIST 1 2 3 9 4 5 6 7...

Page 5: ...ed down and you will hear a click once successfully attached You will have 6 completed Enclosure Poles 5 MODEL 9315TS RECINTA PASO 1 Re na todos los Postes Curvados Del Recinto Parte 2 y Tapa De Poste...

Page 6: ...D Contin e haciendo esto en todas las patas en forma de U una por una hasta que haya instalado todos los 6 postes del armario rmemente INSTRUCCIONES DE MONTAJE 6 CustomerService GQBrands com GQBrands...

Page 7: ...5 4 4 6 6 7 7 8 8 ASSEMBLY INSTRUCTIONS 6 4 7 5 8 Screw Spacer Washer Nut Black Nut Cap 7 MODEL 9315TS RECINTA 5 5 4 4 6 6 7 7 8 8 6 4 7 5 8 Tornillo Arandela Grande Arandela Tuerca Tapa de Tuerca Neg...

Page 8: ...Contin e haciendo esto hasta que todos los ganchos en el gabinete est n conectados de esta manera INSTRUCCIONES DE MONTAJE 8 CustomerService GQBrands com GQBrands com 1 866 498 5269 ASSEMBLY INSTRUCTI...

Page 9: ...You will successfully connect both sides when you hear them click B A C D E 9 MODEL 9315TS RECINTA PASO 6 A Para jar la cubierta a los casquetes agarre la correa correspondiente en la parte superior d...

Page 10: ...CustomerService GQBrands com 4401 Samuell Blvd Ste 150 Mesquite TX 75149 NOTAS INFORMACI N DEL CONTACTO 10 CustomerService GQBrands com GQBrands com 1 866 498 5269 GQBrands 1 866 498 5269 CustomerServ...

Reviews: