background image

1.Loosen the fitting nuts and the cap from the RO membrane housing as shown in

the picture. Unpack the RO membrane and insert to its housing (rubber gasket
towards to the open end). When completed, tighten up the cap with the RO
membrane housing and the jaco fittings.

2.Turn off the water supply. Loosen the stainless steel pipe connector.

PRO

RE

NG

WAT

ER

SYST

EM

3.Get feed water connector and connect it to the stainless steel pipe as in the

picture 2.

Jaco nuts

Cold

Installation diagram

DRINKING WATER SYSTEM

RO400 400GPD Light Commercial

RO400 400GPD Light Commercial

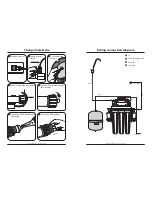
To tank

To faucet

To RO system

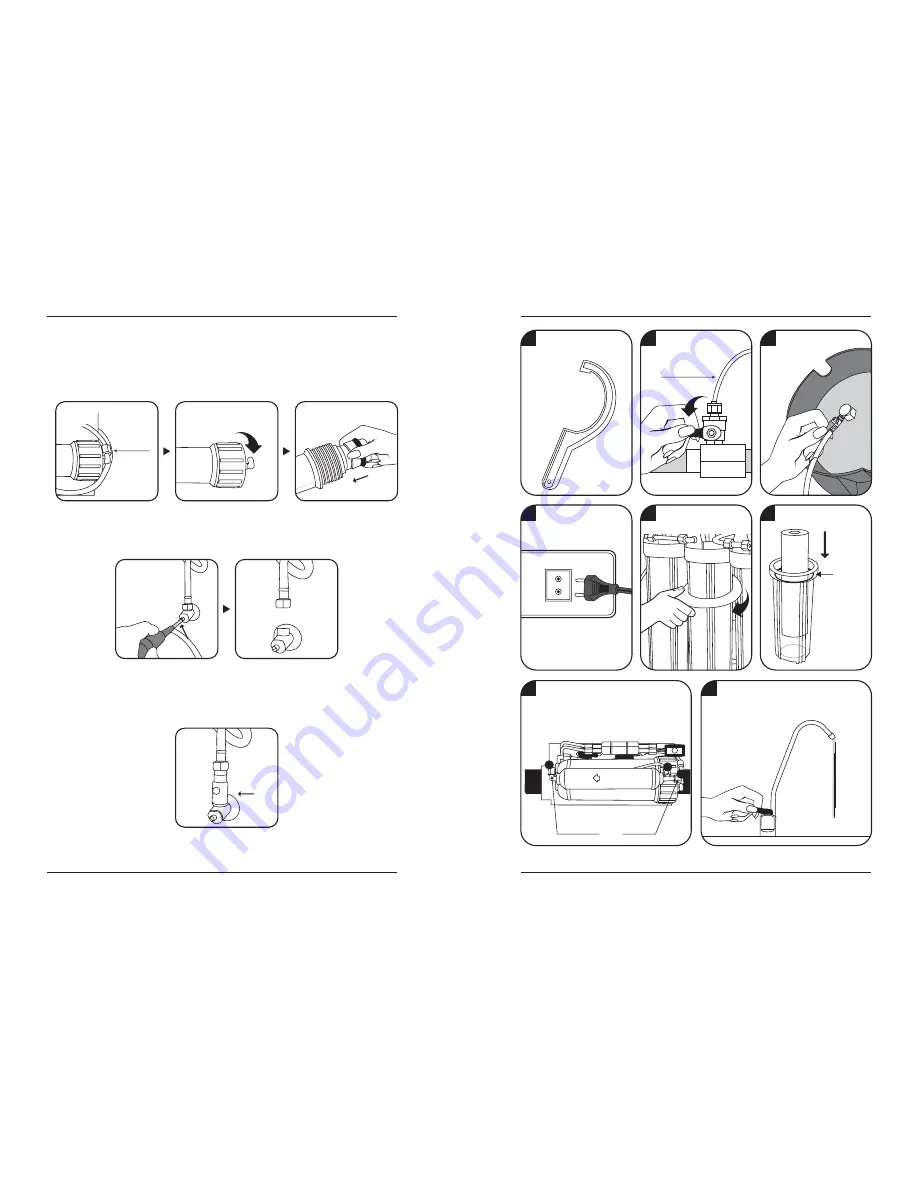
2

Switch off water
supply.

4

Unplug electricity.

7

Loose the fitting nuts at point 1,2,3.
Take out the jaco fittings, and seal
it up with the Teflon tape again.
Replace the new pre-filters.

5

Open the housings
clockwise.

3

Turn off water tank
supply.

6

Insert new filter.

8

After changing filters, let water run

for about 15 minutes to clear the
filters.

Change filters

1

Have a half-circle
housing wrench
ready.

Be sure the
rubber gasket
is attached
on the housing

FLOW

1

2

3

Summary of Contents for RO1500

Page 1: ...chase Name Tel Address Memo 01 Introduction of RO1500 02 What is Reverse Osmosis 03 Components Selections 04 Cartridge filters 05 The parts of RO1500 07 Installation diagram 12 Change filters 13 Change RO membrane 14 Operation regulations 16 FAQ 17 Maintenance checking list 19 Memo 06 Tubing connection diagram USER S MANUAL ...

Page 2: ...m fluoride nitrite nitrate and selenium With your own RO water filter system under your sink working for you twenty four hours a day you can have as much purified water at the touch of a finger whenever you want it Free to use all you want clean safe water on tap and no more trips to the store Specifications Production 1500LPD NSF Standards water storage tank 11 gallons Operation pressure 10 125 p...

Page 3: ...properly it will remove all microorganisms from tap water and produce sterile water Reverse osmosis is the reversal of the natural flow of osmosis In a water purification system the goal is not to dilute the salt solution but to separate the pure water from the salt and other contaminants When the natural osmotic flow is reversed water from the salt solution is forced to pass through the membrane ...

Page 4: ... water will cause the production of R O water to fall to half of that at 76 F The maximum water temperature recommended is 85 F 3 The higher the amount of dissolved contaminants in the water the lower the quantity of water produced A high level of TOTAL DISSOLVED SOLIDS can be overcome with additional water pressure 4 Different membranes have different characteristics Some produce more water than ...

Page 5: ...4 7 100GPD TFC membrane 8 pcs Stage 8 12 Inline Post Carbon Filters Cartridge Filters Filter Description 3 Months 3 Months This 5micron sediment filter is made of 100 pure polypropylene fibers High capacity filter removes dusts particles and rusts This granular activated carbon filter is composed of high performance activated carbon that r e m o v e s f r e e c h l o r i n e o d o r o r g a n i c ...

Page 6: ...rbon filter RO system main housing bracket Flow restrictor Flow restrictor Transformer Booster pump Electronic solenoid valve Transformer Booster pump Electronic solenoid valve Transformer Low pressure switch Tank shut off switch To the faucet To the tank Operation regulation 5 For the first time operation when changing the filters water should run for at least 20 minutes before drinking it 1 Plug...

Page 7: ...e Jaco fitting anti clockwise 5 Open the RO membrane housing anti clockwise 6 Take out the old RO membrane with a handy tool 7 Insert a new RO membrane 1 Unplug electricity 2 Switch off water supply 3 Turn off water tank supply To RO system Faucet Tank Input water Drain out Tubing connection diagram 1 2 3 4 In To water storage tank Drain out To faucet ...

Page 8: ...s in the picture 2 Jaco nuts Cold Installation diagram DRINKING WATER SYSTEM RO400 400GPD Light Commercial RO400 400GPD Light Commercial To tank To faucet To RO system 2 Switch off water supply 4 Unplug electricity 7 Loose the fitting nuts at point 1 2 3 Take out the jaco fittings and seal it up with the Teflon tape again Replace the new pre filters 5 Open the housings clockwise 3 Turn off water t...

Page 9: ...4 Get deliver valve and seal it with Teflon tape for 14 circles Then connector it with the feed water connector 5 Get tubing white connect it with deliver valve and the inlet water supply as point 1 on page 06 Installation diagram 11 Take tubing white Wear the concave type screw on tubing white and insert the tubing shroud as shown in the picture Connect the tubing top with the faucet end Then con...

Page 10: ...e an electric drill and drill an approximately 1 cm hole through the kitchenware table Installation diagram 10 Take out the faucet and its components Install the faucet and the rubber gasket to the kitchenware table Install the rest of component as shown in the picture Installation diagram Faucet Kitchenware table Twisted plastic locker Rubber gasket Flat metal piece Screw locker PS To suit your k...

Reviews: