background image

!

1. ΟΔΗΓΙΕΣ ΑΣΦΑΛΕΙΑΣ

l


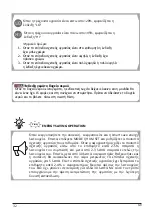
Παρακαλούμε ΜΗΝ ΕΠΙΤΡΕΠΕΤΕ σε παιδιά κάτω των 8 ετών να χρησιμοποιούν αυτή τη συ-

σκευή. Βεβαιωθείτε ότι τα παιδιά, άτομα με αναπηρία (ΑμεΑ) ή έλλειψη γνώσης και εμπειρί-

ας, επιβλέπονται, ανάλογα με την περίπτωση, από άτομα υπεύθυνα για την ασφάλειά τους 

και δεν αναλαμβάνουν διαδικασίες όπως τον καθαρισμό ή την συντήρηση της συσκευής.

l


Τα παιδιά θα πρέπει πάντοτε να επιβλέπονται ώστε να μην παίζουν με τη συσκευή.

l


Αυτός ο αφυγραντήρας αποτελεί προϊόν οικιακής χρήσης και μόνο. Μην χρησιμοποιείτε 

τη συσκευή σε βιομηχανικές εγκαταστάσεις, εξωτερικούς χώρους, σκάφη ή μέρη με έντονη 

παρουσία νερού, όπως μπάνια και τουαλέτες.

l


Η συσκευή θα πρέπει πάντα να τοποθετείται σε όρθια θέση για την αποφυγή βλαβών.

l


Διατηρήστε κλειστά όλα τα παράθυρα και τις πόρτες του δωματίου, όπου λειτουργείτε τον

αφυγραντήρα.

l


Σε περίπτωση που εισέλθει νερό στη συσκευή, απενεργοποιήστε αμέσως τον αφυγραντή-

ρα και αποσυνδέστε τον από τη παροχή ρεύματος.

l


Προτού μετακινήσετε τη συσκευή από το ένα μέρος στο άλλο, βεβαιωθείτε ότι ο αφυγρα-

ντήρας παραμένει σε όρθια θέση.

l


Αδειάστε το δοχείο νερού, όποτε αυτό γεμίσει, καθώς και σε περιπτώσεις που δεν θα χρη-

σιμοποιηθεί η συσκευή για μεγάλο χρονικό διάστημα.

l


Να αδειάζετε πάντα το δοχείο νερού, πριν αποθηκεύσετε τη συσκευή.

l


Σε περίπτωση που ο αφυγραντήρας απενεργοποιηθεί και τεθεί αμέσως σε λειτουργία ξα-

νά, θα υπάρχει καθυστέρηση 3 λεπτών στην εκκίνηση για λόγους ασφαλείας. 

l


Σε περίπτωση που ο αφυγραντήρας πέσει ή αναποδογυρίσει, απενεργοποιήστε και απο-

συνδέστε τον από το ρεύμα αμέσως. Βεβαιωθείτε ότι η συσκευή έχει στεγνώσει πλήρως προ-

τού την επανεκκινήσετε.

l


Αποσυνδέστε τον αφυγραντήρα, σε περίπτωση που ακούγονται ασυνήθιστοι θόρυβοι ή 

εξέρχονται μυρωδιές και καπνός.

l


Αν το καλώδιο παροχής ρεύματος είναι κατεστραμμένο, θα πρέπει να αντικατασταθεί άμε-

σα από τον κατασκευαστή, το σέρβις ή άλλον αδειοδοτημένο τεχνικό, ώστε να αποφευχθούν 

πιθανά ατυχήματα.

l


Μην επιχειρήσετε ποτέ να επέμβετε και να επισκευάσετε μόνοι σας τη συσκευή. Επικοινω-

νήστε με αδειοδοτημένο τεχνικό για την συντήρηση και επισκευή της μονάδας.

l


Μην ενεργοποιείτε ή απενεργοποιείτε τη συσκευή συνδέοντας ή αποσυνδέοντας την από 

τη πρίζα.

l


Μην εισάγετε αντικείμενα στην εξαγωγή και εισαγωγή αέρα της συσκευής, καθώς υπάρχει 

πιθανότητα βλάβης.

l


Μην τοποθετείτε βαριά αντικείμενα πάνω στο καλώδιο τροφοδοσίας. Βεβαιωθείτε ότι το 

καλώδιο δεν συμπιέζεται.

l


Μην τοποθετείτε το καλώδιο τροφοδοσίας κάτω από μοκέτες, καθώς υπάρχει πιθανότητα 

υπερθέρμανσης.

l


Η συσκευή φέρει ροδάκια για την εύκολη μετακίνηση και τοποθέτηση. Χρειάζεται ιδιαίτε-

ρη προσοχή όταν μετακινείτε τη συσκευή πάνω σε χαλιά, ώστε να μην υπάρχουν εμπόδια 

και αναποδογυρίσει ο αφυγραντήρας, αδειάζοντας το νερό που βρίσκεται στο δοχείο περι-

συλλογής. 

l


Μην κάθεστε ή σκαρφαλώνετε πάνω στη συσκευή.

l


Μην επιτρέπετε την απευθείας έκθεση του αφυγραντήρα στην ηλιακή ακτινοβολία ή σε άλ-

λες πηγές θερμότητας.

l


Μην λειτουργείτε τη συσκευή κοντά σε πηγές θερμότητας, χημικά, ραδιενεργά στοιχεία, 

εύφλεκτα υλικά ή φωτιά.

l


Μην αφαιρείτε το δοχείο νερού ενώ η μονάδα βρίσκεται σε λειτουργία.

l


Μην χρησιμοποιείτε τη μονάδα χωρίς φίλτρο. Σκόνη και χνούδια θα συσσωρευτούν στη 

συσκευή και θα μειώσουν την απόδοσή της.

l


Μην πίνετε και μην χρησιμοποιείτε το νερό που συλλέγεται από τον αφυγραντήρα.

l


Μην χρησιμοποιείτε τη μονάδα με βρεγμένα χέρια.

24

GR

Summary of Contents for PD 12L Design

Page 1: ...USER S MANUAL ENGLISH DEHUMIDIFIER PD 12L Design...

Page 2: ...LANGUAGES ENGLISH 3 23...

Page 3: ...SKED QUESTIONS TROUBLESHOOTING 16 Dear Consumer Congratulations on your choice Puredry s PD12 L Design dehumidifier is distinguished among its class by its excellent performance quite operation and tw...

Page 4: ...it is misplaced or tipped unplug the power cord immediately Make sure the unit is completely dry before resuming oper tion l Disconnect the device if abnormal sounds odors or smoke ccur l If the suppl...

Page 5: ...ample T 3 15A 250V or 350V etc Power o the dehumidi er before removing the plug 3 SOCIABLE REMARKS ENVIRONMENTAL PROTECTION Disposal of equipment no longer used Please follow the instructions below wh...

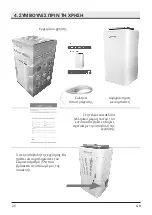
Page 6: ...se note the SN serial number The SN is labeled on side of the device Please refer to the electronic warranty instructions in the last page English section of this manual 4 STEPS BEFORE USE User s manu...

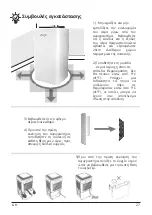
Page 7: ...els will not fall bellow 5 C 41 F There is a possibility the coils will collect frost at temperatures that are under 5 C 41 F which may result in low performance 3 Ensure the filter is clean 4 Place u...

Page 8: ...Consumption values may vary depending on the relative humidity in the room of operation 30W Consumption during the fan operation The fan only operation is a function that cannot be manually selected I...

Page 9: ...6 GETTING TO KNOW YOUR DEHUMIDIFIER Air Filter Power Cord Air outlet Handle Drain hose outlet Removable water tank Control Panel EN 9...

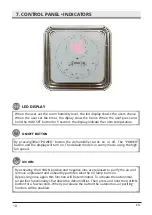
Page 10: ...on or off The POWER button and the display will turn on The default mode is in sunny mode using the high fan speed UV ION By activating the UV ION positive and negative ions are released to purify the...

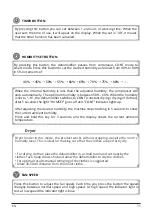
Page 11: ...ay shows the current ambient temperature TIMER BUTTON By pressing this button you can set between 1 24 hours of working time When the user sets the time of use it will apear on the display When the se...

Page 12: ...as soon as possible the humidity levels with the lower possible power consumption In any case that the compressor does not start from the beginning lower room humidity that the user sets the product w...

Page 13: ...spilled on the floor Empty the water from the tank and place it again in to the device The water tank must be securely and properly placed for the dehumidifier to operate When the water tank is re in...

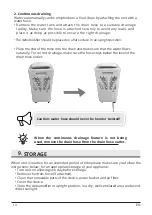
Page 14: ...into the drain and make sure that the water flows naturally For correct drainage make sure the hose stays below the level of the drain hose outlet When the continuous drainage feature is not being us...

Page 15: ...ier Do not use abrasive cleaning agents or solvents use a brush or vacuum attachments for cleaning Do not use a dishwasher to clean the filter Do not apply any water directly on or into the device whi...

Page 16: ...e humidity level is essential for your well being and that of your household Extreme fluctuations cause adverse effects on both low humidity may cause respiratory problems and damage on wooden doors w...

Page 17: ...midiifer while operating you may feel that the air coming out of the fan is cooler due to the diffusion reality it is at the same room temperature but with less humidity The unit does not start l Make...

Page 18: ...y is below 20 RH the code LO appears At this state the compressor does not work but the other functions works normally HI When the relative humidity is above 95 RH the code HU appears At this state bo...

Page 19: ...y specialized and certified technicians Does not cover Accidental damage sabotage defects caused by normal wear and tear including wear of consumable parts ie parts that require periodic replacement d...

Page 20: ...submission within thirty 30 days from the date of purchase of the relevant electronic form available on the website https puredryhellas com egg iseis In addition it is possible to post the completed...

Page 21: ...improper transport or packaging when the System is returned to the Dealership or an authorized center Damages caused by service or repairs or other modifications of the System that were not performed...

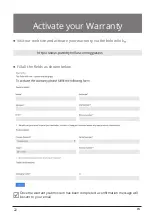
Page 22: ...the fields as shown below Once the warranty submission has been completed a confirmation message will be sent to your email l Visit our web site and activate your warranty via the below link https www...

Page 23: ...1 24 2 25 3 25 4 26 6 29 7 30 9 33 11 35 10 34 36 PD12L Design 5 28 8 12 39 GR 23...

Page 24: ...1 l 8 l l l l l l l l l 3 l l l l l l l l l l l l l l l l 24 GR...

Page 25: ...24 2 l l l l l l l l PCB T 3 15A 250V 350V 3 l 2002 96 EC 27 2003 l CO2 l A B 25 GR...

Page 26: ...26 SN 4 GR...

Page 27: ...27 1 2 5 C 41 F 5 C 41 F 3 4 2 5 GR 20cm...

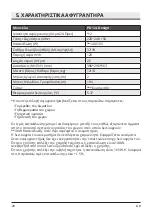
Page 28: ...5 PD 12L Design 24 12 V Hz 220 240 50 W 140 165 dB A 37 39 m3 h 120 2 5 x x mm 308 298 563 kg 12 10 m 2 m 1 94 C 5 37 30W smart save energy 140W mode 165W 5 GR 28...

Page 29: ...29 GR 6...

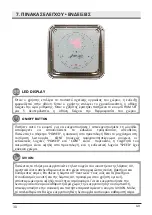
Page 30: ...7 LED DISPLAY HUM SET 5 30 GR ON OFF BUTTON POWER CONT POWER CONT SPEED UV ION UV UV UV UV ION...

Page 31: ...31 GR HUMIDITY SET BUTTON CONT 40 80 5 40 45 50 55 60 65 70 75 80 50 60 CONT 5 HUMSET CONT 5 3 TIMER BUTTON Timer Timer 1 24 00 FAN SPEED HUM SET Cont Cont 30 50...

Page 32: ...32 GR ENERGY SAVING OPERATION smart save energy MODE HUM SET 2 5 2 3 30 5 2 4 30 E Saving 20 LO 1 2 3 15 95 HI...

Page 33: ...GR 8 O 1 33...

Page 34: ...GR 34 2 9 24...

Page 35: ...35 10 l 5 GR...

Page 36: ...GR 36 11 HEPA 50 60...

Page 37: ...GR 37 2 5 Dryer O Dryer l l l l l l l l l l l...

Page 38: ...l l l l l l l l l l l l CL 5 C CH 38 C LO 20 RH HI 95 RH E1 2 38 GR...

Page 39: ...12 GR 39 Silver 2 Puredry Hellas EE Silver Puredry Hellas Puredry...

Page 40: ...40 GR Puredry Puredry Puredry Hellas EE service 15 Platinum 5 Puredry Hellas EE 1 6 2018 Platinum 30 https puredryhellas com egg iseis Manual Puredry Hellas...

Page 41: ...1 6 2018 2 Puredry Puredry Puredry Puredry Hellas EE service 15 GR 41...

Page 42: ...l link https www puredryhellas com egguiseis l email 42 GR...

Reviews: