background image

10

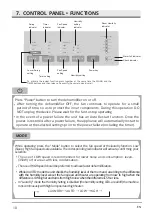
7. CONTROL PANEL • FUNCTIONS

EN

Room Humidity (RH)

40

45

55

65

75

%

50 

%

60 

%

70 

%

80 

%

Check

Full

Front

Wide

UP

Ionizer

8H

12H

4H
2H

High
Low
Auto

60
50

45

55

40

%

%

%

Room Humidity
indicator

setting

Humidity

indicator

Fan Speed
indicator

Timer 
indicator

Swing 
indicator

Louver Swing
setting

Fan Speed
setting

Water full 

 indicator

Check

 indicator

Power key

Timer setting 

Humidity setting

To  activate  the  ionizer  function  press  together  at  the  same  time  the  SWING  and  the 

TIMER buttons and then release. Do exactly the same to deactivate it.

Press “Power” button to turn the dehumidifier on or off.    

• After  turning  the  dehumidifier  OFF,  the  fan  continues  to  operate  for  a  small

period of time, so as to protect the inner components. During this operation DO

NOT unplug the device. Please wait for the fan to stop operating.

• In the event of a power failure the unit has an Auto Restart function. Once the

power is restored after a power failure, the appliance will automatically restart to

operate at the selected settings prior to the power failure (including the timer).

While  operating  press  the  "Mode"  button  to  select  the  fan  speed or the laundry function.  Low 

(Sleep), High fan speeds are available. The corresponding led indicator will activate, confirming your 

selection.  

The use of LOW speed is recommended for lower noise and consumption  levels

(350W) or for areas with less condensation.

The use of HIGH speed should be preferred  to achieve faster dehumidification.


MODE


While in AUTO mode the unit checks the humidity level of the room and according to the difference 

with the humidity level we set the fan speed and heater are operating from low to high when the 

difference is 10% higher and turns from high to low when the differecne is 5% or less.

Laundry

In "Laundry" mode the Humidity Setting is disabled (the humidity setting LEDs are all off) the machine 

runs continuously with high fan speed and high heater.

LAUNDRY

 AUTO 

 LOW 

HIGH 

Summary of Contents for PDD 8519 FAMOUS

Page 1: ...USER S MANUAL ENGLISH DEHUMIDIFIER PDD 8519 FAMOUS...

Page 2: ...LANGUAGES ENGLISH 3 20...

Page 3: ...10 STORAGE 15 11 FREQUENTLY ASKED QUESTIONS TROUBLE SHOOTING 16 Dear Consumer Congratulations on your choice What distinguishes dehumidifier Puredry PDD 8519 Famous is the unique design and the upgrad...

Page 4: ...n mind that for operational reasons there is a 3 minute delay in order to regain normal operation l If the unit is misplaced or tipped unplug the power cord immediately Make sure the unit is completel...

Page 5: ...tug on the cord Power off the dehumidifier before removing the plug Never unplug the unit before the fan has stopped blowing 3 SOCIABLE REMARKS ENVIRONMENTAL PROTECTION Disposal of equipment no longe...

Page 6: ...ranty purposes please note the SN serial number Please find it on the back side of the device Please refer to the electronic warranty instructions in the last page English section of this manual User...

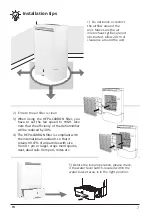
Page 7: ...h located within the water bucket area is in the right position EN 2 Ensure the air filter is clean 3 When using the HEPA CARBON filter you have to set the fan speed to HIGH Also note that the efficie...

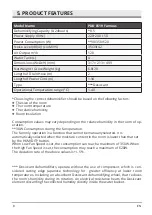
Page 8: ...maximum of 620W The deviation rate of the above values is 5 Desiccant dehumidifiers operate without the use of compressor which is con sidered cutting edge Japanese technology for greater efficiency...

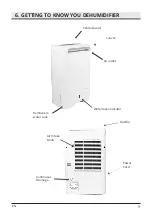
Page 9: ...9 Power Cord Handle Continuous Drainage Removable water tank Louver Water level indicator 6 GETTING TO KNOW YOU DEHUMIDIFIER Control panel Air Intake Grille Air outlet EN...

Page 10: ...the unit has an Auto Restart function Once the power is restored after a power failure the appliance will automatically restart to operate at the selected settings prior to the power failure includin...

Page 11: ...ode buttons are settable though the fan stops TIMER Press the TIMER button to set the timer and the remaining time before the machine turns off will be displayed by the LED If there isn t any timer no...

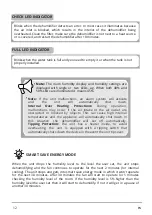
Page 12: ...ay occur if the air intake or the air outlet are obstructed or blocked by objects This can cause high internal temperatures and the appliance will automatically shut down In this situation the dehumid...

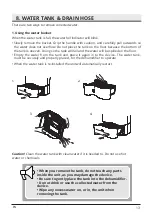
Page 13: ...on the floor Empty the water from the tank and place it again in to the device The water tank must be securely and properly placed for the dehumidifier to operate When the water tank is re installed...

Page 14: ...a suitable drainage facility Make sure the hose is attached securely to avoid any leaks and place it as deep as possible to ensure the right drainage The dehumidifier should be placed on a flat surfa...

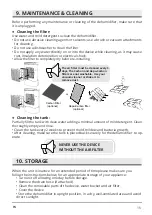
Page 15: ...ty and rinse Clean the tank every 2 weeks to prevent mold mildew and bacteria growth After cleaning make sure the tank is placed back securely for the dehumidifier to op erate NEVER USE THE DEVICE WIT...

Page 16: ...from the dehumidifier This is caused by the Zeolite desiccant material and it is not a sign that the dehumidifier is not working properly nor that it is harmful to humans or pets The smell occurs beca...

Page 17: ...the greatest comfort for you and your family preventing allergies or diseases and keeps your home healthy and well maintained in terms of plasterboards dye exfoliation wood furniture and any other equ...

Page 18: ...damaged l Make sure you have cleaned the filter as suggested Clogged filter may result in re duced performance lAll house exits windows doors etc where the dehumidifier is operating should be shut l R...

Page 19: ...ty submit For the correct efficient and safe operation of electrical appliances it is recommended as a good practice to clean and maintain them at regular intervals depending on their use by specializ...

Page 20: ...t to determine the manner place and time of repair of the defects at its sole discretion depending on the specific characteristics of each case The means and costs of transportation to and from Puredr...

Page 21: ...ll the fields as shown below Once the warranty submission has been completed a confirmation message will be sent to your email l Visit our web site and activate your warranty via the link below https...

Page 22: ...22 1 23 2 24 3 24 4 25 5 27 6 28 7 O 29 8 32 9 34 10 34 11 35 O Puredry PDD 8519 Famous Desiccant GR 12 36...

Page 23: ...23 1 l 8 l l l l l l l l l l l l l l l l l l l l l l l GR...

Page 24: ...2 l l l l l l l l 3 l 2002 96 EC 27 2003 l A B GR 24...

Page 25: ...A SN 4 GR 25...

Page 26: ...1 20cm 5 GR 26 2 3 HEPA CARBON HIGH 30 4 HEPA CARBON 99 97 0 1 m...

Page 27: ...GR 5 PDD 8519 Famous 24 8 5 V Hz 220 240 50 W 30 350 620 dB A 35 39 42 m3 h 120 L 4 x x mm 317 213 499 kg 6 8 7 8 A m 2 m 1 94 Desiccant C 1 40 l l l l 30W 350W 620W 5 Desiccant 27...

Page 28: ...28 6 GR...

Page 29: ...Humidity RH 40 45 55 65 75 50 60 70 80 Check Full Front Wide UP Ionizer 8H 12H 4H 2H High Low Auto 60 50 45 55 40 Laundry 29 7 GR SWING TIMER POWER TIMER TIMER LED LED 2hr 4hr 8hr 12hr continuous no...

Page 30: ...OW HIGH 10 HIGH LOW 5 MODE LOW Sleep HIGH LED 350W HUMIDITY 5 40 45 50 55 60 40 HUMIDITY smart save energy mode 2 LED HUMIDITY 5 smart save energy mode 30 5 30 smart save energy mode Laundry HIGH LED...

Page 31: ...31 GR SWING Stop no led SWING LED IONIZER ionizer on SWING TIMER SWING TIMER ionizer off SWING TIMER CHECK LED 10 FULL LED 2 smart save energy mode 30 30 5 5 30...

Page 32: ...32 8 1 FULL LED GR LED LED 40 50 45 1 2 3 4...

Page 33: ...33 2 GR...

Page 34: ...34 9 l l 2 10 24 GR Hepa Carbon 5 Hepa Carbon...

Page 35: ...35 11 HEPA CARBON PDD HEPA CARBON PDD CARBON GR...

Page 36: ...36 50 60 60 desiccant PDD 8519 Famous 10 12o C GR...

Page 37: ...35 l l l l l l l l l l l GR l l l l l l l l l l l...

Page 38: ...12 36 GR Puredry Hellas EE 1 6 2018 Platinum Puredry Hellas 30 https puredryhellas com egg iseis 1 6 2018 2...

Page 39: ...Puredry Puredry Puredry Puredry Hellas EE service 15 GR 37...

Page 40: ...l link https www puredryhellas com egguiseis l email...

Reviews: