background image

6

CHAPTER

6-1

Y-500009-00 Rev. J (6/06)

KnightStar 330

 User’s Manual

6

EMC information

6.1

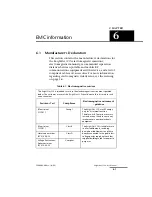
Manufacturer’s Declaration

This section contains the manufacturer’s declarations for 
the 

KnightStar 330

’s electromagnetic emissions, 

electromagnetic immunity, recommended separation 
distances between portable and mobile RF 
communications equipment and the device, and a list of 
compliant cables and accessories. For more information 
regarding electromagnetic interference, see the warning 
on page 1-6.

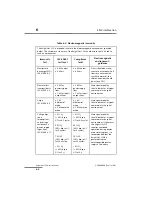
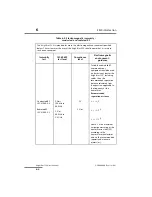
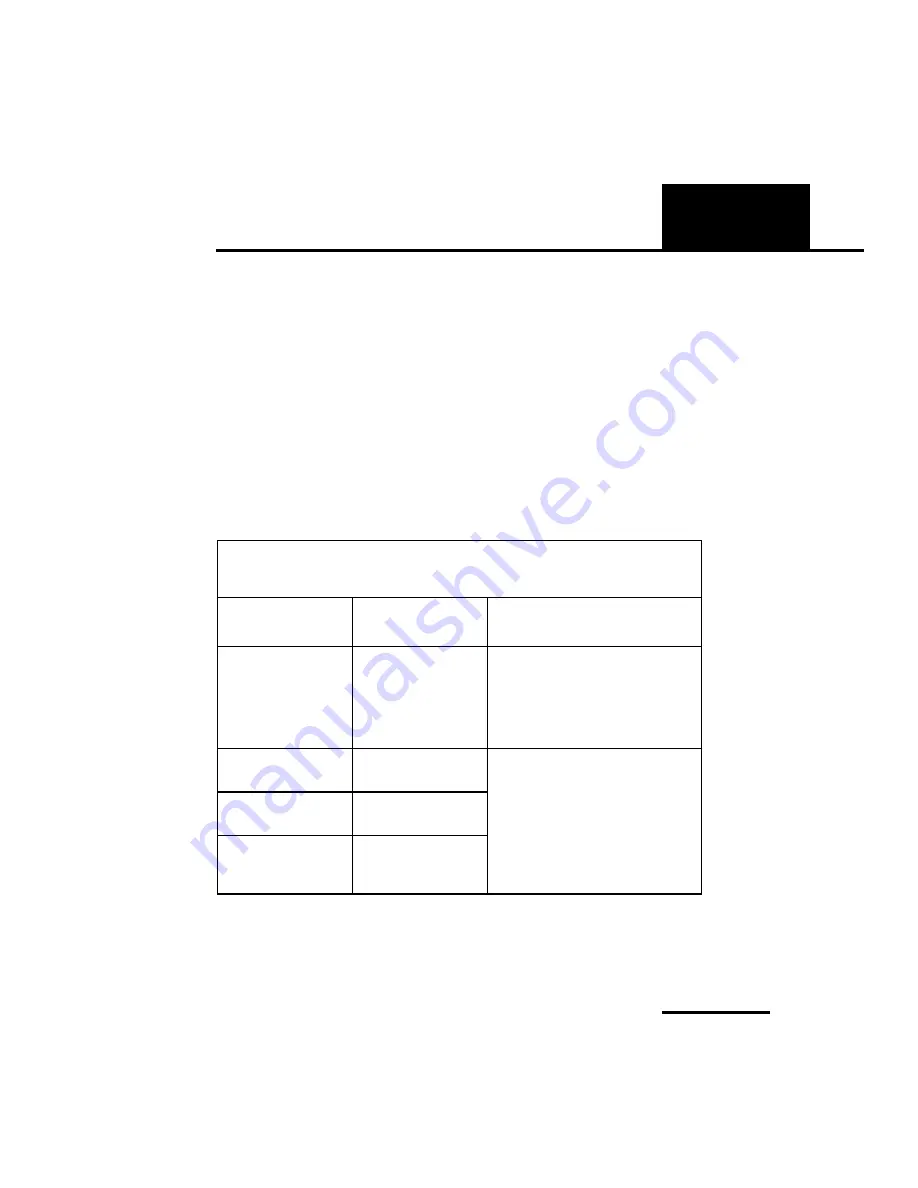
Table 6-1: Electromagnetic emissions

The 

KnightStar 330

 is intended for use in the electromagnetic environment specified 

below. The customer or user of the 

KnightStar 330

 should assure that it is used in such 

an environment.

Emissions Test

Compliance

Electromagnetic environment 

– guidance

RF emissions
CISPR 11

Group 1

The 

KnightStar 330

 uses RF energy 

only for its internal function. 
Therefore, its RF emissions are very 
low and are not likely to cause any 
interference in nearby electronic 
equipment.

RF emissions
CISPR 11

Class B

The 

KnightStar 330

 is suitable for use 

in all establishments, including 
domestic establishments and those 
directly connected to the public low-
voltage power supply network that 
supplies buildings used for domestic 
purposes.

Harmonic emissions
IEC 61000-3-2

Class D

Voltage fluctuations/
flicker emissions
IEC 61000-3-3

Complies

Summary of Contents for KnightStar 330

Page 1: ...B i L e v e l V e n t i l a t o r KnightStar 330 User s Manual Y 103008 0Rev B 04 04 KnightStar User s Manual Part No Y 500009 00 Rev J June 2006 ...

Page 2: ......

Page 3: ...B i L e v e l V e n t i l a t o r KnightStar 330 User s Manual Y 103008 0Rev B 04 04 KnightStar User s Manual Part No Y 500009 00 Rev J June 2006 This space for Home Care Provider s Business Card ...

Page 4: ...hing in this manual shall limit or restrict in any way Puritan Bennett s right to revise or otherwise change or modify the equipment including its software described herein without notice In the absence of an express written agreement to the contrary Puritan Bennett has no obligation to furnish any such revisions changes or modifications to the owner or user of the equipment including its software...

Page 5: ... 3 How to connect the breathing circuit outlet filter and mask 2 5 3 How to operate the KnightStar 330 3 1 3 1 Basic operation 3 1 3 1 1 How to set the Delay Ramp 3 2 3 1 2 How to de activate and activate the Delay Ramp feature 3 4 3 2 How to use the KnightStar 330 with supplemental oxygen 3 5 3 3 How to use the optional humidifier 3 7 3 4 How to use the KnightStar 330 with an external battery 3 1...

Page 6: ...Contents ii KnightStar 330 User s Manual Y 500009 00 Rev J 6 06 4 How to solve device problems 4 1 5 Patient and caregiver information 5 1 6 EMC information 6 1 6 1 Manufacturer s Declaration 6 1 ...

Page 7: ...uous Positive Airway Pressure CPAP I E PAP mode allows you to breathe at separate inspiratory and expiratory pressure levels while CPAP mode provides a single continuous breathing pressure These pressure levels are set by your clinician so that they provide enough pressure to keep the airway open while maintaining a comfortable breathing effort while you sleep A C mode ventilates patients just as ...

Page 8: ...tStar 330 Notes indicate information of particular interest for more efficient and convenient operation When using this equipment it is important that you read understand and follow the instructions and warnings in this user s manual There is no audible alarm built into the KnightStar 330 to indicate that the patient has stopped breathing Under certain conditions some alarms may not occur For exam...

Page 9: ... s However when the device is not operating a substantial proportion of exhaled air including carbon dioxide CO2 may be rebreathed Prolonged rebreathing of carbon dioxide can increase CO2 levels and in some circumstances may even result in death DO NOT BLOCK THE INTERFACE VENT HOLE S At low pressure settings the flow through the vent hole may be inadequate to clear all exhaled air from the tubing ...

Page 10: ...he presence of oxygen At a fixed flow rate of supplemental oxygen the inhaled oxygen concentration will vary depending upon pressure settings patient breathing patterns mask or nasal interface selection and leak rate Explosion Hazard This equipment is not suitable for use in the presence of a flammable anaesthetic mixture with air or with oxygen or nitrous oxide The KnightStar 330 should never be ...

Page 11: ...r drop or insert any object into the air outlet or any other opening on the unit or breathing circuit Should you experience nasal or airway dryness skin sensitivity runny nose ear pain sinus discomfort daytime sleepiness mood change disorientation or memory lapse when using this device discontinue use and call your physician Contact your home care company if the equipment malfunctions in any way D...

Page 12: ...en tested and found to comply with the limits for medical devices to IEC 601 1 2 2001 or EN 60601 1 2 2001 or Medical Device Directive 93 42 EEC This testing shows the device provides reasonable protection against harmful interference in a typical medical installation However there is no guarantee that interference will not occur in a particular installation for example in the presence of portable...

Page 13: ...ypical of this type of device Always operate the KnightStar 330 with the outlet filter in place Failure to do so could increase your risk of infection or contaminant inhalation Inspect the inlet air filter often Remove the foam filter from the rear panel and clean it at least once per week or more often in dusty environments Let the filter air dry completely before reinstallation See Section 3 5 3...

Page 14: ...e KnightStar 330 control panel and indicators and describe the various symbols displayed on the device s labels and LCD screen The KnightStar 330 control panel keys and indicators are shown in Figure 1 1 and described in Table 1 1 Figure 1 1 KnightStar 330 control panel PURITAN BENNETT TM Mode Set Delay Ramp Alarm Silence Bi Level âVentilator 1 2 3 4 5 6 7 8 10 9 ...

Page 15: ... Clinician access mode allows your physician to program the prescribed breathing mode pressure s and other settings into the device 2 Mode key Press the Mode key to leave the Settings mode after changing the delay time ramp duration or ramp start pressure settings Pressing this key also turns on the LCD panel backlight In Clinician access mode the Mode key is used to set the breathing mode to A C ...

Page 16: ...ttings mode use this key to mute an active alarm for one minute In I E mode when the main display screen is shown pressing this key displays V peak inhalation flow and I E ratio ratio of inhalation time to exhalation time if there are no active alarms 6 On Off key Turn the KnightStar 330 system on with a quick press and release action To turn the device off press and hold the On Off key for 3 seco...

Page 17: ...LED When flashing indicates a HIGH PRIORITY alarm condition accompanied by an audible alarm signal a series of 3 beeps then 5 beeps then 2 beeps at intervals of approximately 6 seconds Refer to Chapter 4 How to solve device problems for causes and corrections for alarm conditions 10 Liquid Crystal Display LCD The LCD provides an easy to read format for mode settings and patient data A backlight il...

Page 18: ...ables 1 2 and 1 3 identify and describe the connectors and their identifying symbols found on the KnightStar 330 Figure 1 2 KnightStar 330 rear view 1 2 3 Table 1 2 KnightStar 330 rear panel connectors Index Figure 1 2 Symbol Description 1 Mains AC power receptacle The KnightStar 330 operates on 100V to 240 V AC at 50 or 60 Hz ...

Page 19: ...cations with other devices such as a personal computer PC 3 External battery connector Used to connect an optional external 12 V DC battery or for use with a 12 V automobile cigarette lighter adapter when Mains AC power is not available Table 1 2 KnightStar 330 rear panel connectors continued Index Figure 1 2 Symbol Description ...

Page 20: ...t panel connectors and labeling Index Figure 1 3 Labeling Description 1 Troubleshooting label Contains information on how to respond to some alarms 2 Refer to manual for information on using the ventilator with oxygen 3 N A Patient pressure tube connector 4 Air outlet connector 22 mm conical fitting 5 N A Alarm speaker See Operator s Manual for use with oxygen ...

Page 21: ...e 1 4 KnightStar 330 bottom panel label 6 Notifies user to refer to the manual page 1 6 regarding increased outlet gas flow temperature 7 Warning label Warns user that the ventilator can become hot to the touch Table 1 3 KnightStar 330 front panel connectors and labeling continued Index Figure 1 3 Labeling Description Note The patient outlet gas flow can be as much as 7 F 4 C degrees warmer than r...

Page 22: ...latory standard classification for protection against electrical shock for the part of the device that contacts the patient 3 Authorized to bear the CSA certification mark signifying the product has been evaluated to the applicable CSA standards for use in the US and Canada UL2601 1 CAN CSA C22 2 No 601 1 M90 4 Alternating current Mains AC power from wall outlet 5 Direct current battery power 6 At...

Page 23: ...D panel symbols Symbol or abbreviation Definition START UP DISPLAY SYMBOLS ON TIME Total hours of operation USAGE Total compliance time usage in hours SN Serial number ID Patient identification number 12 digits MODES A C Assist Control mode I E Inspiratory Expiratory Positive Airway Pressure mode CPAP Continuous Positive Airway Pressure mode and pressure setting MEASURED VALUES f Respiratory rate ...

Page 24: ...respiration rate in A C mode I E I E ratio ISENS Inspiratory sensitivity ESENS Expiratory sensitivity RISE Rise time setting Alarm volume level Leak alarm setting Low pressure alarm setting High pressure alarm setting DELAY Delay time RAMP Ramp duration STRT P Ramp start pressure MASK L Interface mask leak type 1 6 Table 1 5 KnightStar 330 LCD panel symbols continued Symbol or abbreviation Definit...

Page 25: ...ssure alarm condition Leak alarm condition Backup respiratory rate active apnea Malfunction one or two digit error code denotes error type STATUS Ramp delay active Patient access mode Clinician access mode Alarm is silenced Table 1 5 KnightStar 330 LCD panel symbols continued Symbol or abbreviation Definition P P L f ...

Page 26: ...1 Introduction 1 20 KnightStar 330 User s Manual Y 500009 00 Rev J 6 06 This page is intentionally blank ...

Page 27: ...r physician you will not need to make any adjustments To begin using the KnightStar 330 you will need an interface either nasal pillows or a mask a breathing circuit to deliver air flow to your nose The KnightStar 330 is designed to be used with standard 6 ft 1 8 m or optional 8 ft 2 4 m breathing circuits and Puritan Bennett non invasive interfaces Breathing circuits nasal pillows and masks are a...

Page 28: ... included accessories The interface mask or nasal pillows is supplied separately Figure 2 1 KnightStar 330 components Make sure that you have all of the components shown in the figure If anything is missing contact your homecare provider KnightStar 330 Bi Level Ventilator Power cord Outlet filter Spare inlet air filter Breathing circuit and patient pressure line or ...

Page 29: ... This tube is part of the pressure measurement system that controls the output pressure of the KnightStar 330 Outlet filter The outlet filter removes small contaminants and bacteria from the outlet air This single patient use filter removes particles and microbes as small as 0 2 microns This filter is disposable and should be replaced in accordance with the filter manufacturer s instructions Be su...

Page 30: ...ons in Section 3 5 on page 3 11 2 2 2 How to connect to AC power To connect to AC power 1 Place the KnightStar 330 on a stable flat surface near the bedside with at least 1 in 2 5 cm of clearance at the back of the device to allow proper air flow into the air inlet 2 Attach one end of the power cord to the AC receptacle at the back of the KnightStar 330 and the other end of the cord to an electric...

Page 31: ...thing circuit patient pressure tube to the corresponding connector on the front of the device 2 Push the larger end of the outlet filter onto the KnightStar 330 s air outlet connector 3 Push the end of the breathing circuit over the outlet filter s connector Always operate the KnightStar 330 with the outlet filter in place Failure to do so could increase your risk of infection or contaminant inhal...

Page 32: ... Getting started 2 6 KnightStar 330 User s Manual Y 500009 00 Rev J 6 06 4 Attach the other end of the breathing circuit to the connector on the mask or nasal interface The system is now ready to operate ...

Page 33: ...splays the copyright notice manufacturer s name firmware version total hours of operation total patient usage hours device serial number and patient ID This is a signal to you that the KnightStar 330 is operating correctly If this sequence does not run properly call your homecare provider for service When POST has completed the main screen appears and displays the breathing mode breath rate f in b...

Page 34: ...eginning of the night to make it more comfortable for you to fall asleep You can also use the delay if you have to get up at night and have trouble going back to sleep Delay time The delay time gives you time to fall asleep before the KnightStar 330 automatically starts to increase the delivered air pressure to the pressure prescribed by your physician The delay time can be set from 0 off to 30 mi...

Page 35: ... pressure is indicated by the symbol STRT P on the LCD panel Your clinician may have already set these options for you in which case no adjustment is needed If however you want to change the settings to improve your comfort level follow these steps 1 Turn the KnightStar 330 on by pressing and releasing the On Off key 2 Enter Settings mode by pressing the Settings key until you see the arrow on the...

Page 36: ...e Delay Ramp feature The Delay Ramp feature can be used only if values for the delay time ramp duration and ramp start pressure are set The delay will automatically start when the device is turned on Follow these steps to de activate or activate the Delay ramp sequence 1 If the Delay Ramp feature is already active press the down arrow ramp key The Delay Ramp symbol in the lower left corner of the ...

Page 37: ...tStar 330 on before turning on the oxygen supply 3 Turn on the oxygen flow at the desired setting 4 When turning off the KnightStar 330 turn off the oxygen supply first then turn off the KnightStar 330 To use supplemental oxygen with the KnightStar 330 oxygen adapter 1 Connect the oxygen adapter to the KnightStar 330 filter outlet refer to Figure 3 1 2 Connect the oxygen supply tubing to the small...

Page 38: ...re 3 1 How to connect the oxygen adapter to the outlet filter Do not use supplemental oxygen at flows above 15 L min Doing so could increase the oxygen concentration inside the device and increase the risk of fire To prevent oxygen from accumulating in the device and tubing turn on the device before turning on the oxygen supply shut off the oxygen before turning off the device Oxygen adapter Outle...

Page 39: ... content in the input air Do not allow water to spill onto the KnightStar 330 or other electrical apparatus To prevent electrical hazard remove the source of power if water is suspected of entering the KnightStar 330 Do not fill the reservoir when it is in the housing Use only distilled or sterile water to fill the reservoir For information regarding operation connection and cleaning refer to the ...

Page 40: ...nightStar 330 on top of the humidifier housing and its reservoir Figure 3 2 Figure 3 2 How to place the KnightStar 330 onto the humidifier housing 2 Remove the reservoir from the housing and fill it to the FILL LINE with distilled or sterile water The reservoir is designed to hold water for only one night s use Reservoir inlet Humidifier housing ...

Page 41: ...ifier tubing Figure 3 4 between the KnightStar 330 s filter outlet and the inlet of the reservoir Figure 3 4 How to connect the humidifier tubing 5 Connect the breathing circuit to the humidifier outlet as shown in Figure 3 4 Be sure to connect the patient pressure tube to the connector next to the KnightStar 330 s air outlet Fill line Humidifier tubing connected to reservoir inlet and outlet filt...

Page 42: ...e 7 ampere hour battery provides up to 3 hours of power Running the KnightStar 330 on external battery power requires special cables that depend upon whether you are connecting to a Puritan Bennett battery or automobile cigarette lighter power port Contact your homecare provider to obtain the correct batteries and cables The KnightStar 330 should not be used adjacent to or stacked with other equip...

Page 43: ... from the back of the device 2 Connect the AC power cord to the KnightStar 330 and plug into a wall outlet 3 Turn the KnightStar 330 on 3 5 How to clean the KnightStar 330 It is important to clean all of the equipment regularly Do not use any cleaning method other than described here 3 5 1 How to clean the breathing circuit Before you use the breathing circuit for the first time and at least three...

Page 44: ...rior surfaces you may wipe them with a cloth dampened with Isopropyl alcohol 70 solution or A mixture of 1 part household bleach to 10 parts distilled water 10 solution 3 5 3 How to clean the inlet air filter Inspect the inlet filter often by removing the inlet baffle removable plastic cover on the back of the unit Clean the filter once a week or more often in dusty environments 1 Remove the baffl...

Page 45: ...rst inserting one end into the housing then snapping the other end into place Figure 3 5 Removing the inlet baffle 3 5 4 Outlet filter replacement The outlet filter is disposable and should be inspected regularly and replaced when noticeably dirty or discolored and in accordance with the filter manufacturer s instructions Frequency of replacement can vary depending on usage and environmental condi...

Page 46: ...r surfaces of the KnightStar 330 ventilator Clean surfaces with cloth dampened with warm soapy water or disinfectant described in Section 3 5 2 Wipe dry Do not let liquid drip into any openings in the device Weekly KnightStar 330 air inlet filter Inspect filter Replace if damaged See Section 3 5 3 for cleaning instructions As needed Frequency of replacement can vary depending on usage and environm...

Page 47: ...beeps then 5 beeps then 2 beeps at intervals of approximately 6 seconds MEDIUM priority Indicated by a flashing YELLOW LED accompanied by an audible alarm signal 3 beeps at intervals of approximately 25 seconds LOW priority Indicated by a steadily lit YELLOW LED on the control panel and no audible alarm In many cases the alarm condition can be remedied by patient or caregiver intervention To mute ...

Page 48: ...ce air inlet 3 Internal elec tronic prob lem 1 De activate the delay feature 2 Move rear of device away from the wall and all objects 3 Contact your home care provider for repair Power loss Display is blank Red LED flashes and alarm sounds No green LED 1 Faulty power cord connec tion 2 Wall outlet power failure 1 Check power cord connections at back of device and wall outlet 2 Verify AC power is a...

Page 49: ...t 1 Reposition nasal pil lows or mask Check breathing circuit connections at device outlet filter and patient inter face If breathing cir cuit is punctured or disconnected replace it or recon nect it as applica ble 2 Verify proper breath ing circuit connec tion Disconnect and reconnect as appli cable Interface mask leak Alarm and flashing red LED Displayed symbol is Mask or breathing circuit leaks...

Page 50: ...igns of distress contact physician Internal malfunction Alarm and flashing red LED Displayed symbol is with being a 1 or 2 digit error code Internal electronic problem Disconnect power then reapply power If condition persists contact your home care provider for repair Table 4 1 Troubleshooting checklist continued Problem Indicators Possible Cause Corrective Action f Consult your clinician to chang...

Page 51: ... must understand T The need for bi level ventilation T The schedule for ventilation T The supplies required for ventilation and their sources T Whom to contact for medical emergencies equipment emergencies or power emergencies T How to contact other resources for assistance health aides attendants therapists and so on T The principles of operation for the bi level ventilator T Power sources for th...

Page 52: ... T The oxygen setting and why it is required T How to connect the oxygen source to the ventilator T How to determine the quantity of oxygen being delivered and how to adjust the quantity T Safety rules for the use of oxygen T How and why to monitor the patient s condition T How to check the patient s vital signs T The significance of the patient s ease of breathing T What to note about the patient...

Page 53: ...ntilator T How to recognize and respond to problems with the oxygen supply T Techniques to prevent aspiration of vomit T The importance of coordinating care for the patient T Resources for respite care T Choices about future care T The purpose of advanced directives T Replacement interval for outlet filters per the filter manufacturer s instructions Table 5 1 Patient and caregiver checklist contin...

Page 54: ...5 Patient and caregiver information 5 4 KnightStar 330 User s Manual Y 500009 00 Rev J 6 06 This page is intentionally blank ...

Page 55: ...lectromagnetic environment specified below The customer or user of the KnightStar 330 should assure that it is used in such an environment Emissions Test Compliance Electromagnetic environment guidance RF emissions CISPR 11 Group 1 The KnightStar 330 uses RF energy only for its internal function Therefore its RF emissions are very low and are not likely to cause any interference in nearby electron...

Page 56: ...pply lines 1 kV for input output lines Mains power quality should be that of a typical commercial or hospital environment Surge IEC 61000 4 5 1 kV differential mode 2 kV common mode 1 kV differential mode 2 kV common mode Mains power quality should be that of a typical commercial or hospital environment Voltage dips short interruptions and voltage variations on power supply input lines IEC 61000 4...

Page 57: ...a typical commercial or hospital environment UT is the AC mains voltage prior to application of the test level Table 6 2 Electromagnetic immunity continued The KnightStar 330 is intended for use in the electromagnetic environment specified below The customer or the user of the KnightStar 330 should assure that it is used in such an environment Immunity Test IEC 60601 test level Compliance level El...

Page 58: ...ironment guidance Conducted RF IEC 61000 4 6 Radiated RF IEC 61000 4 3 3 Vrms 150 kHz to 80 MHz 3 V m 80 MHz to 2 5 GHz 3 V 3 V m Portable and mobile RF communications equipment should be used no closer to any part of the KnightStar 330 including cables than the recommended separation distance calculated from the equation applicable to the frequency of the transmitter Recommended separation distan...

Page 59: ...ically with accuracy To asses the electromagnetic environment due to fixed RF transmitters an electromagnetic site survey should be considered If the measured field strength in the location in which the KnightStar 330 is used exceeds the applicable RF compliance level above the KnightStar 330 should be observed to verify normal operation If abnormal performance is observed additional measures may ...

Page 60: ...communications equipment Rated maximum output power of transmitter W Separation distance according to frequency of transmitter m 150 kHz to 80 MHz 80 MHz to 800 MHz 800 MHz to 2 5 GHz 0 01 0 12 0 12 0 23 0 1 0 38 0 38 0 73 1 1 2 1 2 2 3 10 3 8 3 8 7 3 100 12 12 23 For transmitters rated at maximum output power not listed above the recommended separation distance d in meters m can be estimated usin...

Page 61: ...e cigarette lighter adapter Y 102913 00 74 in 188 cm KnightStar 330 Service Communications Cable Y 103086 00A 72 in 183 cm KnightStar 330 Power cord NEMA 1 15 Y 500012 00 80 in 203 cm KnightStar 330 Power cord CEE 7 16 Y 500013 00 80 in 203 cm KnightStar 330 Power cord UK Y 500014 00 80 in 203 cm The use of accessories and cables other than those specified with the exception of parts sold by Purit...

Page 62: ...6 EMC information 6 8 KnightStar 330 User s Manual Y 500009 00 Rev J 6 06 This page is intentionally blank ...

Page 63: ...ence key B breathing circuit 2 3 cleaning 3 11 how to connect 2 5 C carbon dioxide rebreathing 1 3 caution definition of 1 2 cleaning 3 11 components 2 2 connectors AC power 1 12 air outlet 1 14 external battery 1 13 patient pressure 1 14 RS 232 1 13 control panel illustration 1 8 keys 1 9 CPAP mode 1 1 D delay time 3 2 delay ramp feature 3 2 delay ramp feature how to activate and deactivate 3 4 d...

Page 64: ...ttery connector 1 13 how to use the KnightStar 330 with 3 10 G getting started 2 1 to 2 6 green LED 1 10 2 4 H how to operate the KnightStar 330 3 1 to 3 14 how to solve device problems 4 1 to 4 4 humidifier 3 7 I I E PAP mode 1 1 inlet air filter 2 3 inlet air filter cleaning and replacement 3 12 K keys down arrow delay ramp 1 10 mode 1 9 on off 1 10 settings 1 9 up arrow alarm silence 1 10 Knigh...

Page 65: ...n off key 1 10 onscreen symbols 1 17 operation 3 1 outlet filter 2 3 how to connect 2 5 replacement 3 13 oxygen 3 5 P patient and caregiver information 5 1 to 5 3 patient pressure connector 1 14 patient pressure line 2 3 patient weight minimum requirement for 1 1 POST Power On Self Test 3 1 power cord 2 3 R ramp duration 3 2 ramp start pressure 3 3 red LED 1 11 RS 232 port 1 13 ...

Page 66: ...9 supplemental oxygen 3 5 symbols bottom panel 1 16 control panel 1 9 display 1 17 front panel 1 14 rear panel 1 12 system controls and indicators 1 8 to 1 11 system setup 2 4 T troubleshooting 4 1 to 4 4 U up arrow alarm silence key 1 10 W warning definition of 1 2 Y yellow LED 1 11 ...

Page 67: ......

Page 68: ...Puritan Bennett Corporation 4280 Hacienda Drive Pleasanton CA 94588 USA Toll Free 1 800 635 5267 Rx ONLY 2006 Nellcor Puritan Bennett Incorporated All rights reserved Y 500009 00 Rev J 6 06 ...

Reviews: