11
↳
Cooling
1 Thermostat settings
(for the main zone only)
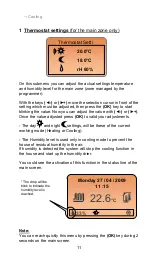
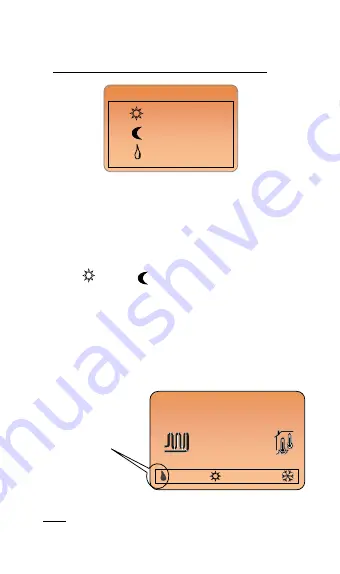
On this submenu you can adjust the actual settings temperature
and humidity level for the main zone (zone managed by the
programmer).
With the keys
(
◄-)
or
(►+)
move the selection cursor in front of the
setting which must be adjusted, then press the
(OK)
key to start
blinking the value. Now you can adjust the value with
(
◄-)
or
(►+)
.
Once the value adjusted press
(OK)
to valid your adjustments.
- The day
and night
settings, will be these of the current
working mode (Heating or Cooling).
- The Humidity level is used only in cooling mode to prevent the
house of residual humidity in the air.
If humidity is detected the system will stop the cooling function in
the house and start up the humidity drier.
You could see the activation of this function in the status line of the
main screen.
Note:
You can reach quickly this menu by pressing the
(OK)
key during 2
seconds on the main screen.
Thermostat Setti
20.0°C
18.0°C
rH 60%
Monday 27 / 04 / 2009
11 :15
22.6
°C
33%
* The drop will be
blink to indicate the
humidity level is
reached.
Summary of Contents for TempCo Central
Page 2: ...2...
Page 39: ...39...
Page 153: ...153 Pami 186 Notatki 186 Annexes PROGRAM P1 to P9 264...
Page 157: ...157...
Page 170: ...170...
Page 191: ...191 Corresponding value for sensors 224 Memory safe 224 Notes 225 Annexes PROGRAM P1 to P9 264...
Page 208: ...208...
Page 227: ...227...
Page 228: ...228 230...
Page 230: ...230 NTC 10K 262 262 263 264...
Page 232: ...232 1 2 3 4 OK i 27 04 2009 11 15 22 6 C 33 3 1 2 4...
Page 233: ...233 i OK i ITCS ZONE A B...
Page 234: ...234 1 2 1 ITCS A A B B 3 4 On Off PWM 5...
Page 235: ...235 1 OK OK 20 0 C 18 0 C rH 60 27 04 2009 11 15 22 6 C 33 osi gni ty...
Page 236: ...236 OK 2 2 OK 2 1 ITCS A B 2 1 2 1 1 OK 1 A A B B ITCS...
Page 237: ...237...
Page 238: ...238 2 1 2 OK 20 0 C 18 0 C 1 0 12 24 programu dnia 20 0 C 18 0 C ITCS 1 nazw...
Page 239: ...239 OK OK 10 2 1 3 OK OK 2 1 4 OK ITCS ITCS...
Page 240: ...240 OK OK 9 P1 P9 3 U1 U3 OK OK P1 P1 0 12 24 7 00 P1 View...
Page 241: ...241 15 6 3 1 1 6 OK 1...
Page 242: ...242 OK OK Ok 5 OK 1 00 00 1 2 05 30 2...
Page 243: ...243 2 1 2 OK OK OK 2 1 2 OK 1 2 05 30 07 45 2 3 07 45 17 30 3 4 17 30 4...
Page 244: ...244 OK OK Ok 2 3 4 17 30 22 45 1 00 00...
Page 247: ...247 Ok ITCS 2 1 6 ITCS 27 04 2009 11 15 22 6 C 33 ITCS...
Page 248: ...248 Ok 2 2 A A 6 A P1 2 3 B ITCS A B...
Page 249: ...249 B 6 B P1 3 i Ok 3 1 Ok 27 04 2009...
Page 250: ...250 Ok Ok Ok Ok Ok Ok i Ok 3 2 Ok 27 04 2009...
Page 251: ...251 1 7 0 C i Ok 3 3 Ok 10 6 C...
Page 252: ...252 1 i Ok 2 4 4 1...
Page 253: ...253 Ok OK 4 2 Ok Ok Ok Ok Ok Ok 11 15 27 04 2009...
Page 254: ...254 4 3 OK 4 3 1 Ok 10 k 25 C 1 2...
Page 255: ...255 1 10 k 25 C 18 0 C 35 C 2 10 k 25 C 0 C 4 3 2 Ok On Off 0 5 C PWM On Off PWM 5 5...
Page 256: ...256 5 5 4 3 3 12 1 5 1 Ok Ok 4 3 4...
Page 257: ...257 1 Ok 4 3 5 Ok 4 3 6 OK 24 C 12 F...
Page 258: ...258 Ok H C module 4 4 0 50...
Page 259: ...259 Ok Ok 100 1 1 0 4 5 Ok 2 5 Ok...
Page 260: ...260 Ok 6...
Page 261: ...261 Er Lo Hi 7 V _ _ _...
Page 264: ...264 Annexes PROGRAM P1 to P9...
Page 265: ...265...


